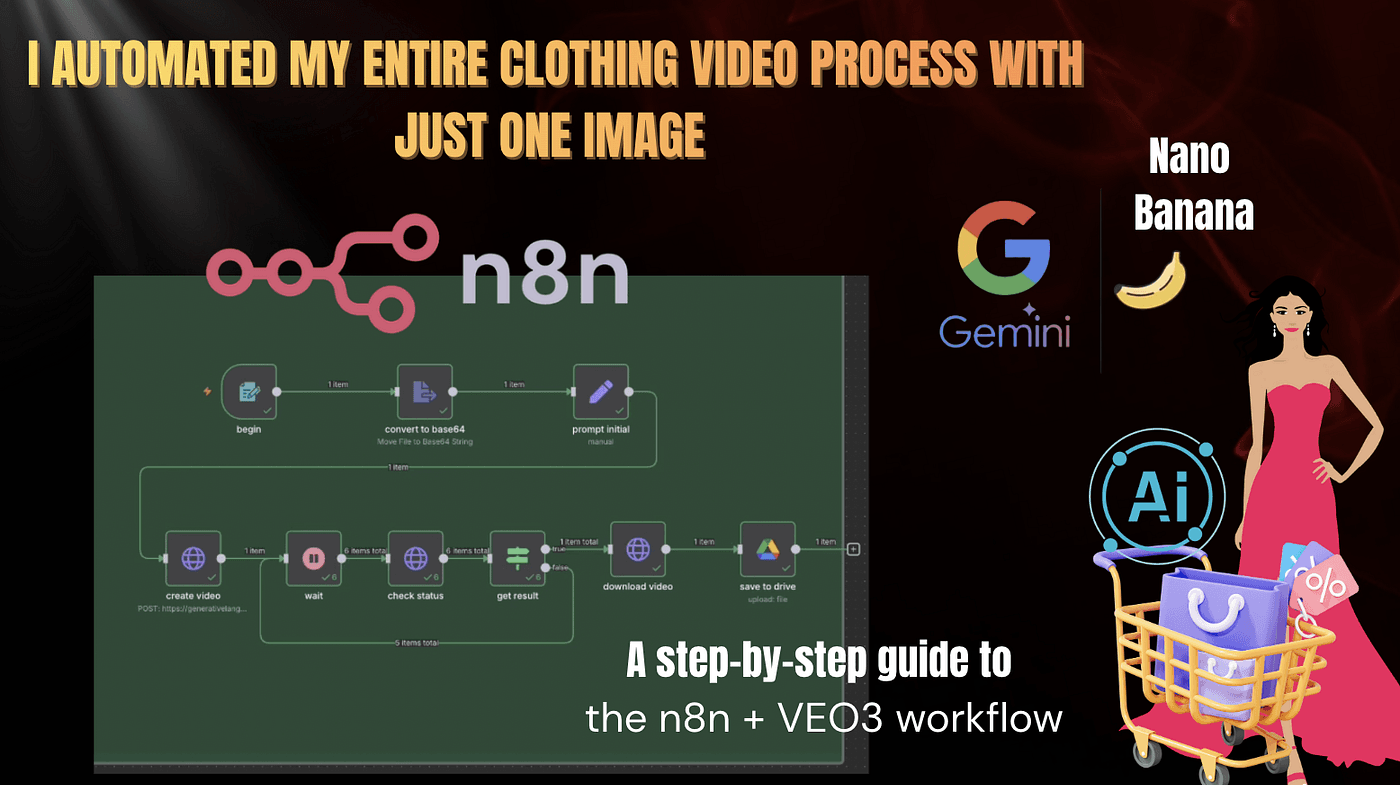
A step-by-step guide to the n8n + VEO3 workflow.Imagine this for a moment — you take just a few clothing photos…
and without hiring a photographer, without a camera, without a studio,
AI automatically generates a fully realistic model video for you.
That sounds pretty surprising, right?
For example, we can simply search for any clothing category online.
Example 1: A cool hoodie
before:
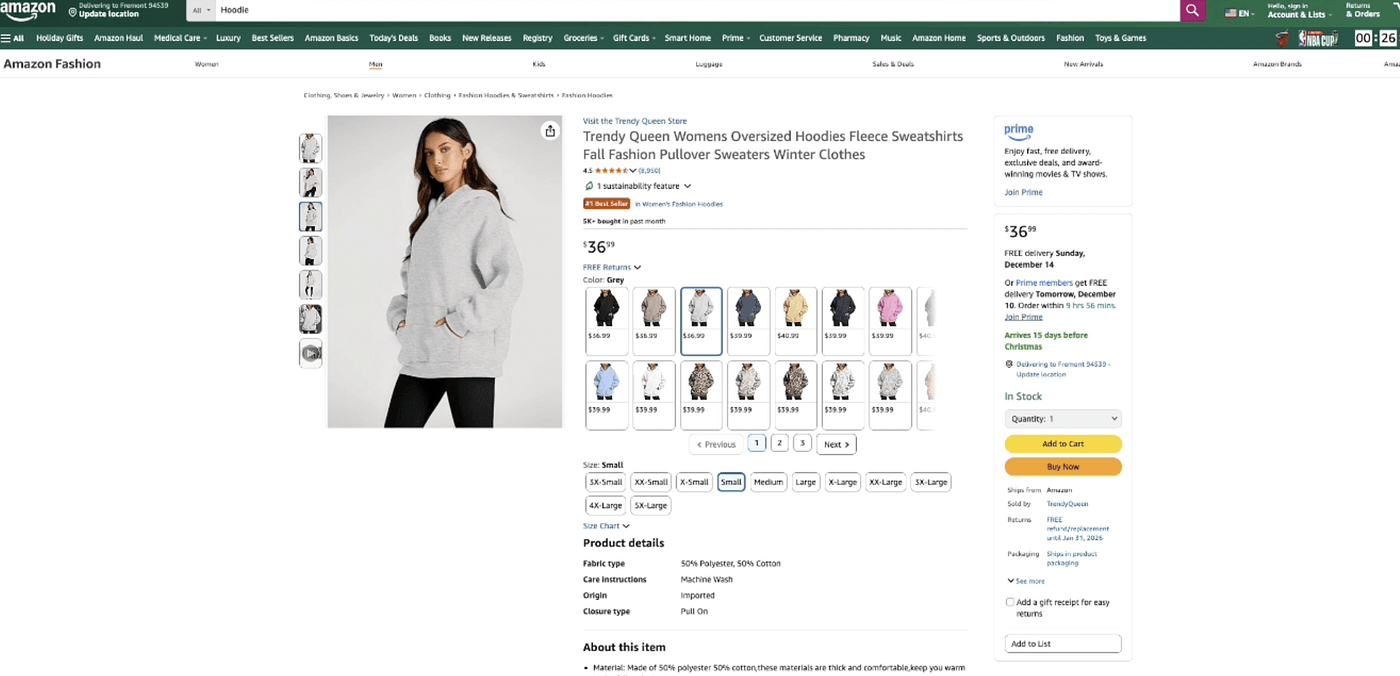
after:
Example 2: A warm puffer jacket
before:
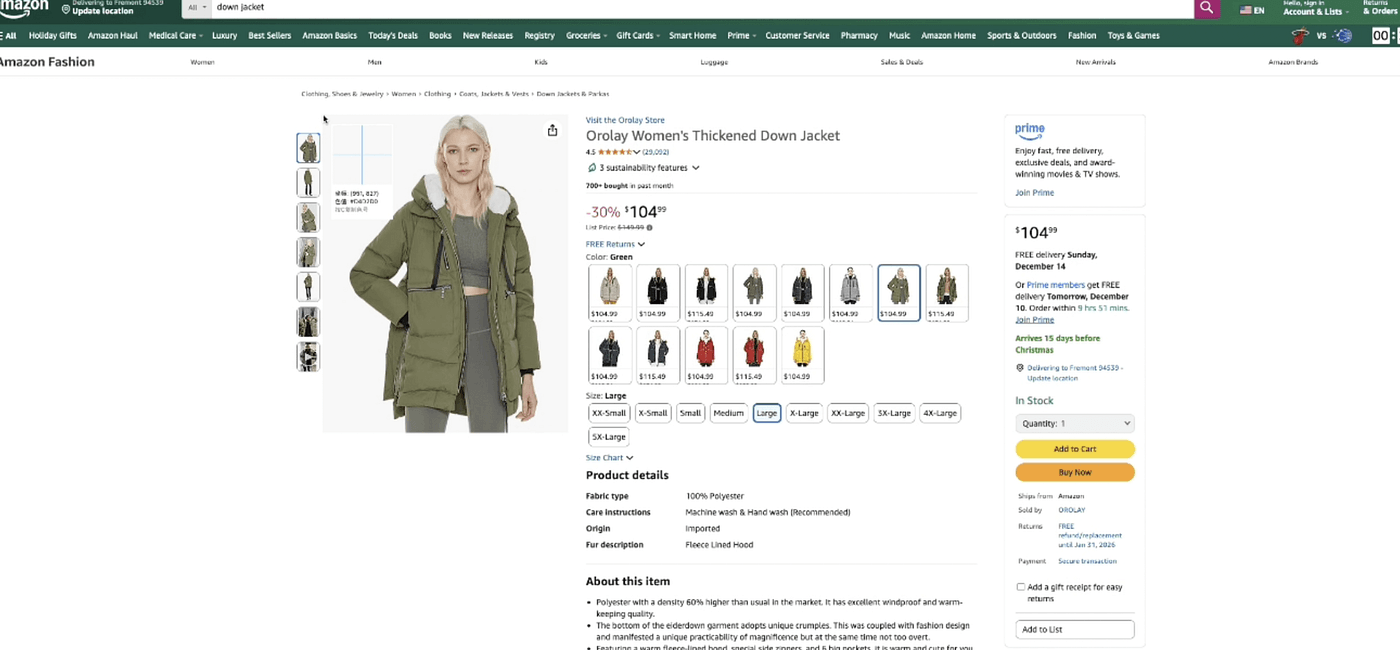
after:
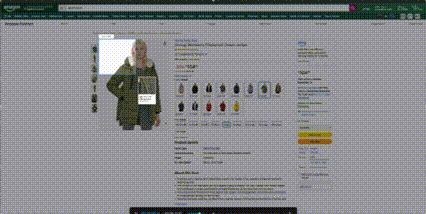
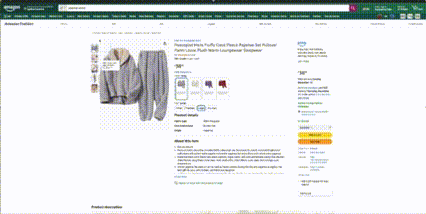
Example 3: Cozy winter pajamas
before:
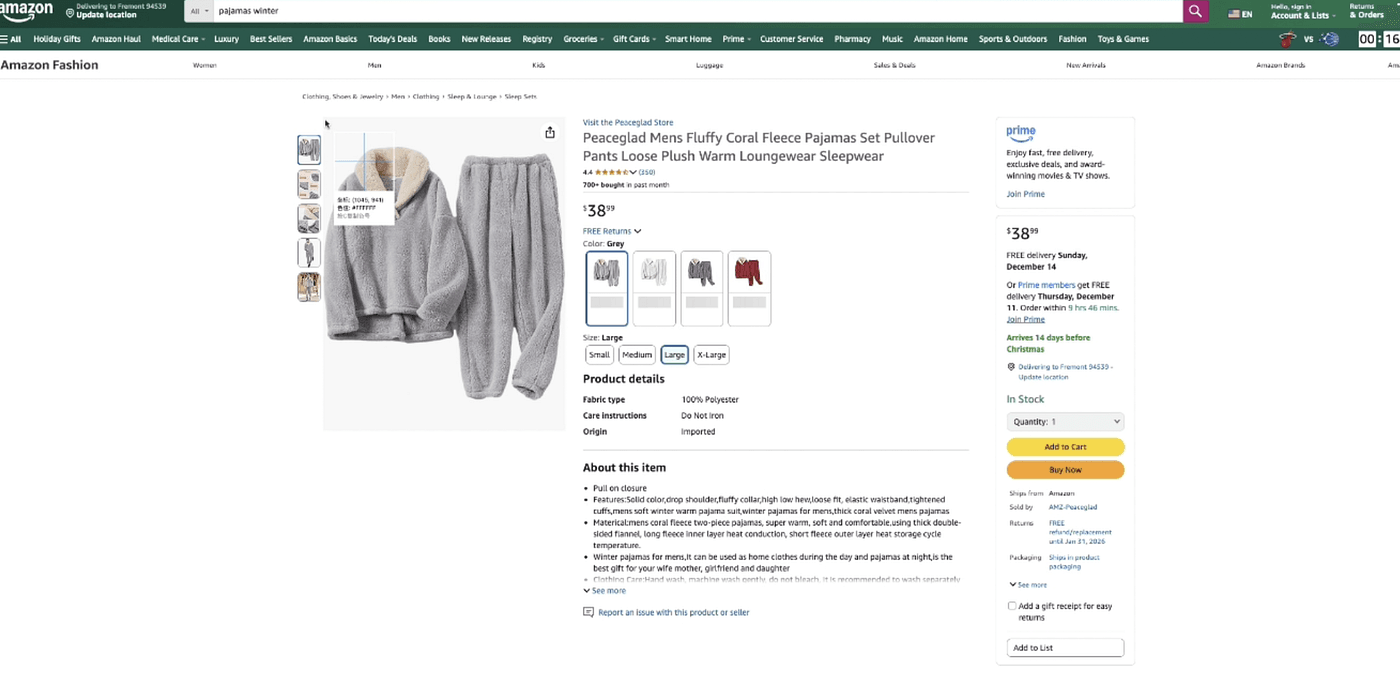
after:
And the most unbelievable part?
This entire process runs automatically inside n8n.
No video editing.
No camera.
No studio.
Everything is handled purely by automation and artificial intelligence.
If you watched my previous article, you already know that using an n8n workflow + the Gemini NanoBanana model,
I was able to turn just two clothing images into a whole set of model poses — different angles, different gestures, different actions.

You can read my article detially : Turn 2 product Photos into a Full AI Photoshoot (n8n + Nano Banana)
Today, we’re taking that to the next level.
In this article, we’ll use another n8n workflow combined with Gemini
VEO3 to animate those AI models —
turning them into fully moving, realistic product videos.
You’re about to see a virtual model put on any outfit and showcase it naturally, exactly like the examples you saw at the beginning.
Pretty exciting, right?
Don’t worry — just like last time, I’m going to walk you through everything from 0 to 1 so you can build this n8n workflow yourself and end up with your very own automated e-commerce system.
If you’ve ever sold clothing online, you already know one painful truth:
product videos are expensive.
Models cost money.
Cameras cost money.
Editing costs money.
And worst of all — the entire production cycle takes forever.
So when I eventually saw ChatGPT Sora 2 and Gemini VEO 3 appear, I asked myself one simple question:
“What if AI could generate ALL my product videos… from just a single image?”
And that question is exactly what leads us into today’s workflow.
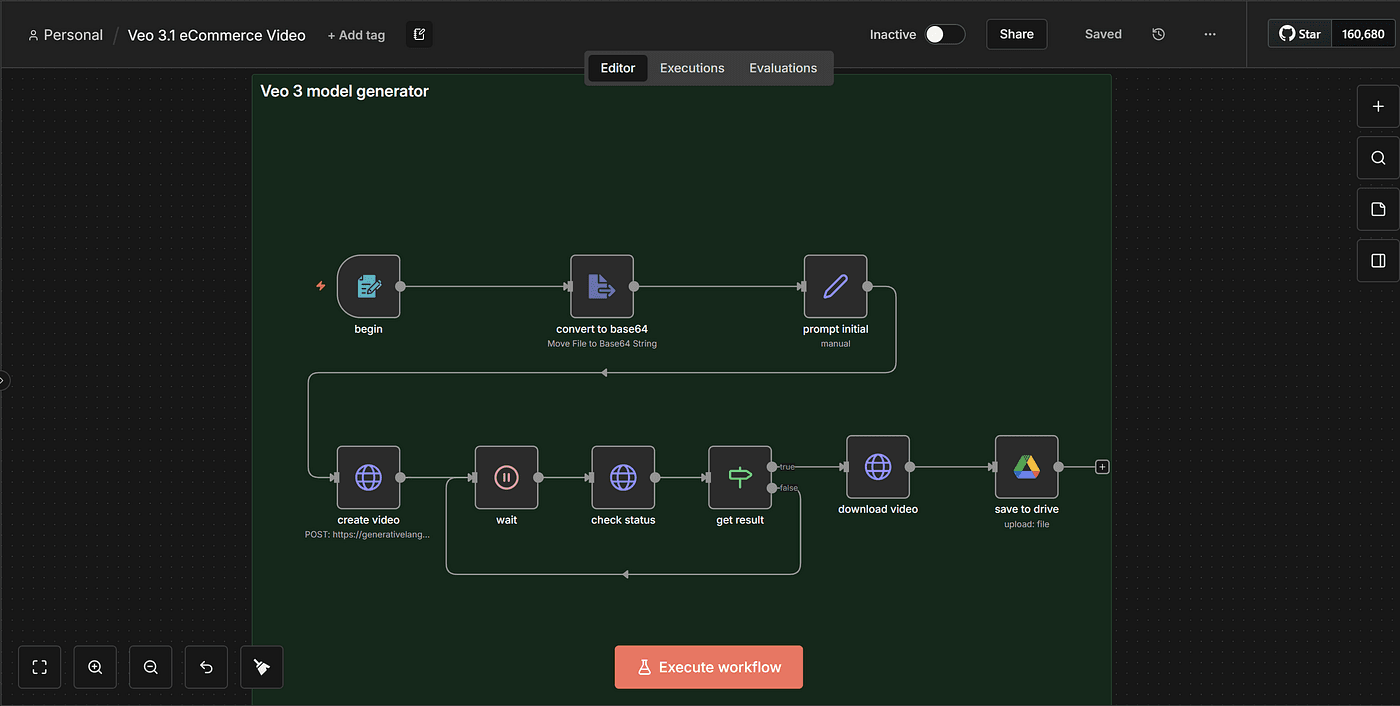
This is the n8n setup I’m going to show you step by step —
and now, I’ll break down every node and every part of the process from start to finish.
Step 1 — Setting Up the Trigger Node
Just like any other n8n workflow we build, we start with a Trigger node.
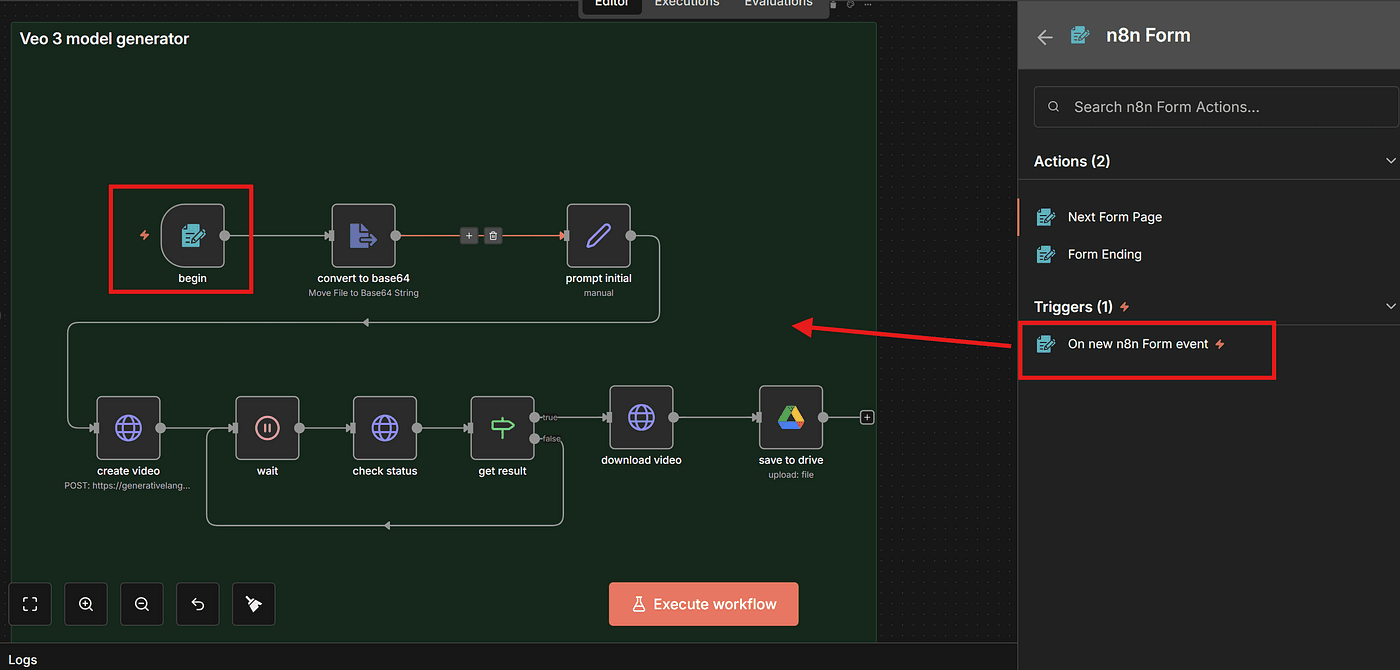
This will be the entry point of the entire process.
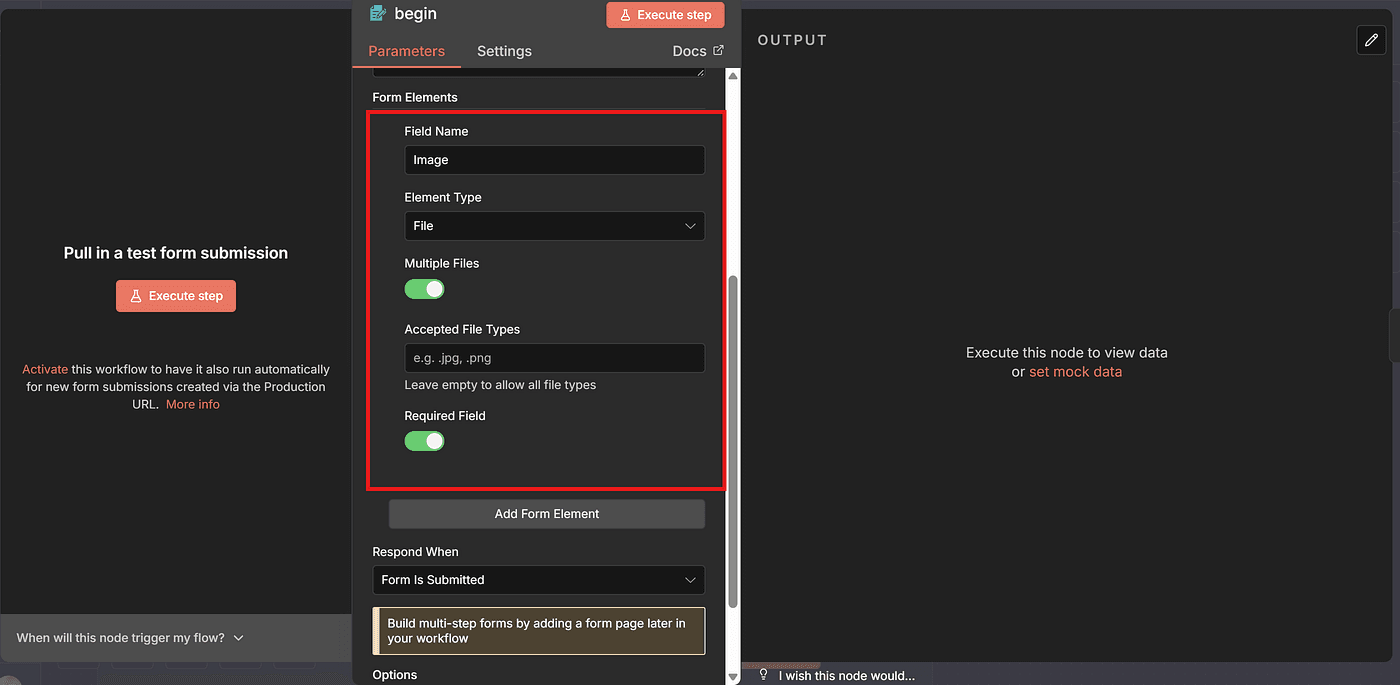
Here, set the Field Name, and choose the field type File.
By default, this allows users to upload JPG or PNG images — perfect for uploading our model photo.
You can test this node by running Execute Step.
Upload any model image, and you’ll see it appear correctly in the output.

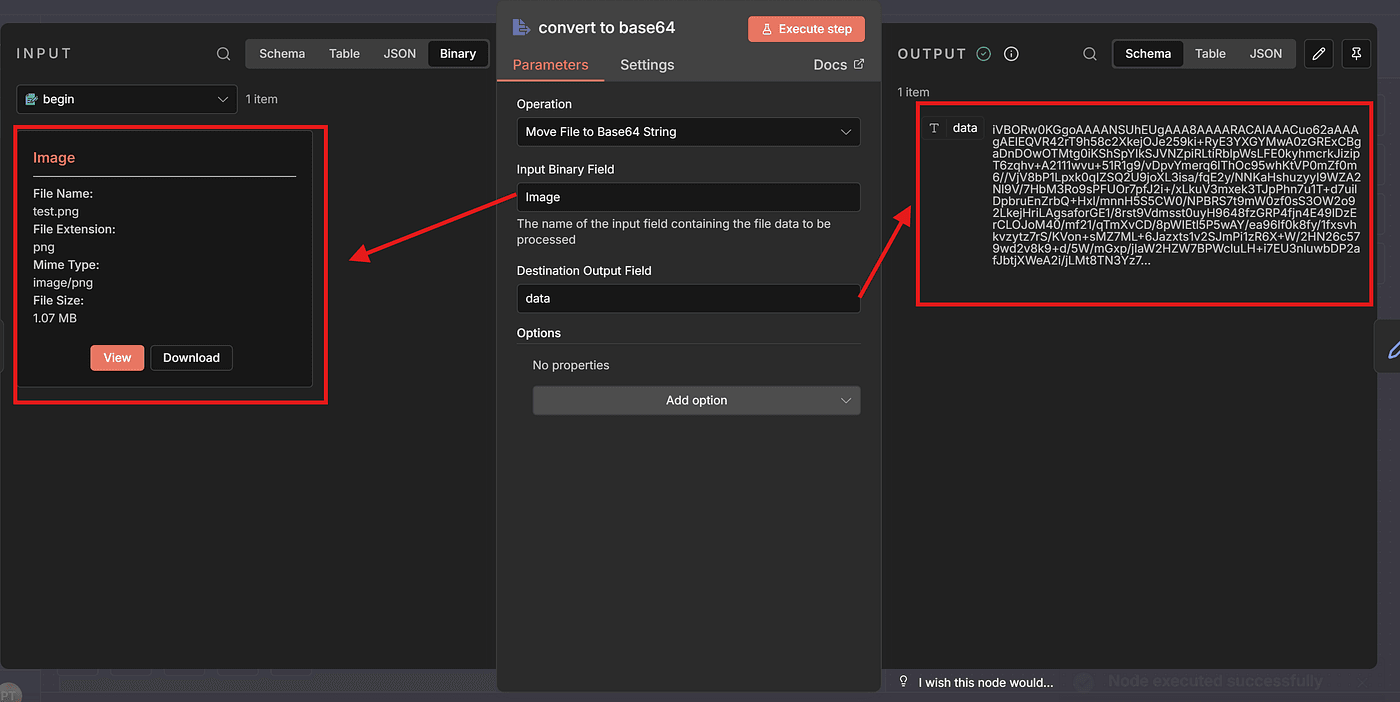
Step 2 — Converting the Uploaded Image to Base64
Next, we need to encode the uploaded image.
Just like in previous workflows I showed, this step is absolutely necessary — because other nodes in n8n can only process the image once it has been converted to Base64.
Add an Extract from File node to the workflow.
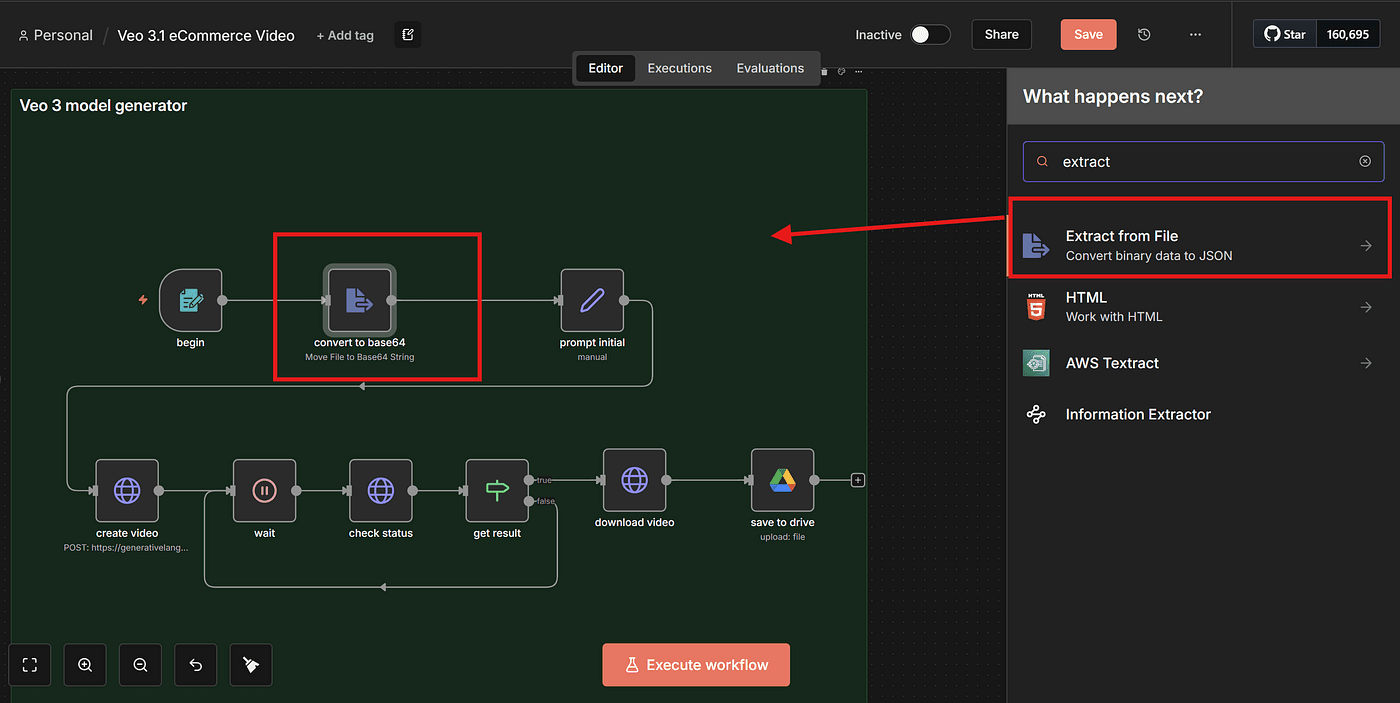
This node’s job is simple:
convert the uploaded image into a Base64 string, and store it under a field name you define.
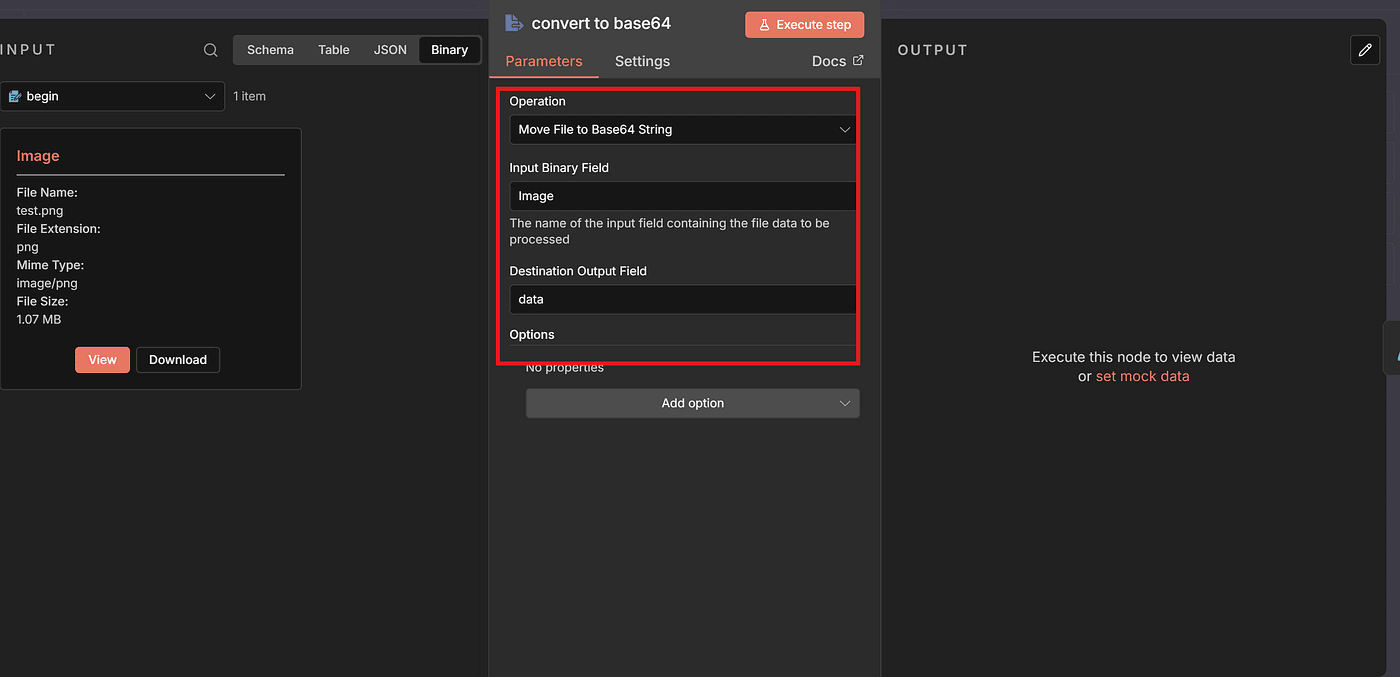
Click Execute Step, and you’ll see that the node outputs a long Base64 string — the encoded version of the model image you uploaded.
Step 3 — Creating the Prompt That Generates the Model Video
Now we’re getting to the part that truly matters:
turning this single model photo into a realistic model video.
The quality of your video depends heavily on the prompt.
This is the most challenging part — and also the part where most people go wrong.
Different clothing types require different modeling movements.
A hoodie moves completely differently from pajamas.
A puffer jacket needs very different gestures compared to a silk top.
If you give AI the wrong instructions…
the video will look strange, stiff, or completely fail.
So I spent several hours studying how real fashion brands design model motions in their product videos.
Zara, Uniqlo, Shein, Aritzia — every brand uses very specific and consistent poses.
Of course, you can also use ChatGPT, Perplexity, or Claude’s Deep Research feature to study these patterns. Both options work well.
Based on this research, I created optimized prompts for three clothing types:
hoodies, puffer jackets, and pajamas.
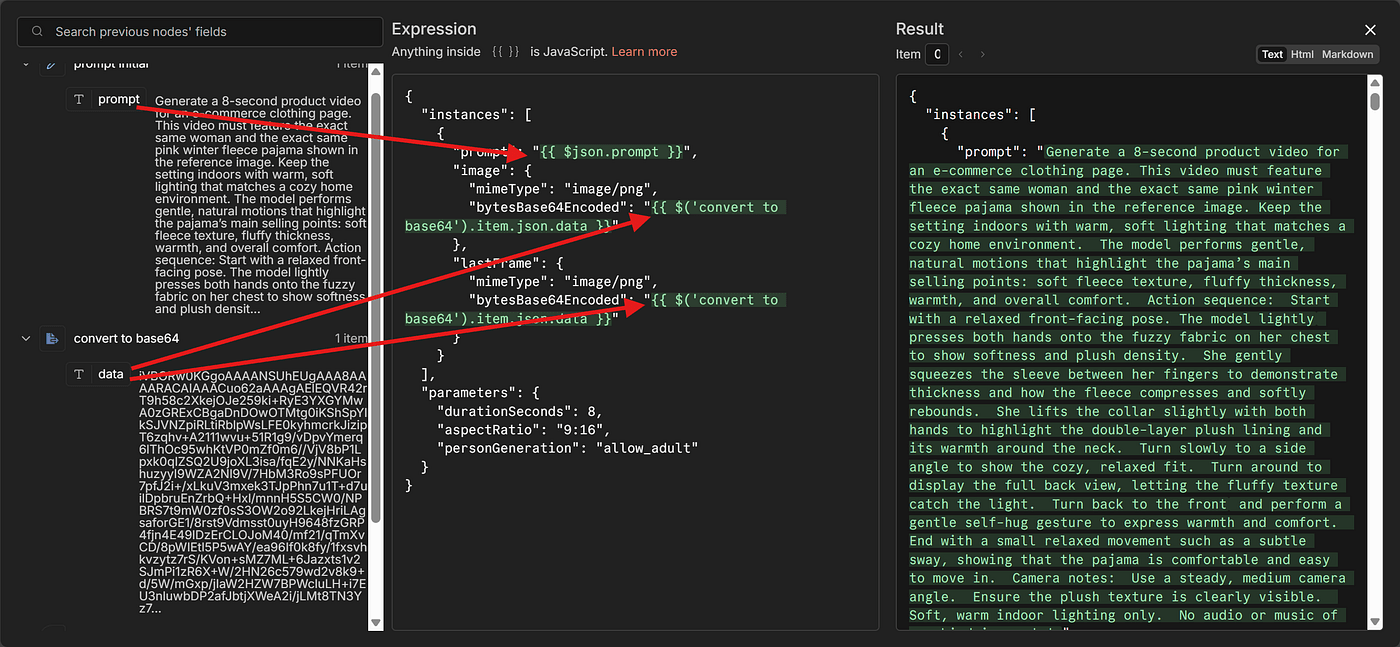
Here’s the full example prompt I use for pajamas:
Pajama Prompt Example
Paste your exact prompt as-is:
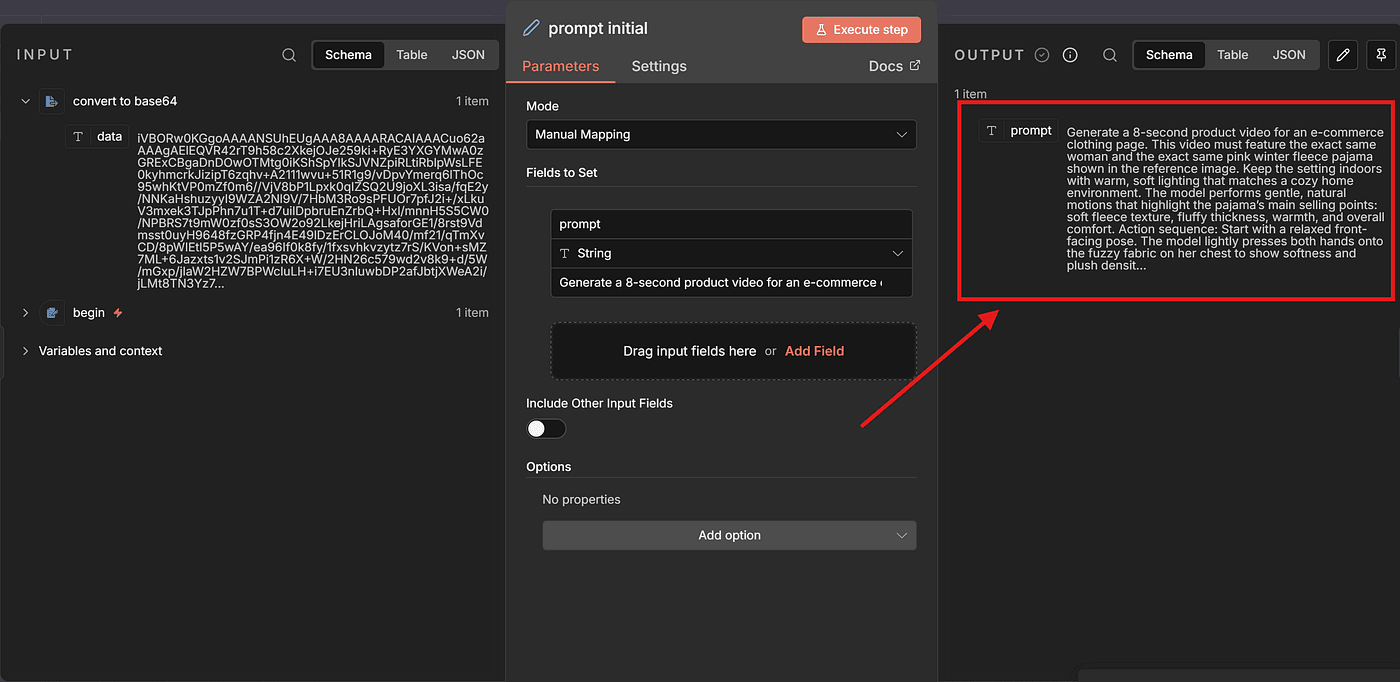
Generate a 8-second product video for an e-commerce clothing page.
This video must feature the exact same woman and the exact same pink winter fleece pajama shown in the reference image. Keep the setting indoors with warm, soft lighting that matches a cozy home environment. The model performs gentle, natural motions that highlight the pajama’s main selling points: soft fleece texture, fluffy thickness, warmth, and overall comfort.Action sequence:Start with a relaxed front-facing pose. The model lightly presses both hands onto the fuzzy fabric on her chest to show softness and plush density. She gently squeezes the sleeve between her fingers to demonstrate thickness and how the fleece compresses and softly rebounds. She lifts the collar slightly with both hands to highlight the double-layer plush lining and its warmth around the neck. Turn slowly to a side angle to show the cozy, relaxed fit. Turn around to display the full back view, letting the fluffy texture catch the light. Turn back to the front and perform a gentle self-hug gesture to express warmth and comfort. End with a small relaxed movement such as a subtle sway, showing that the pajama is comfortable and easy to move in.Camera notes:
Use a steady, medium camera angle. Ensure the plush texture is clearly visible. Soft, warm indoor lighting only. No audio or music of any kind is needed.
This prompt includes seven essential elements:
- Basic video parameters
- Model + clothing consistency
- Scene environment
- Product selling points
- Action / motion sequence
- Camera instructions
- Constraints and limitations
The more precise your elements are, the more realistic and accurate the generated video will be.
Now let’s go back to the workflow and add an Edit Fields node.
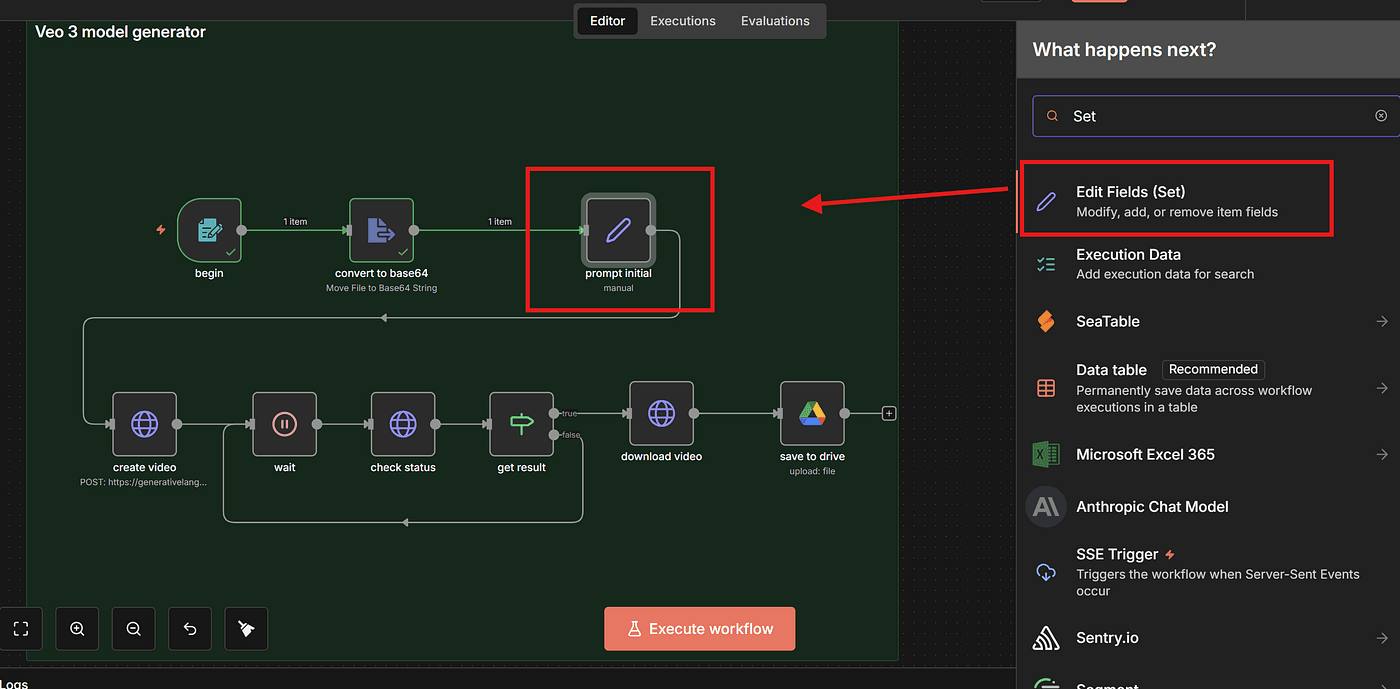
Create a field named prompt.
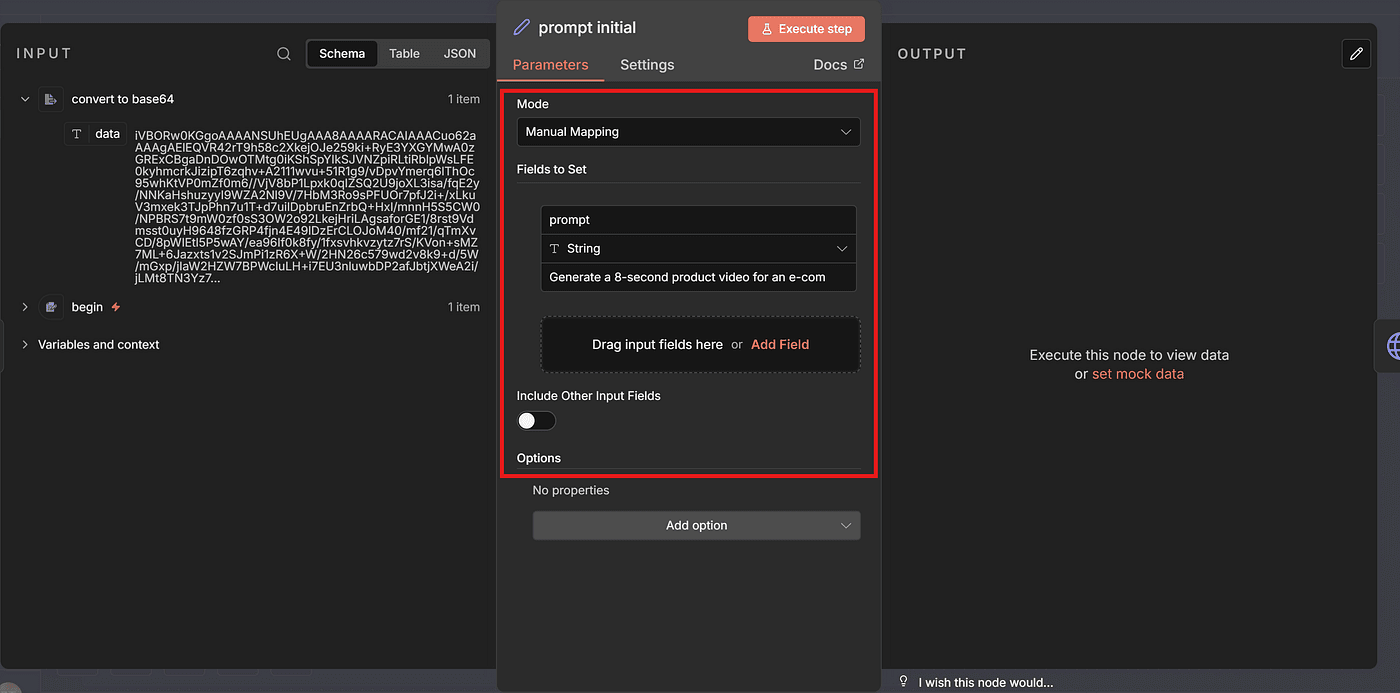
Paste the entire prompt into the value box.

Run Execute Step, and if everything is correct, the prompt field will be set successfully.
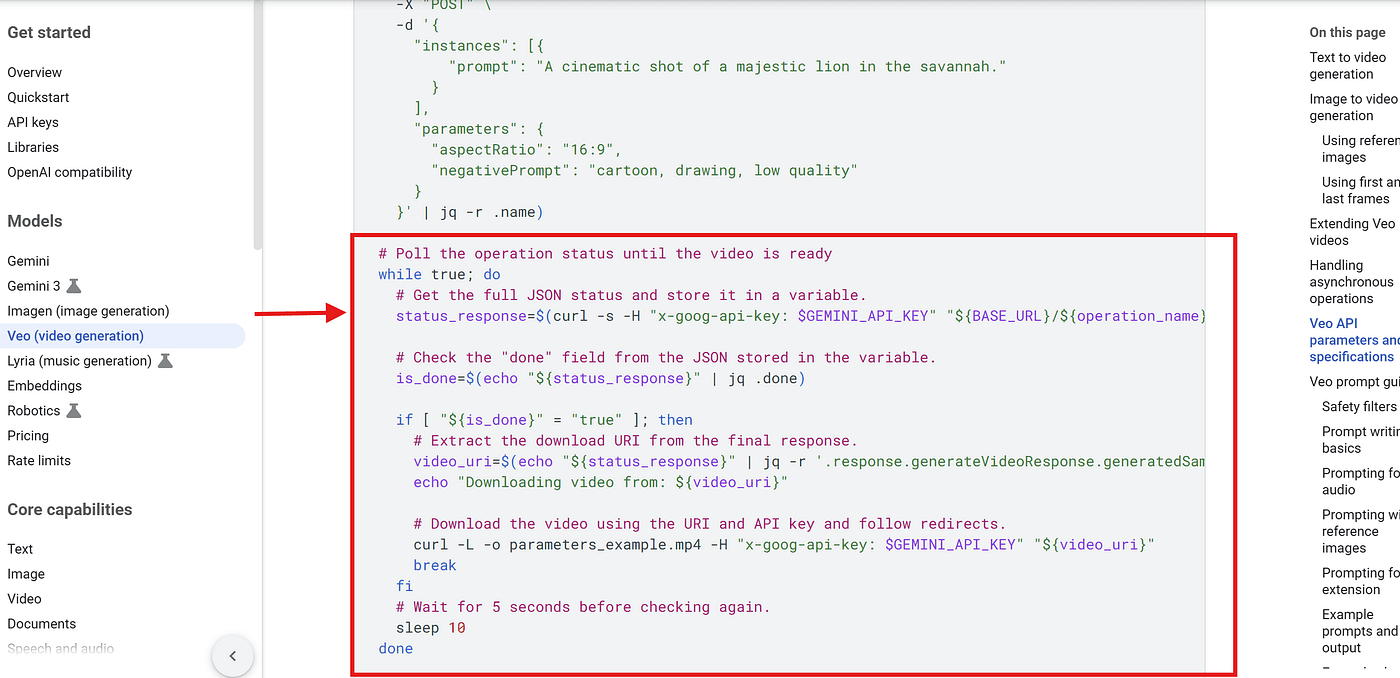
Step 4 — Calling the Gemini VEO3 API
Now that our prompt is ready, it’s time to call the Gemini VEO3 model through its API.
To do that, we head over to the official Google AI Studio documentation:
Gemini API | Google AI for Developers
Gemini API Docs and API Reference
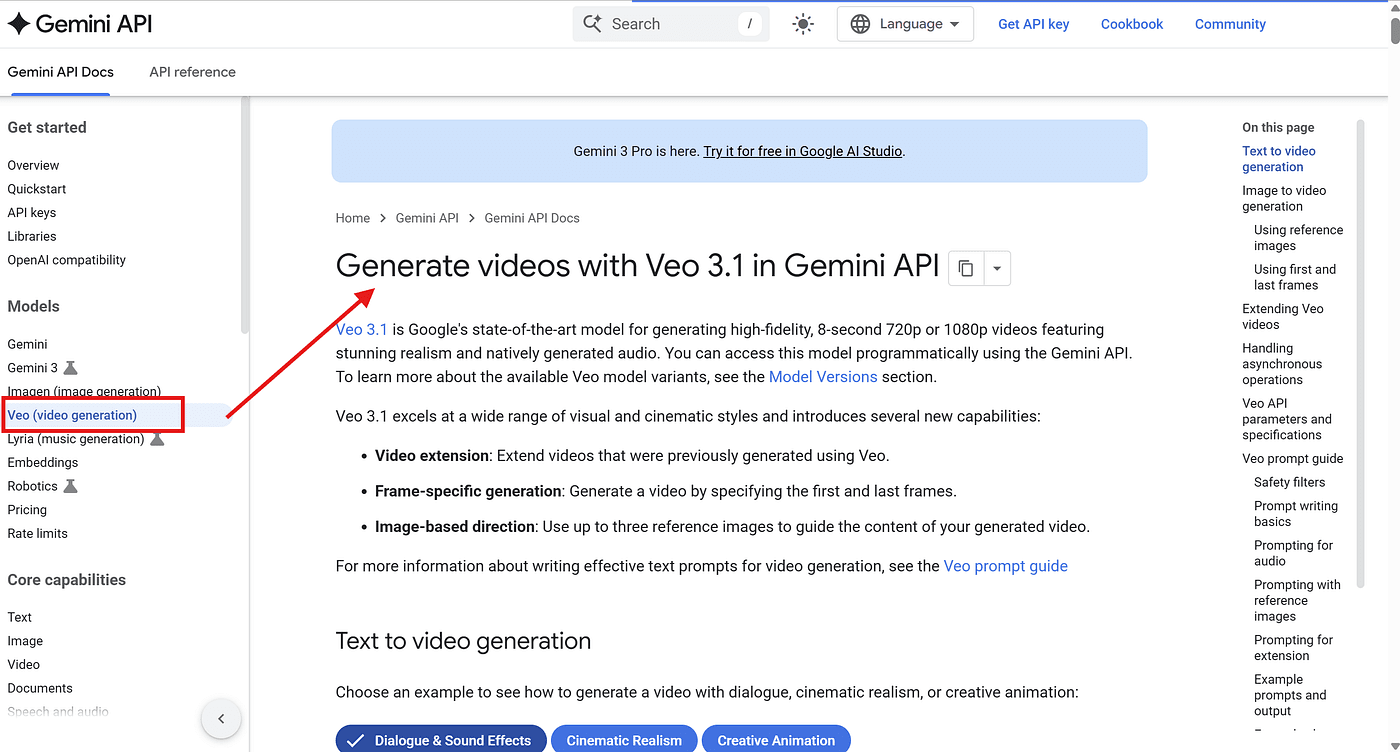
Scroll down until you find the Image-to-Video Generation section.
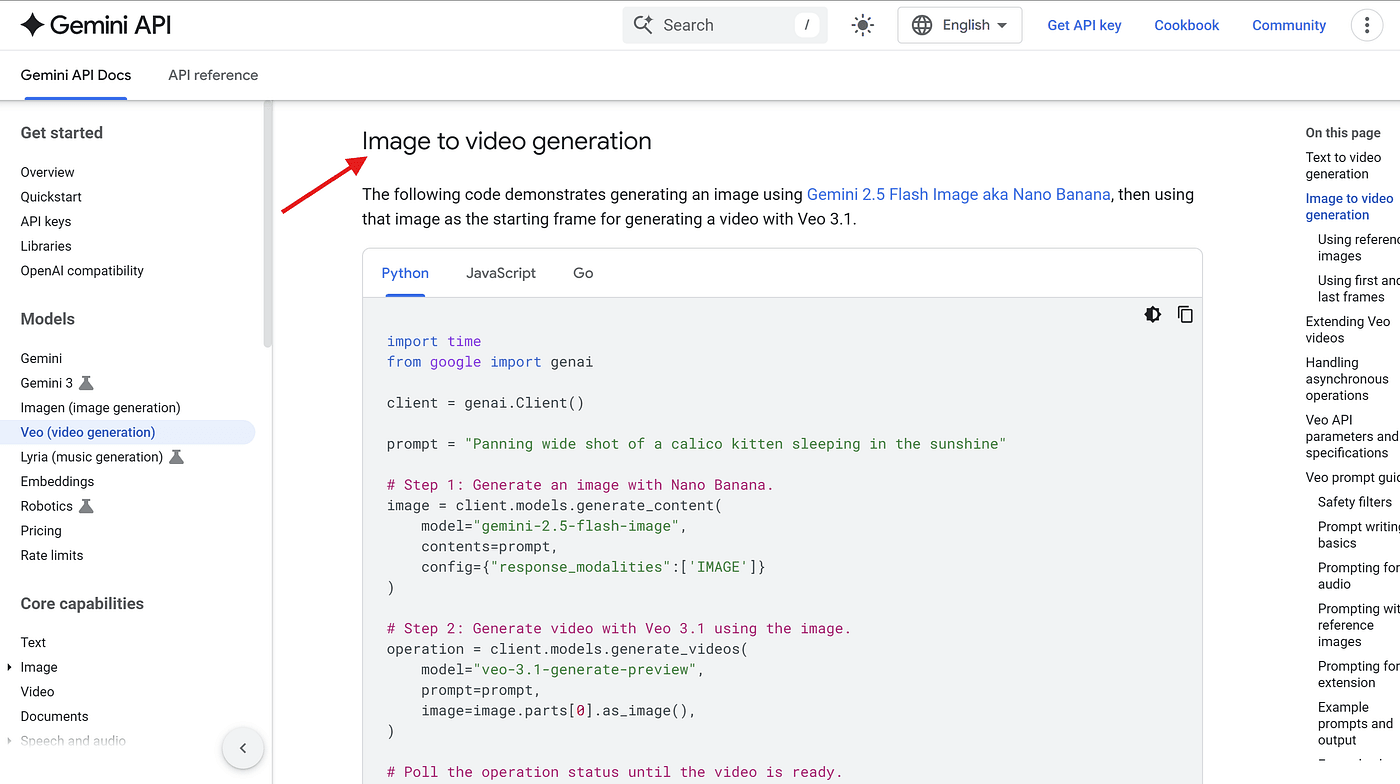
Google provides multiple implementation methods — Python, JavaScript, Go, and REST.

But inside n8n, we will be using the REST API.
That means we need to take everything shown in the documentation — headers, body parameters, the request URL — and replicate it inside an n8n HTTP Request node.
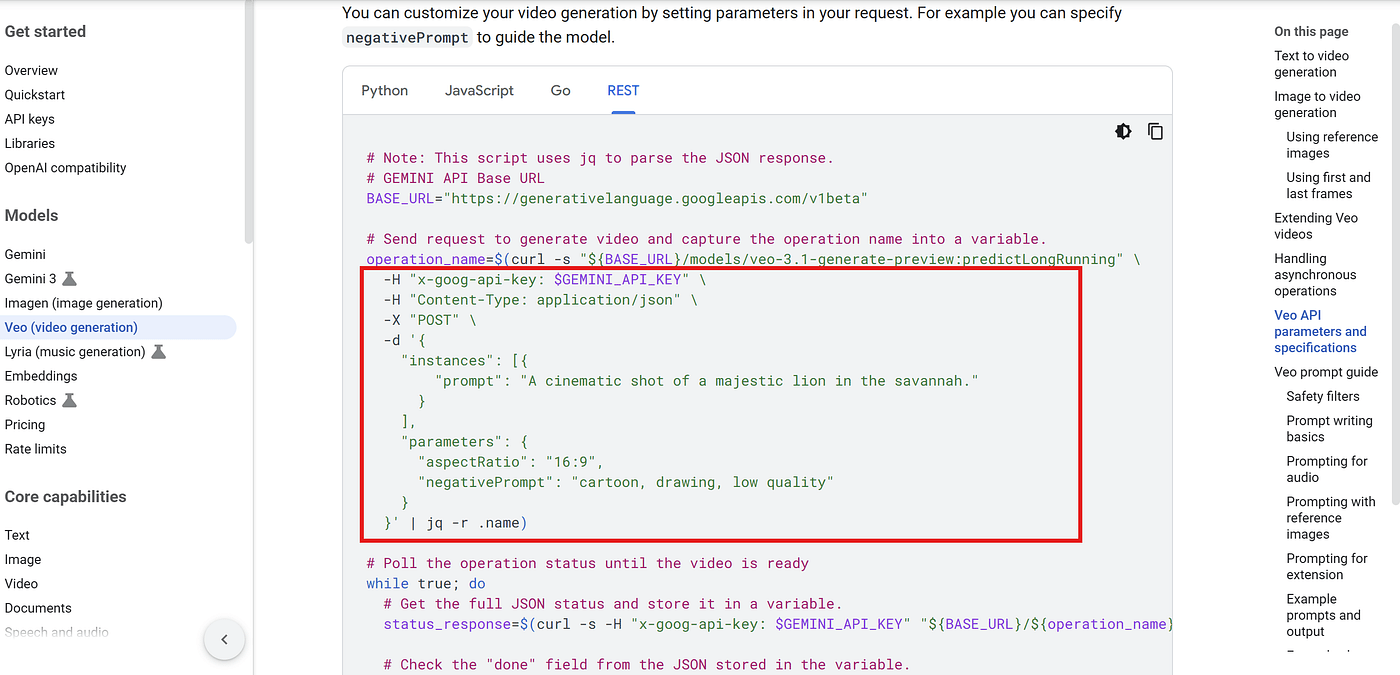
One important thing to know is that video generation is slow.
So Google designed VEO3 as an asynchronous process.
In other words:
- When you call the API → the video is not ready yet.
- You must poll the API repeatedly to check when the video is finished.
- This is why the sample code includes a while-loop, constantly checking the job status.
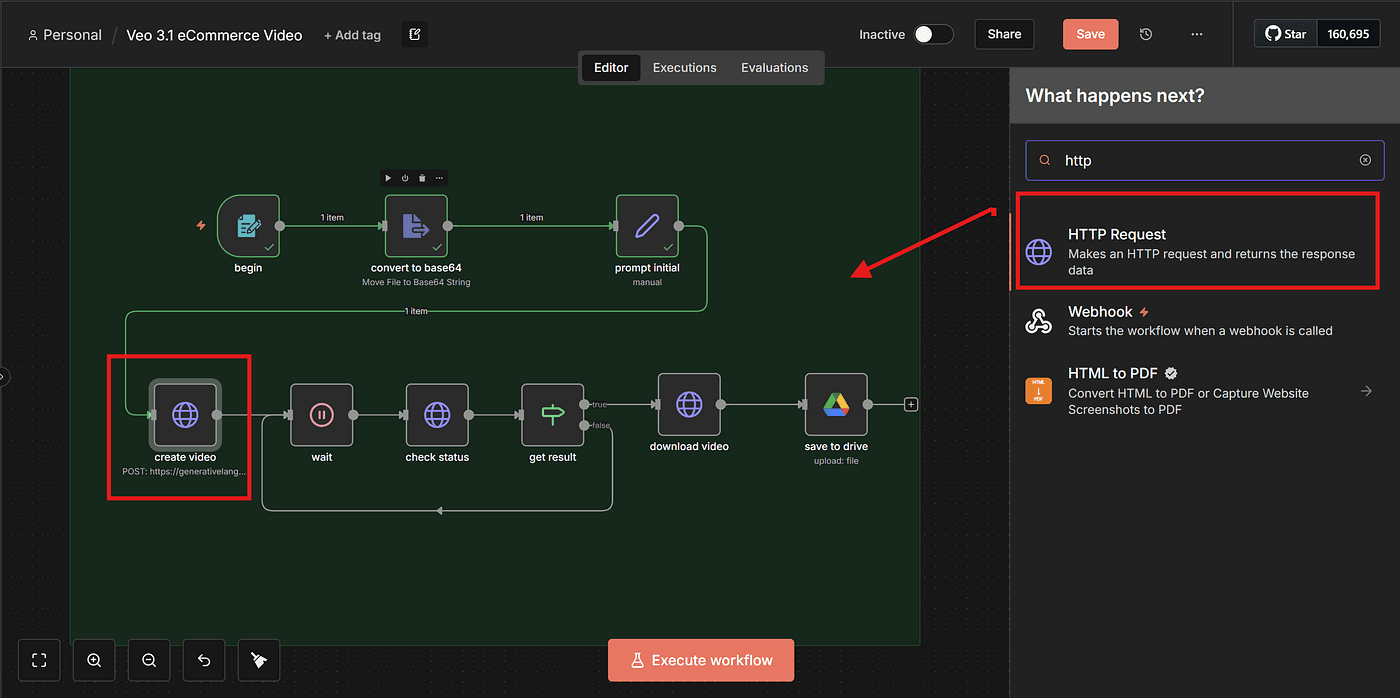
Once we understand how the API works, we can add an HTTP Request node in n8n.
Here, we paste the BASE_URL into the URL field.
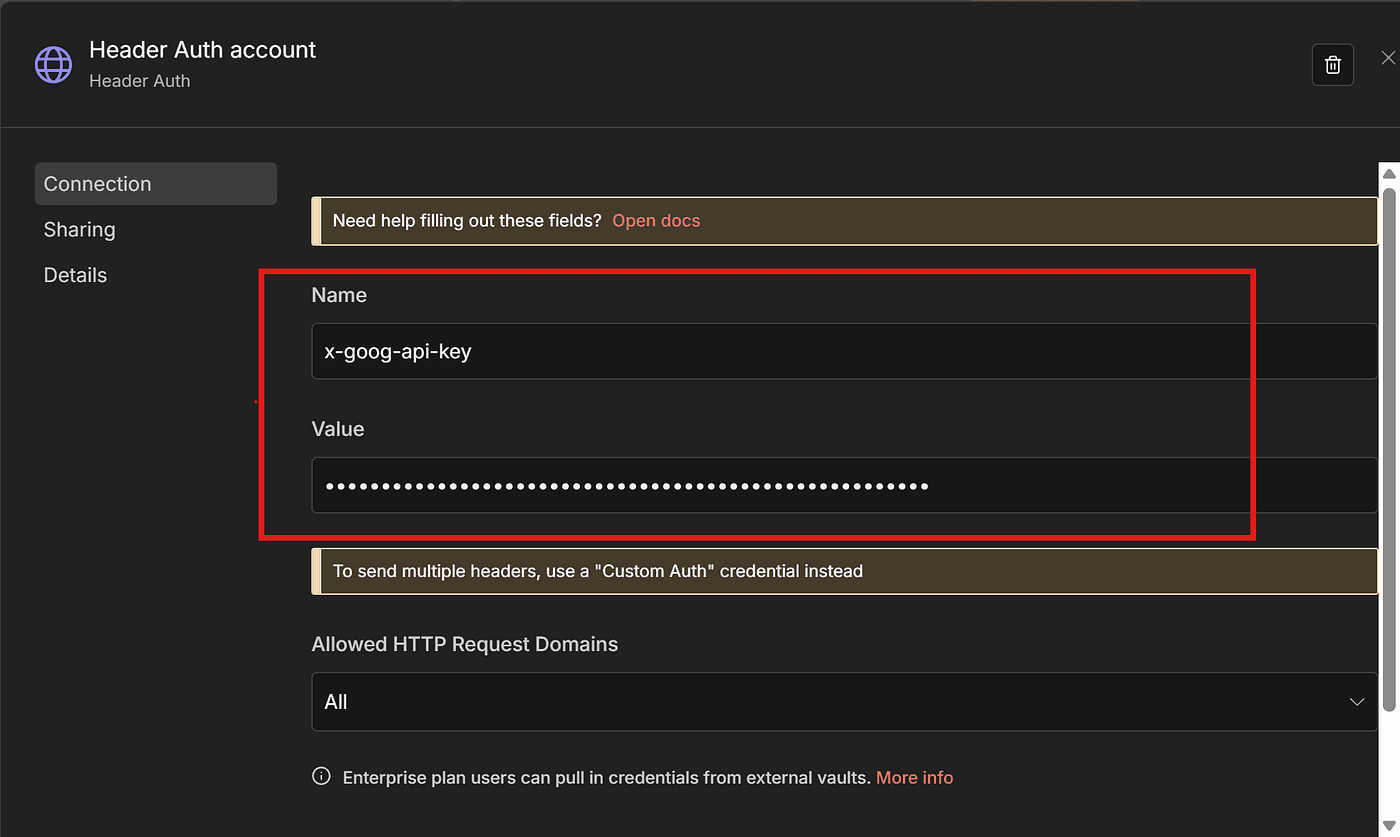
Set Authentication to:
- Generic Credential Type
- Header Auth
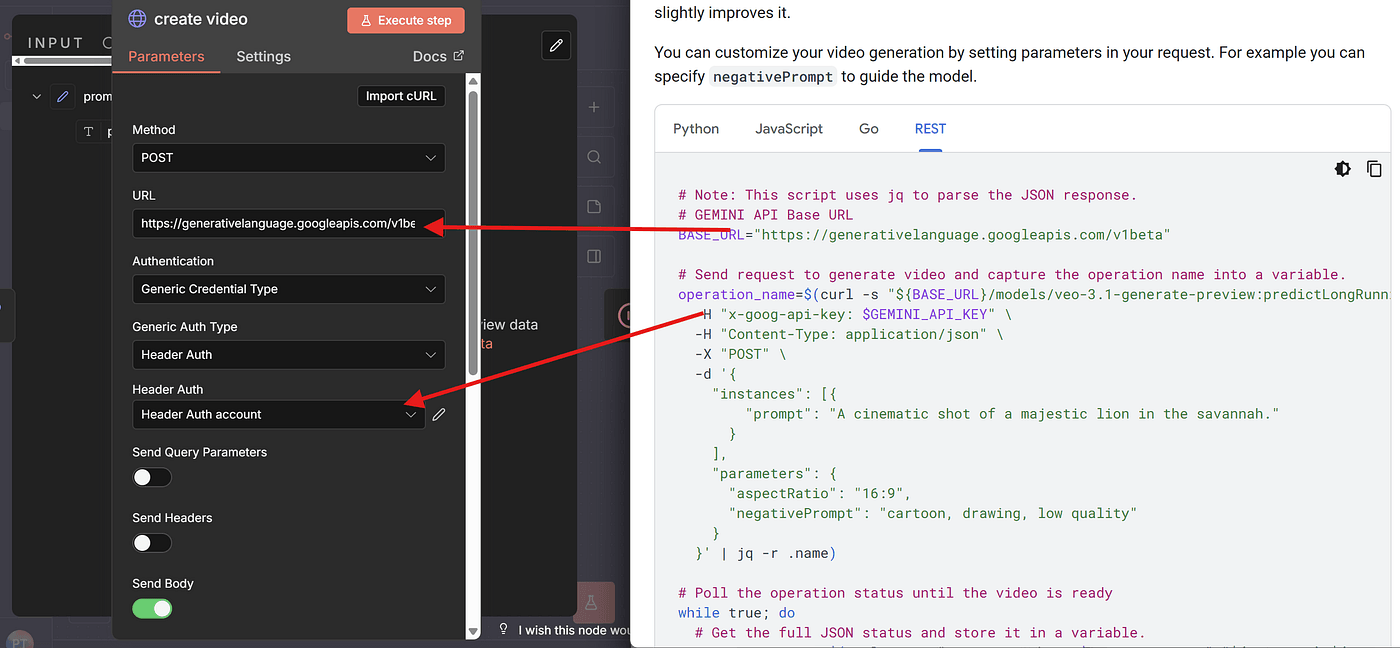
And in Header Auth, we include our Gemini API Key.
As I mentioned in my previous article , Google currently offers $300 in free credits for new users.
Even though VEO3 can get expensive, that $300 is more than enough for testing and experimentation.
If you want to know how I activated the $300 credit, check my previous article.
Next, copy the body template from the documentation:
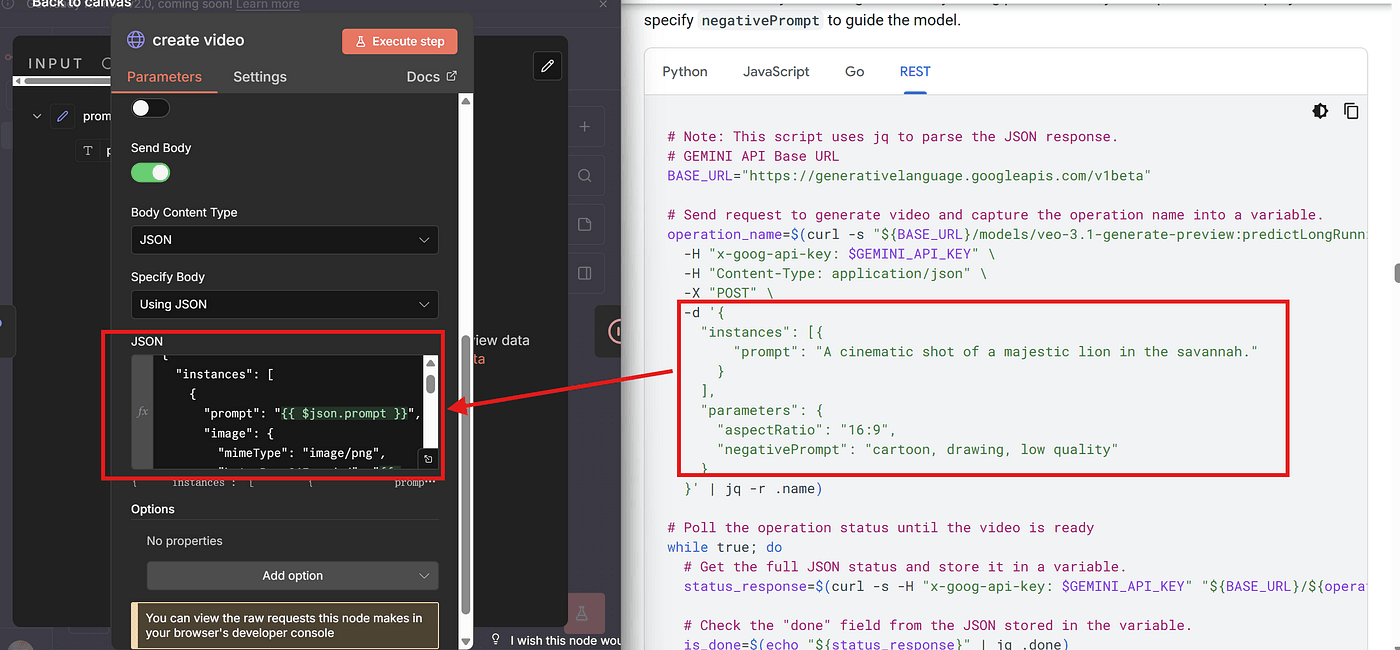
In my workflow, I set the body like this:
- The prompt is inserted via an expression, referencing the value we set in the earlier node.
- I also define the start frame and end frame, ensuring they match the original model photo.
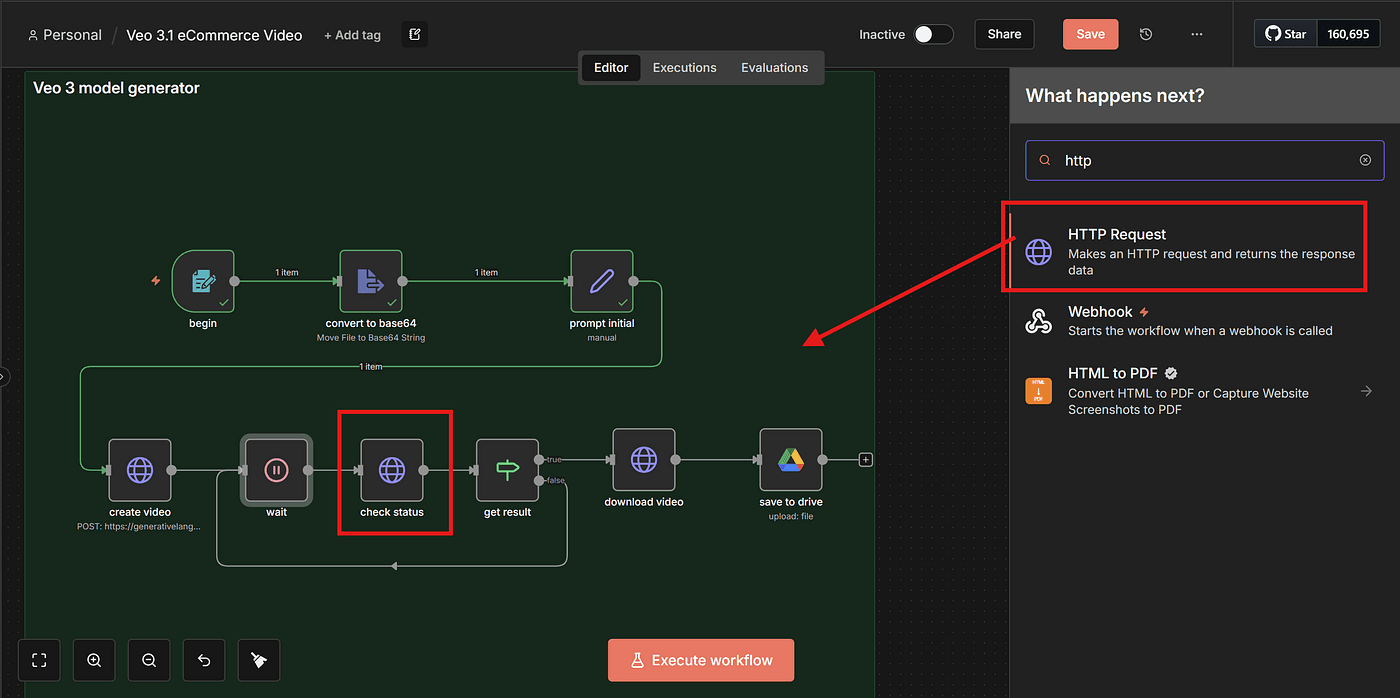
Step 5 — Handling the Async Video Generation Loop
Because VEO3 works asynchronously, we need to create a set of nodes that wait, check, and loop until the video is ready.
Remember the while-loop from the API example?
This loop is represented inside n8n by these nodes:
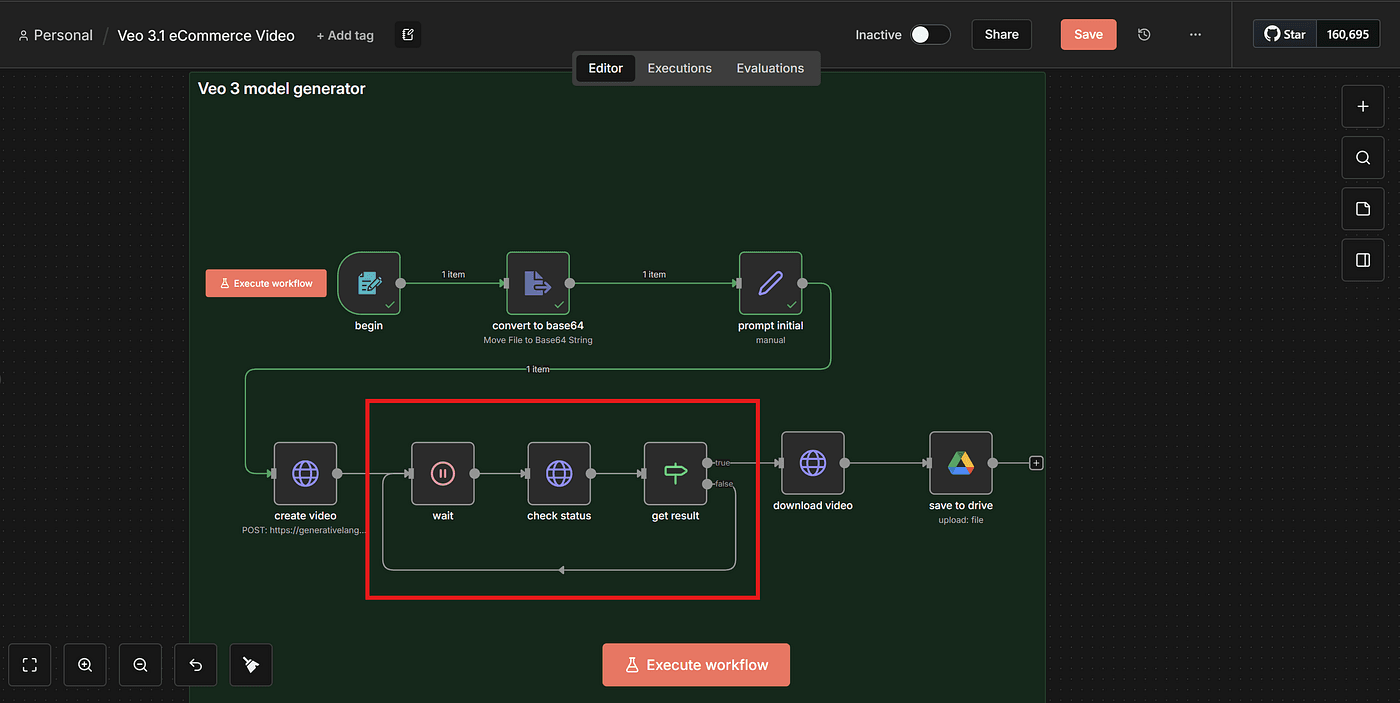
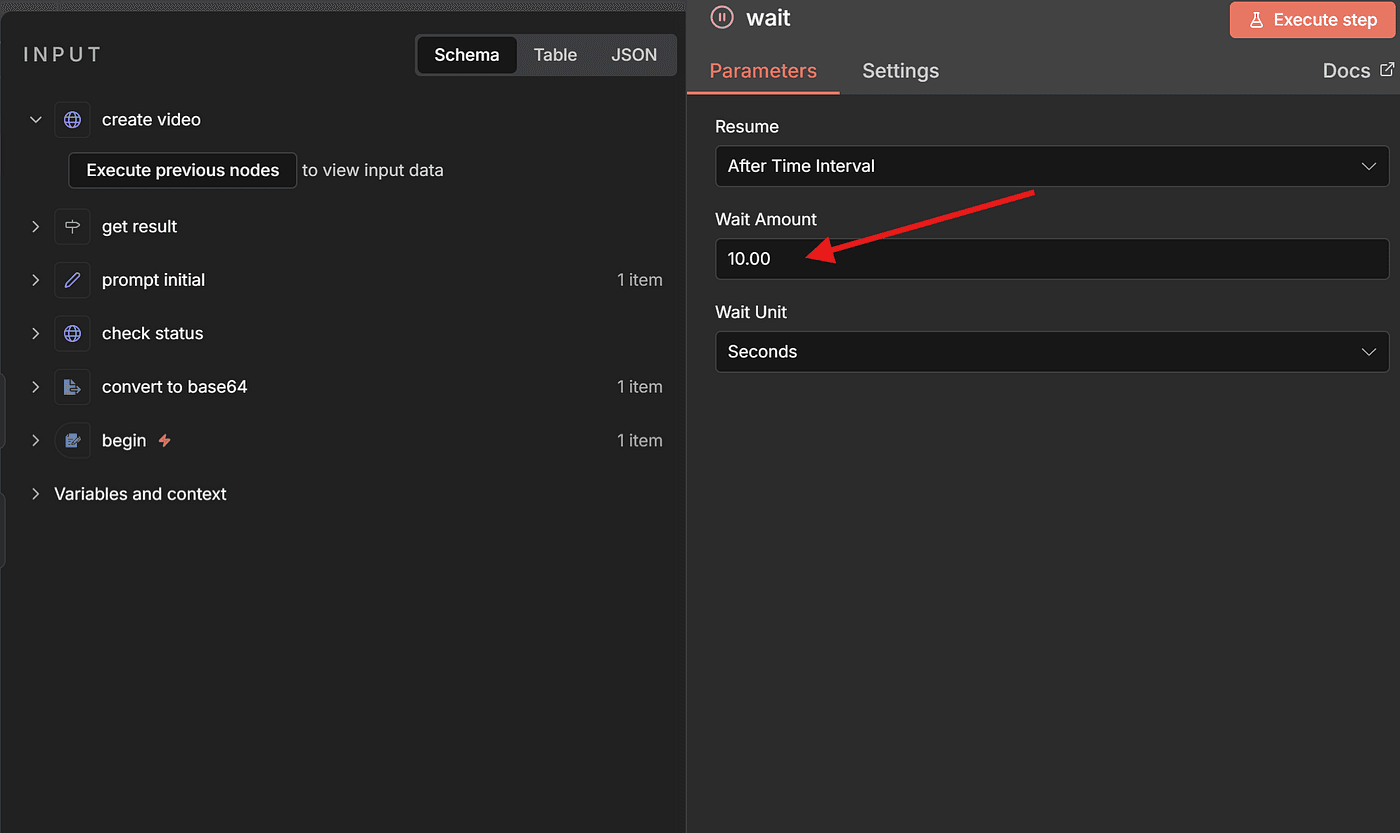
First, add a Wait node:
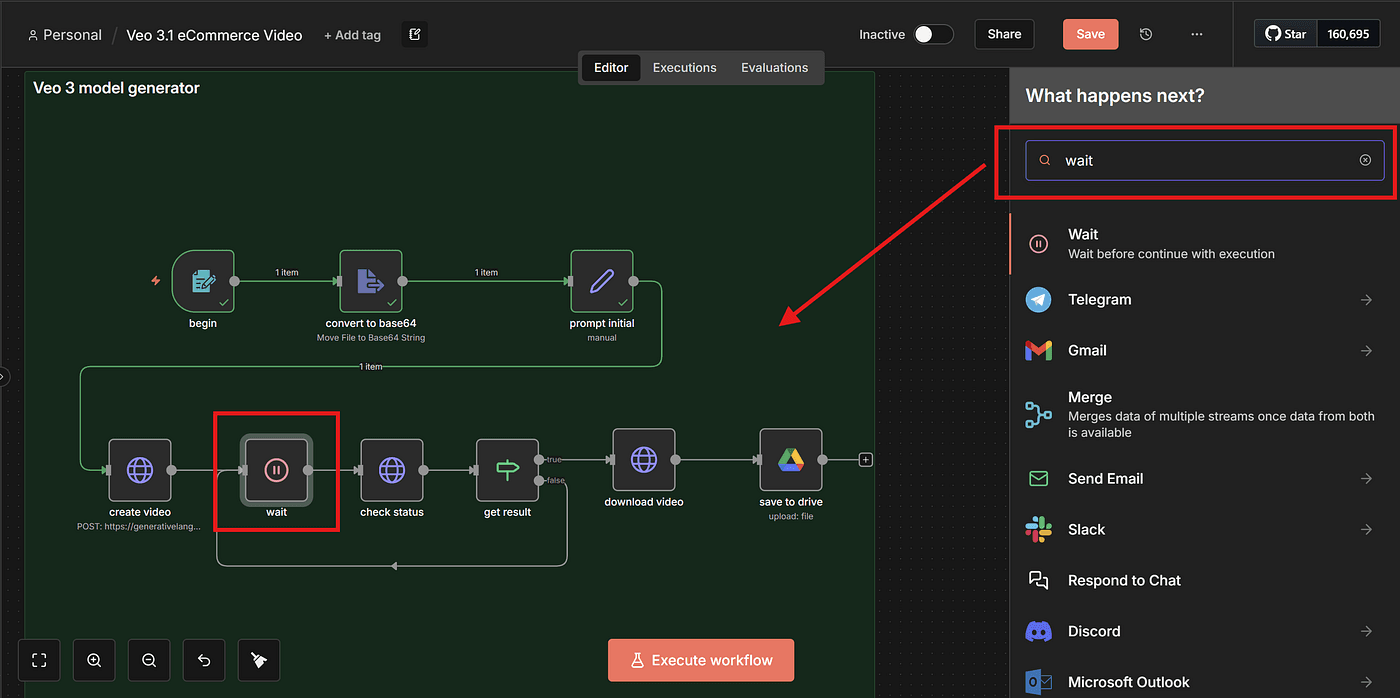
You can set it to pause 10 seconds between each check.
Next, add another HTTP Request node.
This node will check the status of the asynchronous job.
Inside this node, we reference the dynamic parameter json.name, which comes from VEO3’s initial API response.
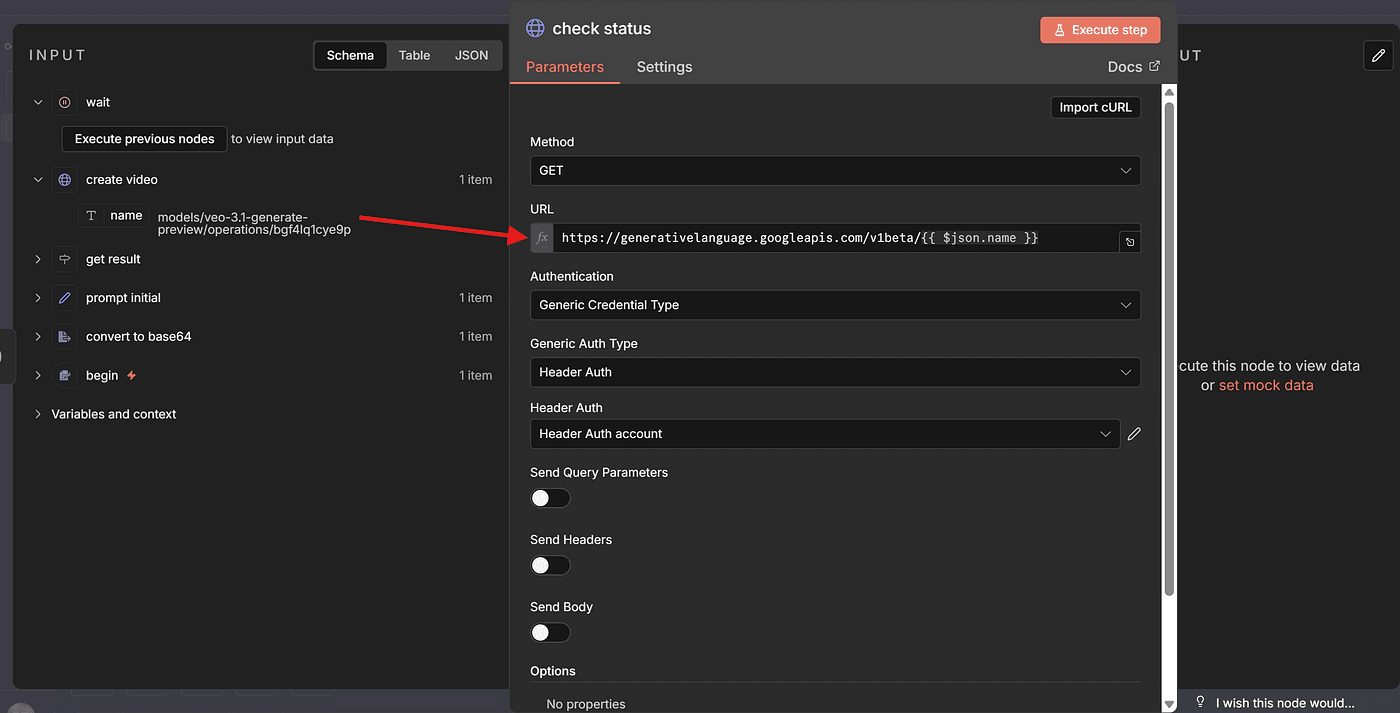
This is the job ID that we use to query the status.
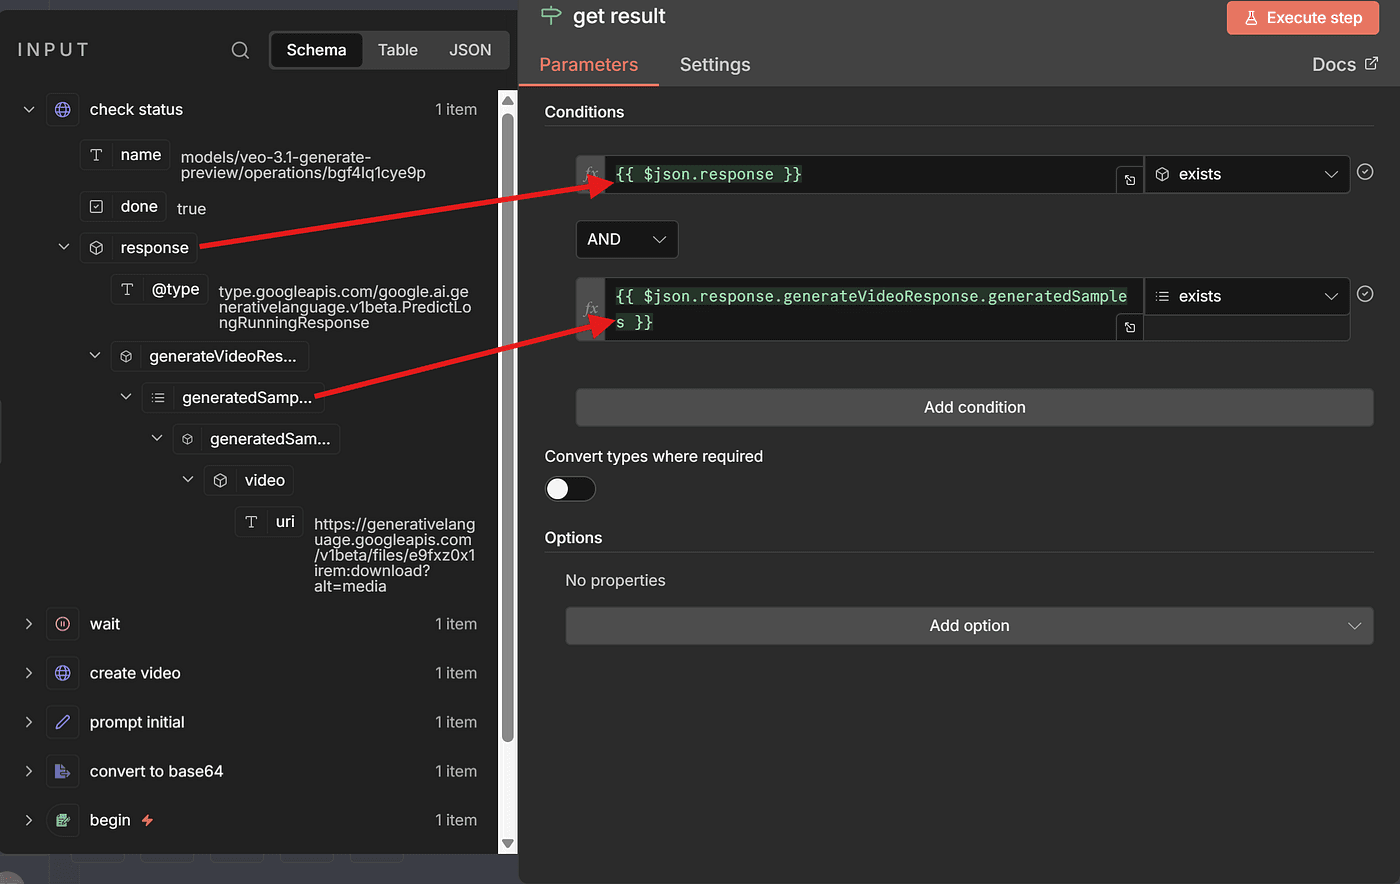
Then, add an IF node to determine whether the video is finished.
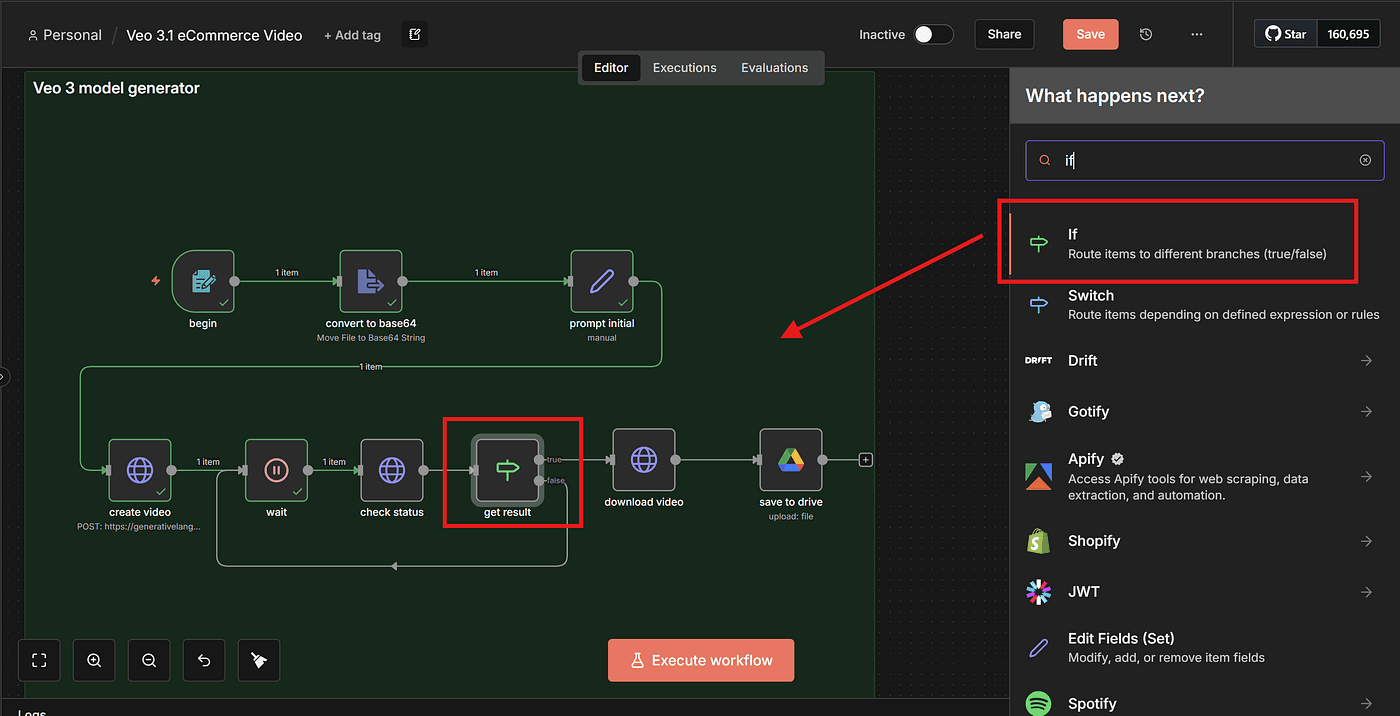
Based on the condition — usually checking whether certain fields exist or contain a “completed” state — we can decide:
- If the video is ready, continue to the download step
- If not, loop back to the Wait node and check again
Step 6 — Downloading the Generated Video
Once the video generation task is completed, we can finally download the result.
To do this, add another HTTP Request node.
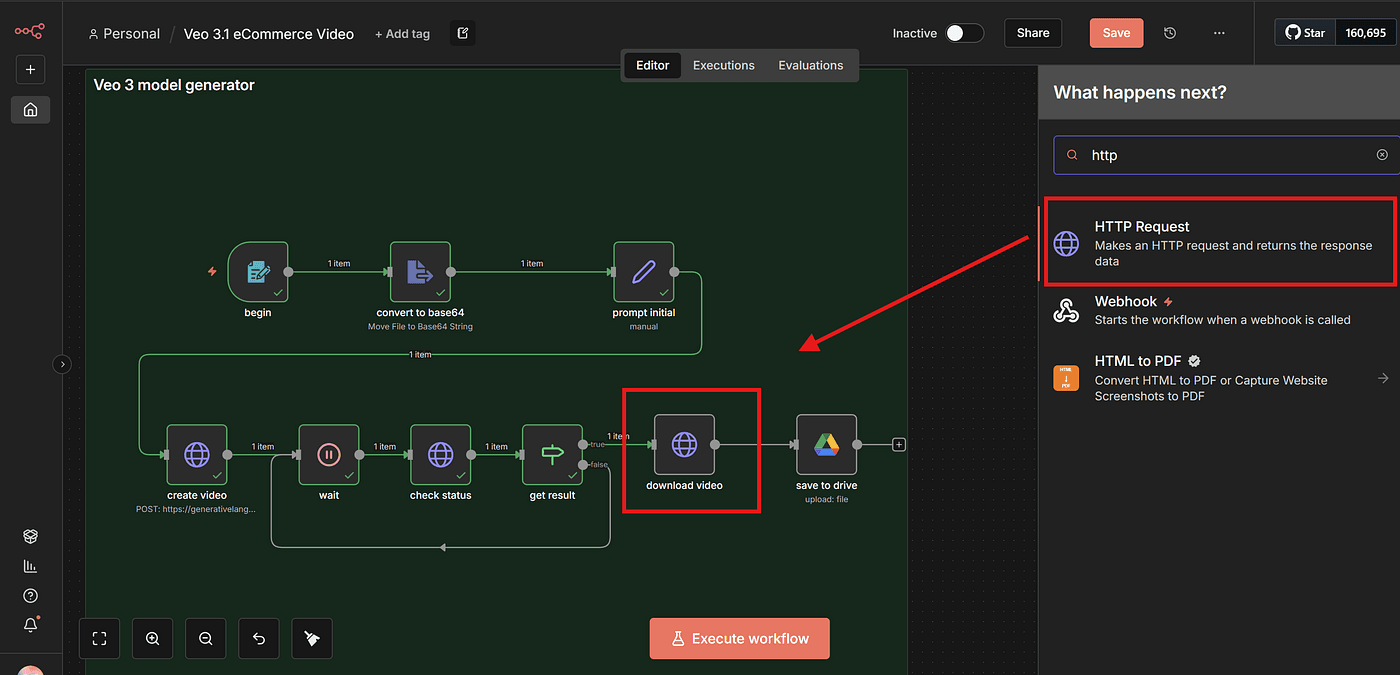
Inside this node, paste the download URL provided by the VEO3 API.
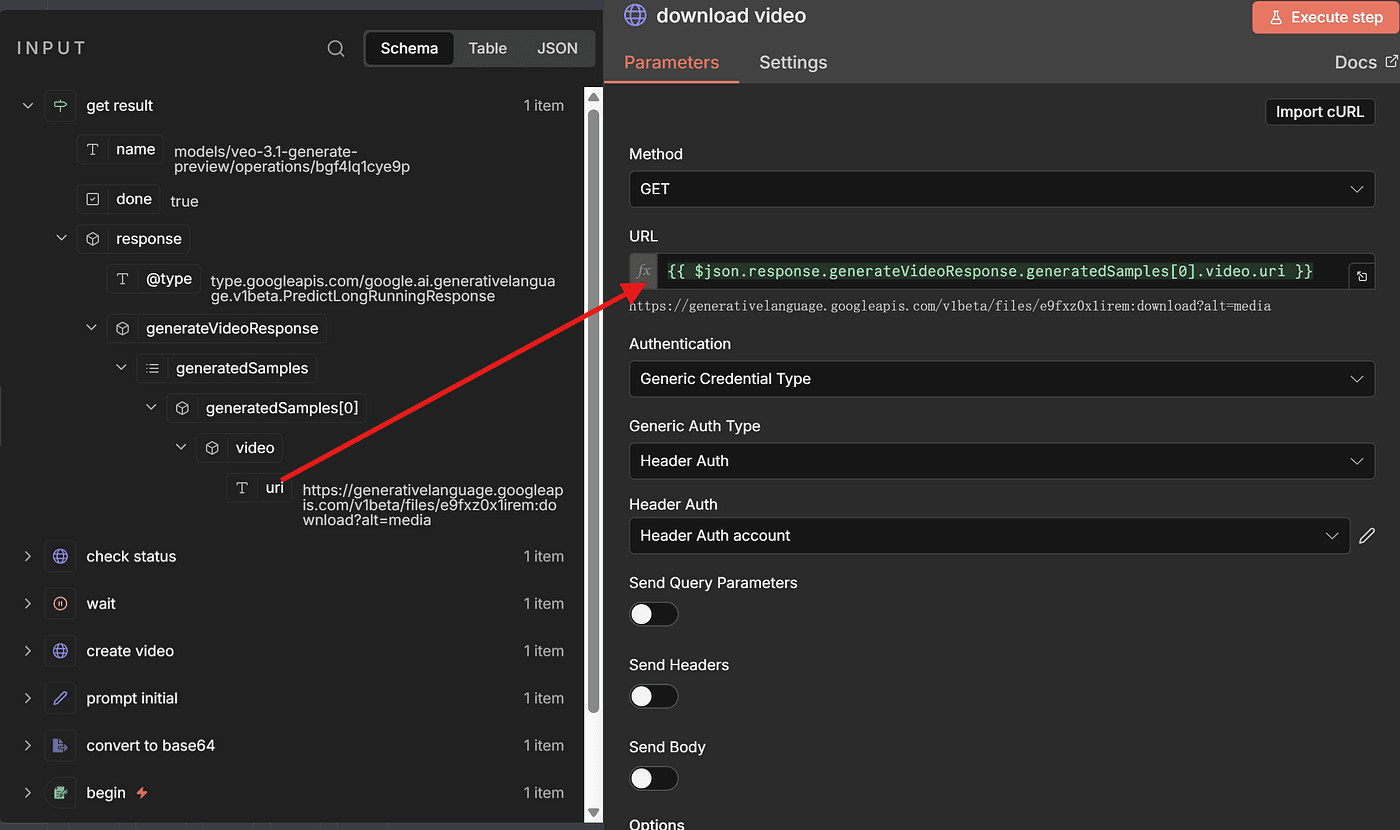
Run Execute Step to test it, and if everything is set up correctly, the video will download successfully.
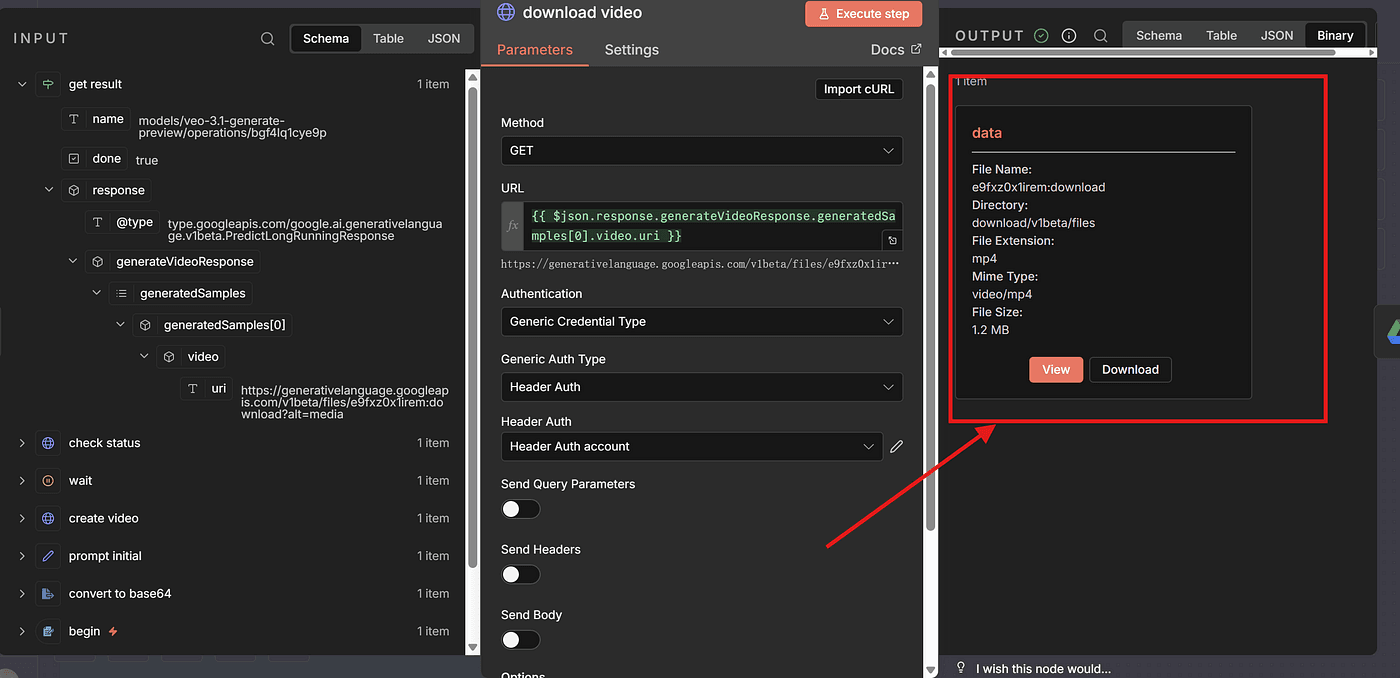
At this point, you officially have a fully generated AI product video.
You can preview it directly and see how your model brings the clothing to life.
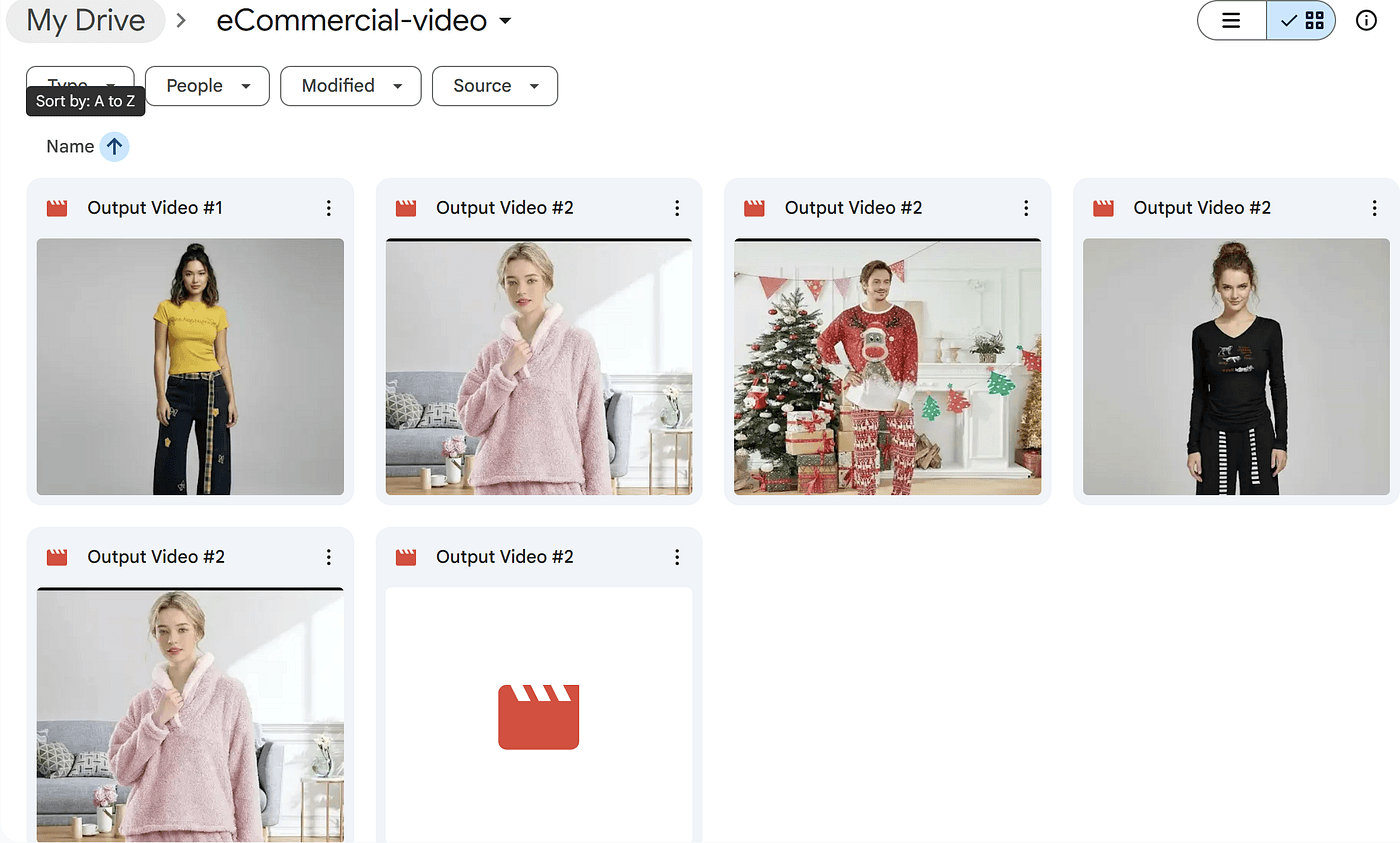
If you want to take it one step further, you can also add another node — for example, uploading the generated video to Google Drive.
This part is optional, but it’s great for organizing your files or pushing them into your e-commerce pipeline.
I covered how to set up the Google Drive node in my previous article as well, so feel free to check that out if you want to automate the upload process too.
Final
And that’s it — with these six steps, you now have a fully automated pipeline inside n8n that turns a single clothing photo into a complete, realistic model video.
No studio.
No camera.
No editing.
Just automation + AI working together behind the scenes.
From uploading the image…
to converting it…
to generating the motion…
to handling the asynchronous API…
to downloading the finished video…
Everything runs end-to-end without you lifting a finger.
And once you have this workflow in place, you can scale it effortlessly:
different outfits, different models, different prompts — all generated automatically.
In other words, you’ve just built the foundation of your own AI-powered e-commerce video system.
Pretty wild, right?
And if you found this helpful and want to see more AI + automation tutorials like this, feel free to like the article .
I’m building workflows like this , and we’re only just getting started.