And why building your own encrypted tunnel is the only way to truly control your privacy and your exit IP.For years, I never liked using other people’s VPN or proxy services.
Shared nodes, unstable speeds, IP reputation issues, random captchas popping up, and the constant suspicion of whether someone is logging my traffic… none of it ever felt safe or reliable.
What I really wanted was simple:
- A line only I can use
- A clean, untouched exit IP
- Stable speed that doesn’t collapse because someone else is streaming 8K videos
- A setup that’s open-source and auditable
- A client that works across all major platforms
So I built my own encrypted tunnel:
VLESS + WebSocket + TLS (Caddy TLS termination) + Sing-box
It’s simple.
It’s stable.
It’s fully under your control.
And most importantly —
this line belongs only to you.
Your traffic goes through a clean exit IP. No crowding. No surprises.
In this guide, I’ll explain every concept from scratch so even complete beginners can follow along.
Before We Start: Understanding the Components
If you’re new to building tunnels or proxies, don’t worry — I’ll explain everything in plain English.
Once you understand this section, the entire architecture will make sense.
1. VPS — Your Private Highway Exit
A VPS is simply a remote Linux server.
When you connect through it:
- All your traffic exits through its public IP
- Nobody else shares your IP
- No one can pollute its reputation
- You avoid the “shared VPN node hell”
A clean IP matters more than raw speed.
2. Domain Name — Required for TLS
TLS (the encryption behind HTTPS) does not work without a domain.
Why?
- Certificate authorities won’t issue TLS certs to an IP address
- WebSocket + TLS requires SNI (domain)
- Clients verify certificates using domain matching
- The HTTPS ecosystem is completely domain-based
Bottom line:
👉 If you want HTTPS-level encryption, you must have a domain.
3. Caddy — The HTTPS Automation Superhero
Think of Caddy as:
“A web server that handles HTTPS automatically, forever.”
You don’t have to touch:
- Certbot
- Certificates
- Renewals
- Complicated reverse-proxy logic
Caddy handles everything.
In our system, it:
- Listens on port 443
- Terminates TLS
- Forwards WebSocket traffic to Sing-box
- Automatically renews certificates
This keeps Sing-box simple and clean.
4. VLESS — A Lightweight, Modern Protocol
VLESS is designed specifically for proxy/tunneling.
It has:
- Lightweight handshake
- No built-in encryption (because TLS handles it)
- Great performance
- Less fingerprinting risk
- A clean, minimal design
It simply identifies users and forwards data.
Encryption = TLS, not VLESS.
5. WebSocket — A Tunnel Disguised as Normal HTTPS
You already use WebSocket every day (chat apps, notifications, online tools).
Why is WS useful?
- Works through almost all servers and CDNs
- Persistent long connection
- Very stable
- Looks like normal HTTPS
- Difficult to interfere with
- Runs on port 443
Perfect for tunneling.
Here, it helps hide proxy traffic inside HTTPS.
6. TLS — Your Encryption Layer
TLS is the exact encryption protocol behind https://.
It protects against:
- Snooping
- Tampering
- MITM attacks
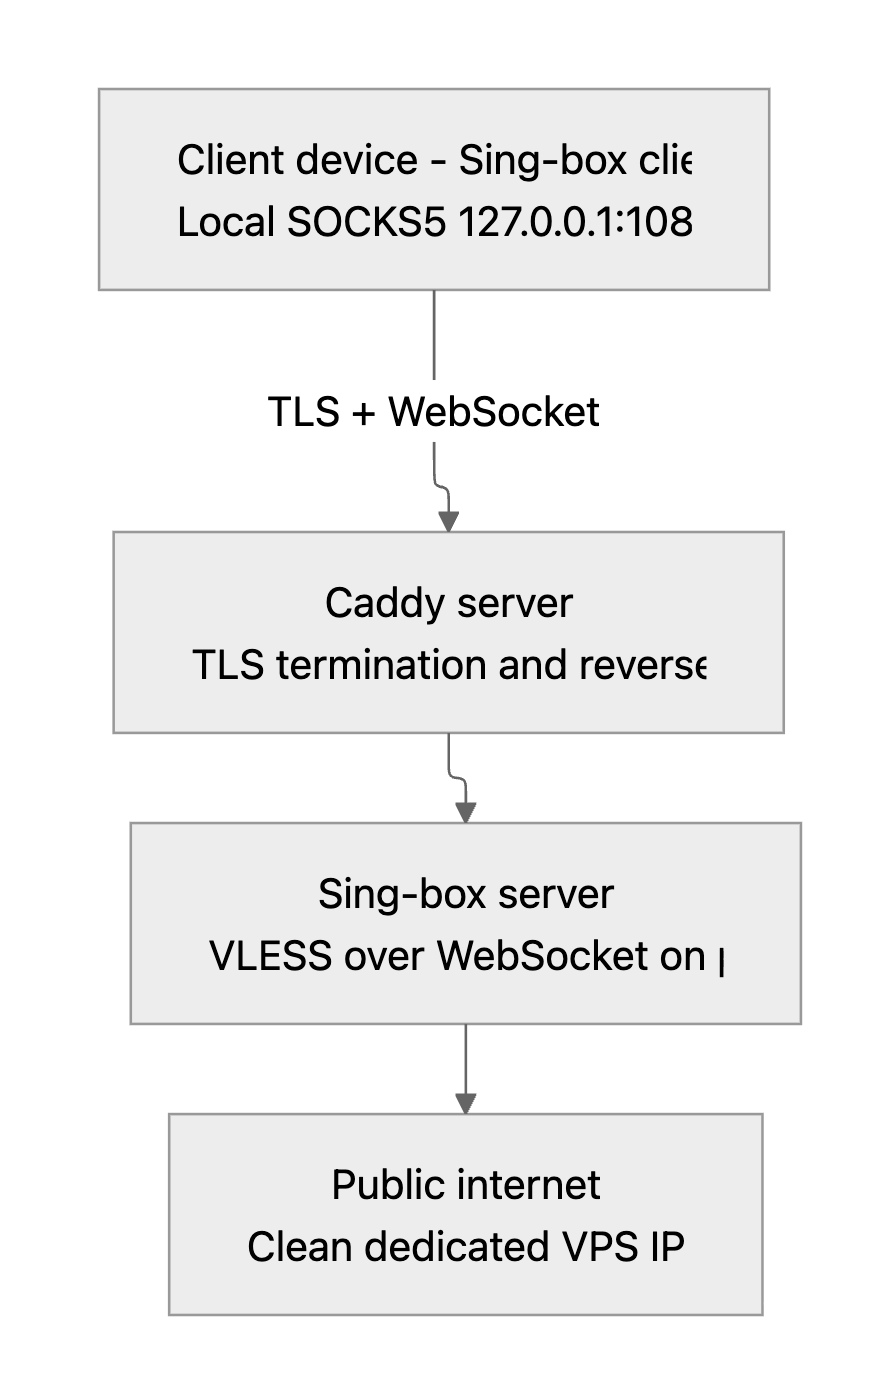
Our full chain looks like this:
Client → TLS → Caddy → WebSocket → Sing-box → Public Internet
Everything is encrypted until it reaches your VPS.
7. Sing-box — The Lightweight, Auditable Engine
Sing-box is an impressive tool:
- Completely open-source
- Supports VLESS, Trojan, Hysteria, etc.
- Works as server or client
- Runs on Windows, macOS, Linux, Android, iOS
- Efficient and fast
- Simple configs
This is the engine of your tunnel.
Key Technology Flow Diagram:

Overall System Architecture Diagram:
Step-by-Step Setup
Everything below is copy-and-paste friendly.
Step 1 — Install Sing-box on Your VPS (The Recommended Way)
Sing-box provides an official installation script that automatically handles:
- Downloading the latest release
- Installing the binary into your system path
- Creating a
systemdservice - Preparing the default config directory at
/etc/sing-box/
You can install everything with a single command:
curl -fsSL https://sing-box.app/install | bash
Once the installation finishes, start the service:
systemctl restart sing-box
systemctl enable sing-box
Check whether it’s running correctly:
systemctl status sing-box
After installation, the main Sing-box binary will be located at:
/usr/bin/sing-box
And the default configuration directory will be:
/etc/sing-box/
Step 2 — Add Your Domain (Needed for TLS)
In your DNS panel:
A record:
your-domain.com → VPS public IP
Wait for DNS to propagate.
Step 3 — Install & Configure Caddy (TLS + Reverse Proxy)
Install Caddy:
sudo apt install caddy -y
Edit your Caddyfile:
your-domain.com {
    reverse_proxy /ws 127.0.0.1:10000
}
Restart:
sudo systemctl restart caddy
Caddy now:
- Handles HTTPS
- Terminates TLS
- Forwards
/ws→ Sing-box - Manages certificates forever
Step 4 — Configure Sing-box Server (WS, No TLS)
Create config:
sudo nano /etc/sing-box/config.json
Insert:
{
  "inbounds": [
    {
      "type": "vless",
      "listen": "127.0.0.1",
      "listen_port": 10000,
      "users": [
        { "uuid": "YOUR-UUID-HERE" }
      ],
      "transport": {
        "type": "ws",
        "path": "/ws"
      }
    }
  ],
  "outbounds": [
    { "type": "direct" }
  ]
}
Apply:
sudo systemctl restart sing-box
sudo systemctl enable sing-box
Step 5 — Set Up Local Sing-box Client
Download:
mkdir -p ~/singbox-client
cd ~/singbox-client
curl -OL https://github.com/SagerNet/sing-box/releases/download/v1.12.12/sing-box-1.12.12-linux-amd64.tar.gz
tar -xzvf sing-box-1.12.12-linux-amd64.tar.gz
mv sing-box sing-box-client
chmod +x sing-box-client
Create client config:
{
  "inbounds": [
    {
      "type": "socks",
      "listen": "127.0.0.1",
      "listen_port": 1080
    }
  ],
  "outbounds": [
    {
      "type": "vless",
      "server": "your-domain.com",
      "server_port": 443,
      "uuid": "YOUR-UUID-HERE",
      "tls": {
        "enabled": true,
        "server_name": "your-domain.com"
      },
      "transport": {
        "type": "ws",
        "path": "/ws"
      }
    }
  ]
}
Run:
./sing-box-client run -c client-config.json
If successful:
socks listening on 127.0.0.1:1080
connected to your-domain.com
Step 6 — Verify Your Clean Exit IP
curl --socks5 127.0.0.1:1080 https://ipinfo.io
If it shows your VPS IP → Your private encrypted line is working.
What You End Up With
A private encrypted line built entirely by yourself
Nobody shares it. Nobody touches it.
A clean exit IP
No captchas. No spam history. No reputation issues.
A fully open-source, auditable system
No logging mysteries. No black boxes.
Cross-platform clients
Linux, macOS, Windows, iOS, Android — everything is covered.
A transparent, understandable architecture
You know exactly what each layer does.
Final Thoughts
Setting this up turned out to be one of those upgrades that quietly changes everything. My connection finally feels like it should’ve felt all along — fast, predictable, and mine. No guessing who else is on the node, no random slowdowns, no wondering what’s happening behind the scenes.
If you’ve ever dealt with shared VPN headaches or felt unsure about where your traffic is really going, building your own line is worth it. It’s surprisingly simple once you walk through it, and the moment it all clicks, you’ll wish you had done it earlier.
No mystery tunnels.
No borrowed IPs.
Just a clean, private route you control end-to-end.