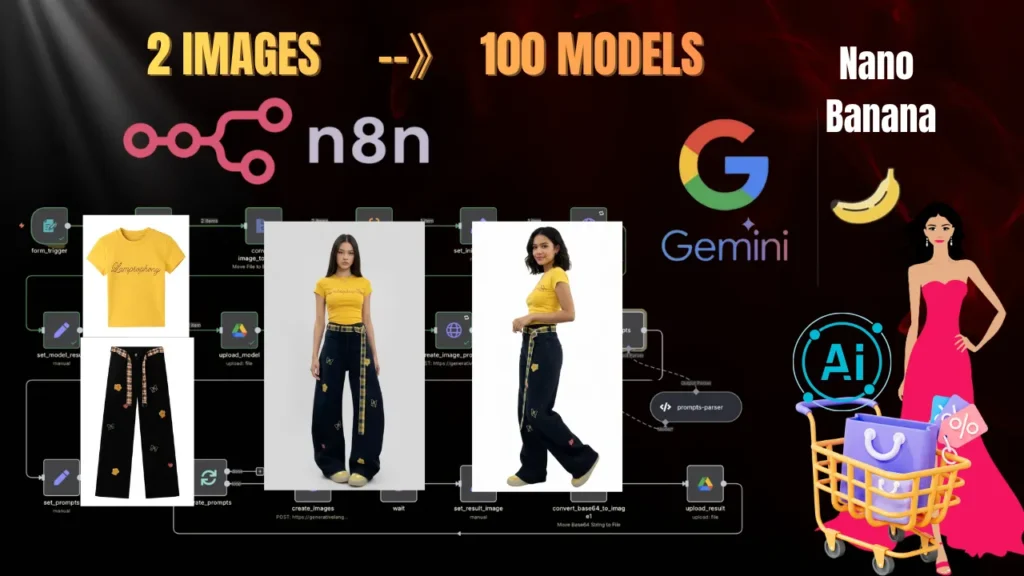
This is how sellers fake pro shoots- step by step
All it takes are two photos shot on your phone — then pair them with this workflow, and you can generate results just like professional studio shots.As many variations as you want — seriously. Believe it?
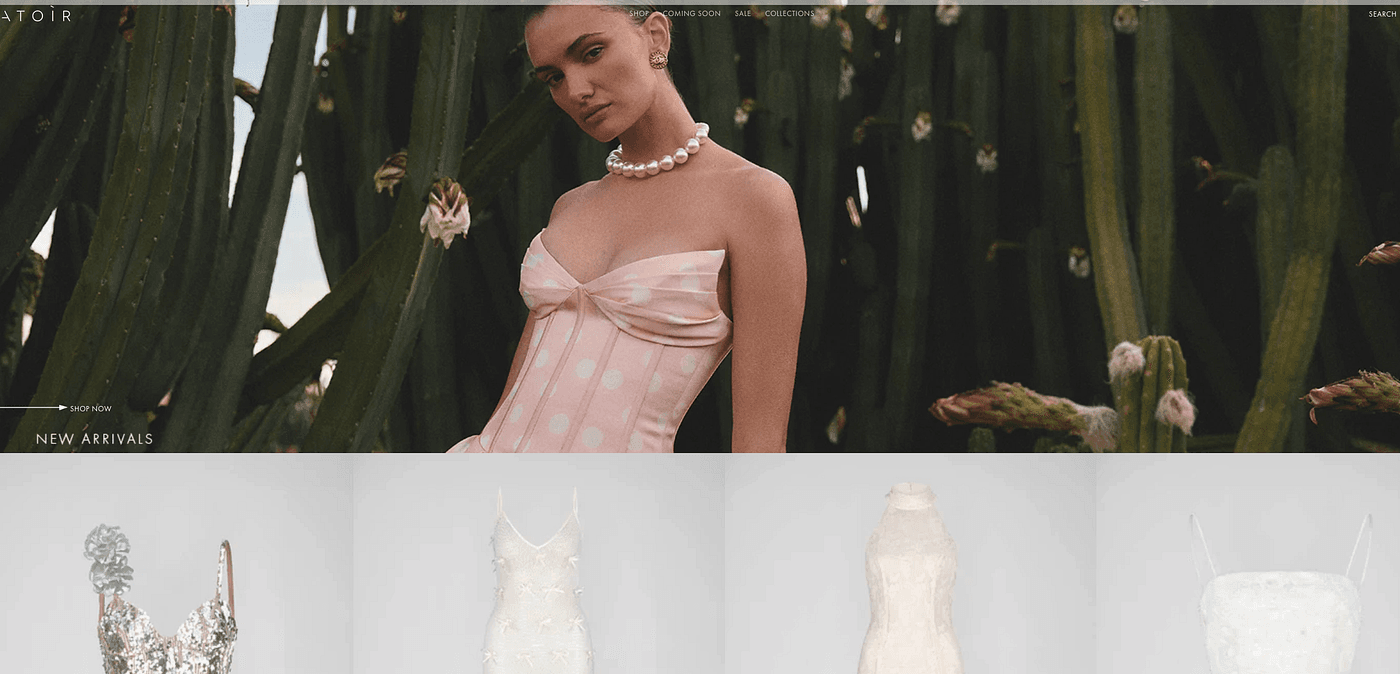
Hello! Have you seen ecommerce sites that use AI models to generate their product promo images?

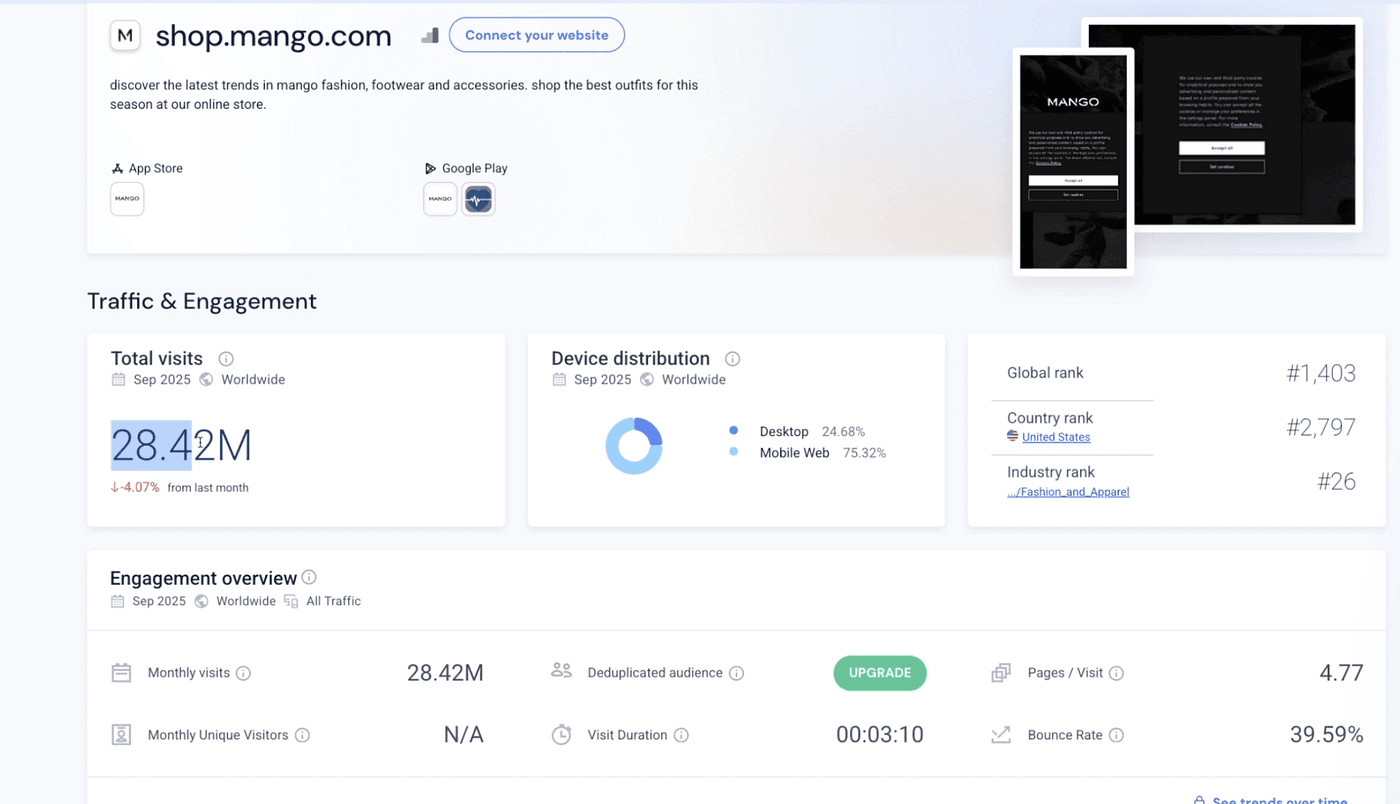
More and more ecommerce brands are adopting AI model photography for product marketing. AI isn’t just speeding up the rise of ecommerce — it’s also unlocking serious profit.
This is the quiet advantage a small group of sellers are using right now to boost efficiency and revenue.
Imagine this: you want to launch your own shop on Amazon / eBay / Etsy / Shopify, but you don’t have pro models, you don’t have a photographer, and your budget is tight. Then you absolutely need to master the workflow I’m sharing today.
In this article, I’ll walk you step by step through an n8n workflow that accelerates production for independent ecommerce sellers.
With it, you can automatically generate stylish model shots to promote your products — male or female — produce unlimited promotional images in any scene, and save on shoots and model fees. Whether you’re building your own store or producing ad creatives for clients, this can 10× your efficiency.
Best of all, no matter who you are or where you’re starting, you can begin right now.
Quick note: if you’re not familiar with n8n workflows, or you’re unsure whether you should pay for n8n, check out my earlier article where I show you how to deploy n8n for free and use it for the basics.
Alright — let’s get started! Let’s go!
Base Setup in n8n: Upload and Prepare Your Images
So here’s the situation.
I’m running my own small online clothing store, and Black Friday is coming fast.
I’ve got this new outfit I need to list, but there’s one problem — no fashion model, no professional photographer, and… yeah, no real budget either.
But that’s fine — we’re gonna make it work anyway.
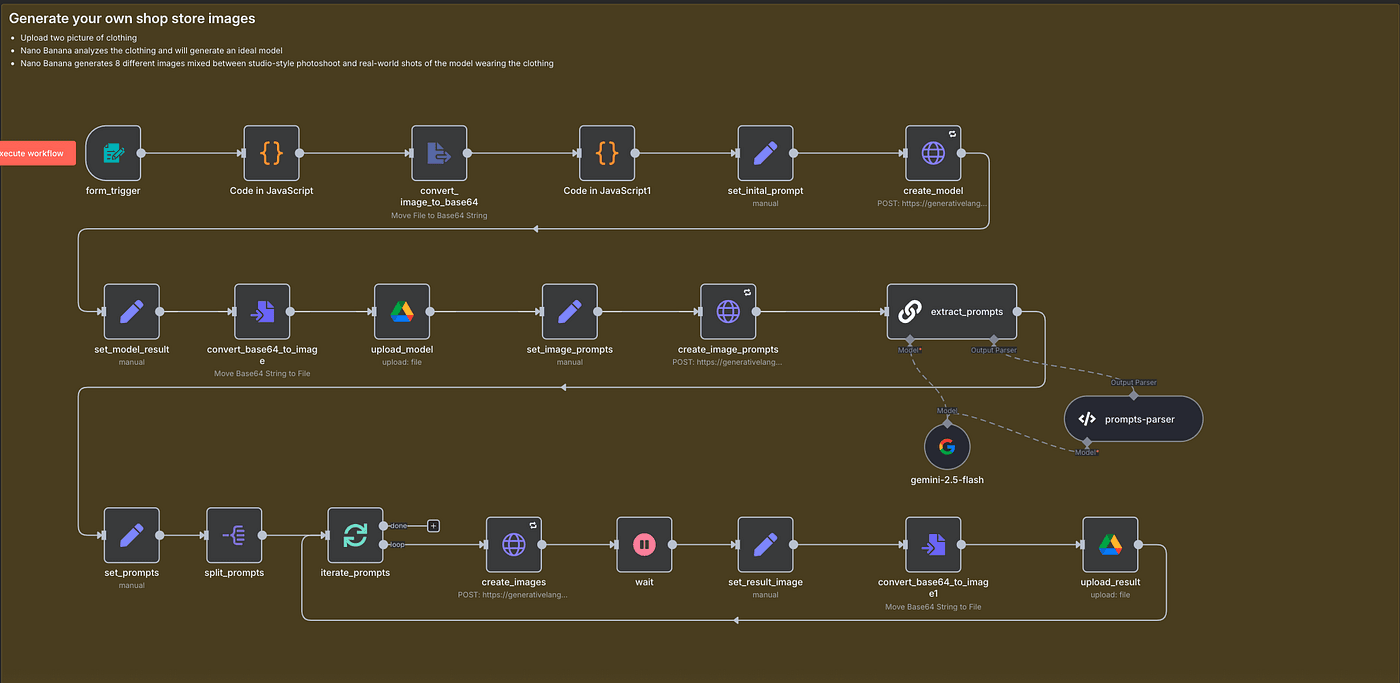
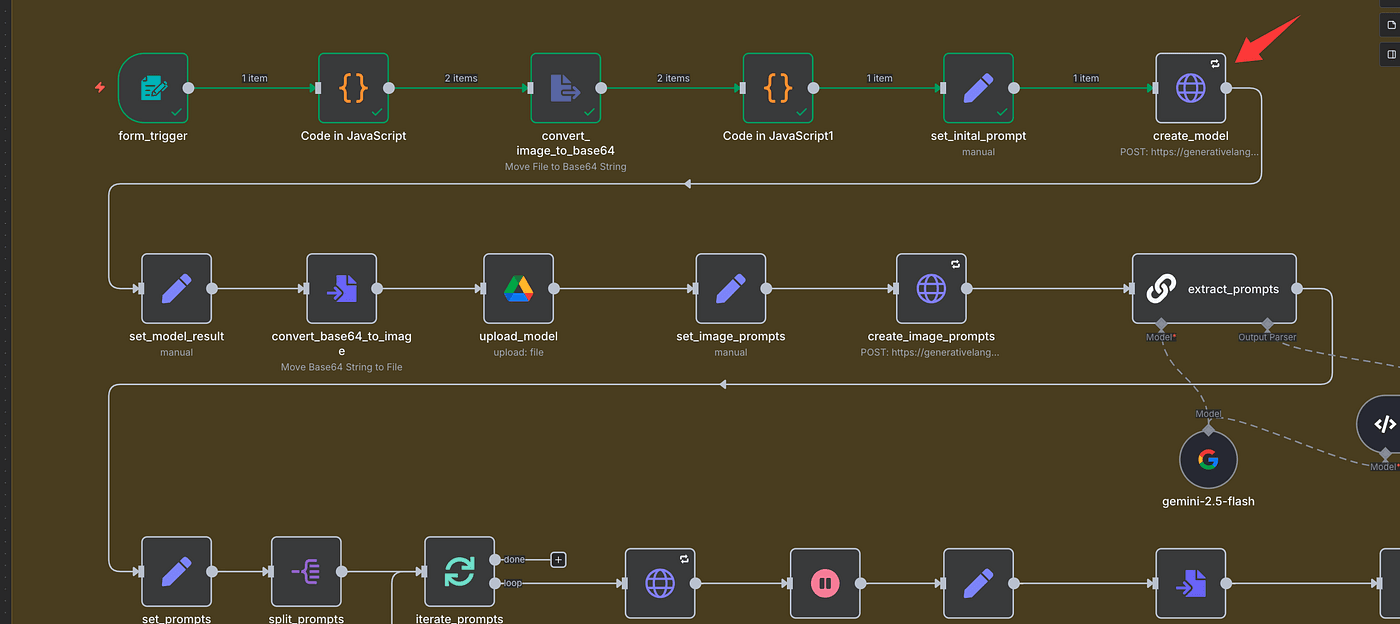
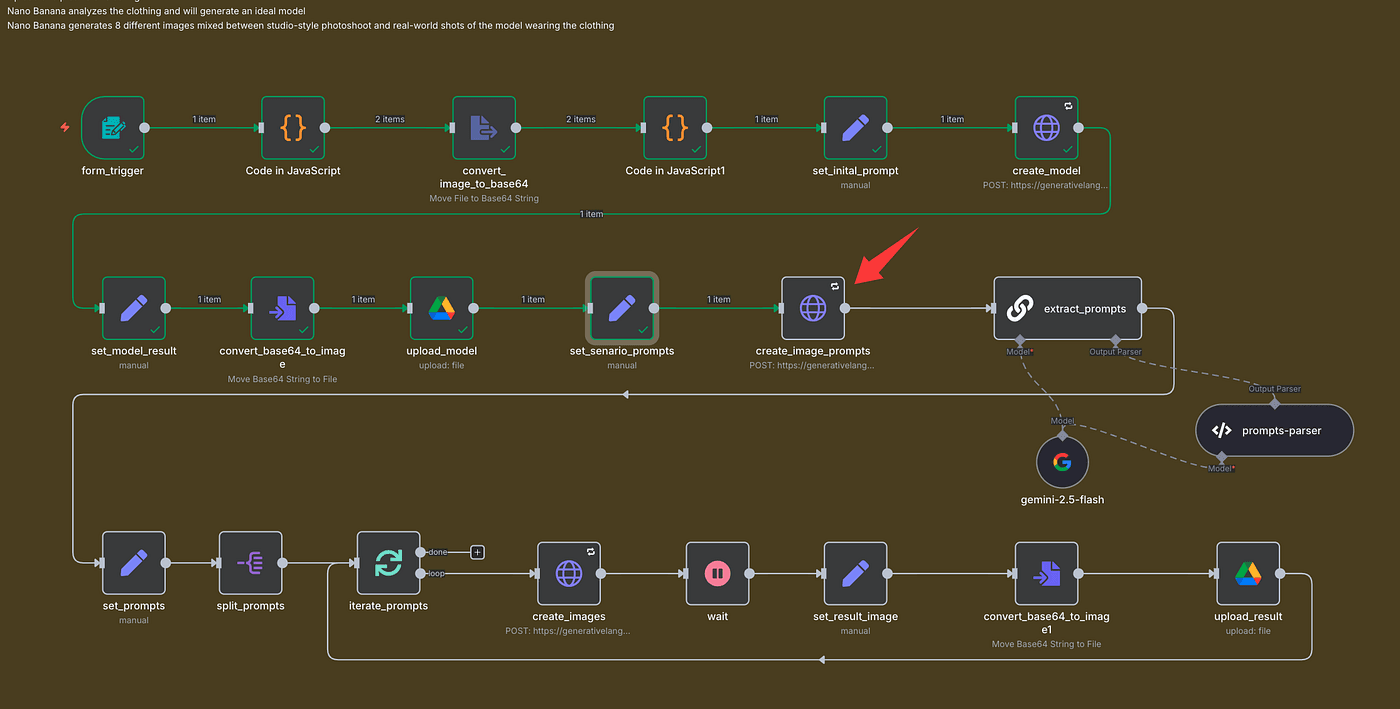
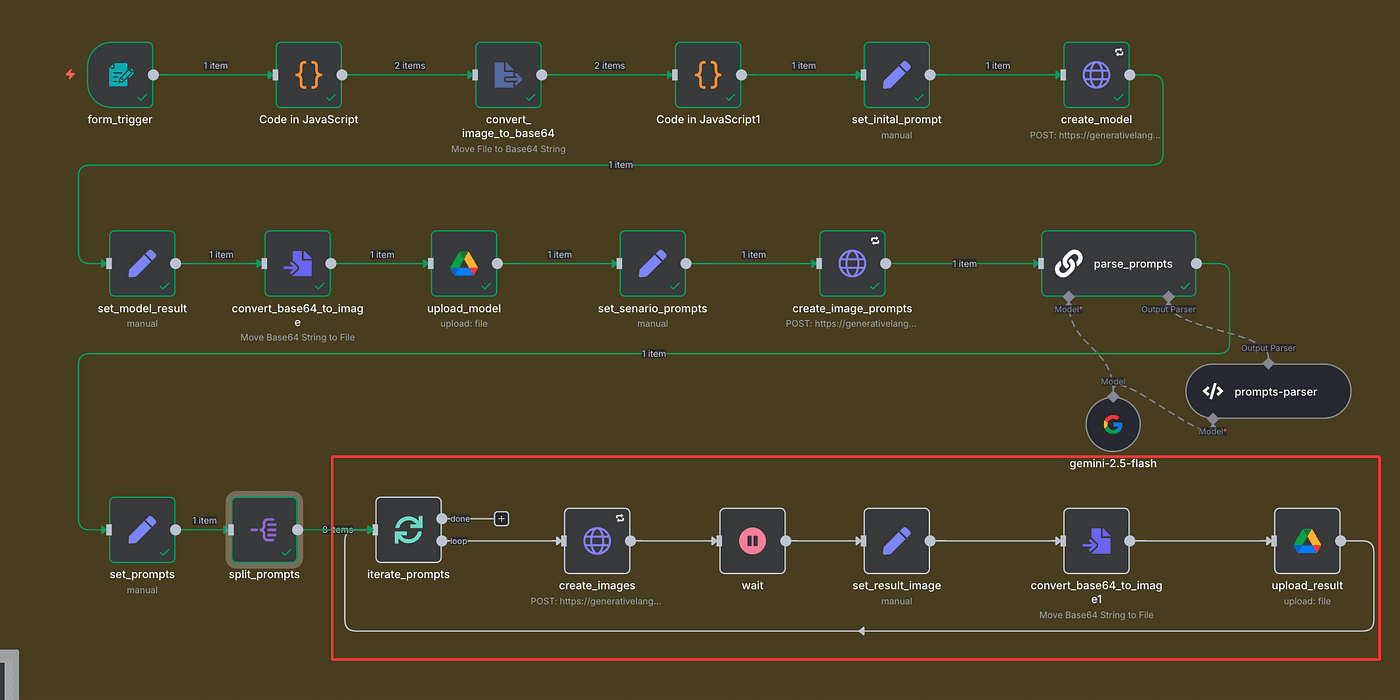
Here’s the full workflow we’ll build today, step by step. It’s made up of three simple tasks:
Task 1: Upload your product photos.
Task 2: Use Google’s Nano Banana model to analyze the clothing and generate the model photo.
Task 3: Use the same model to create multiple versions — flat lays, lifestyle photos, and clean studio shots that look 100% real.
You’ll see exactly how it works in a second.
Now let’s dive into the workflow setup.
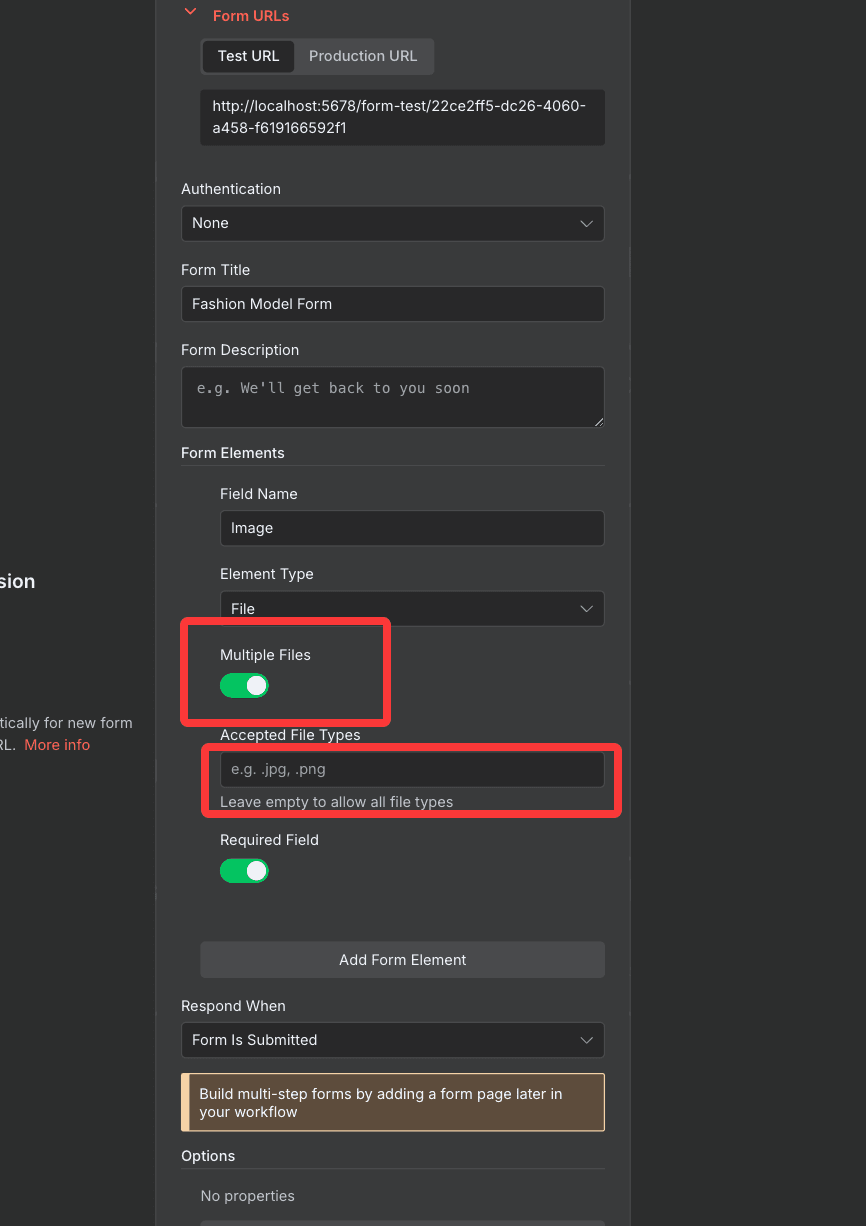
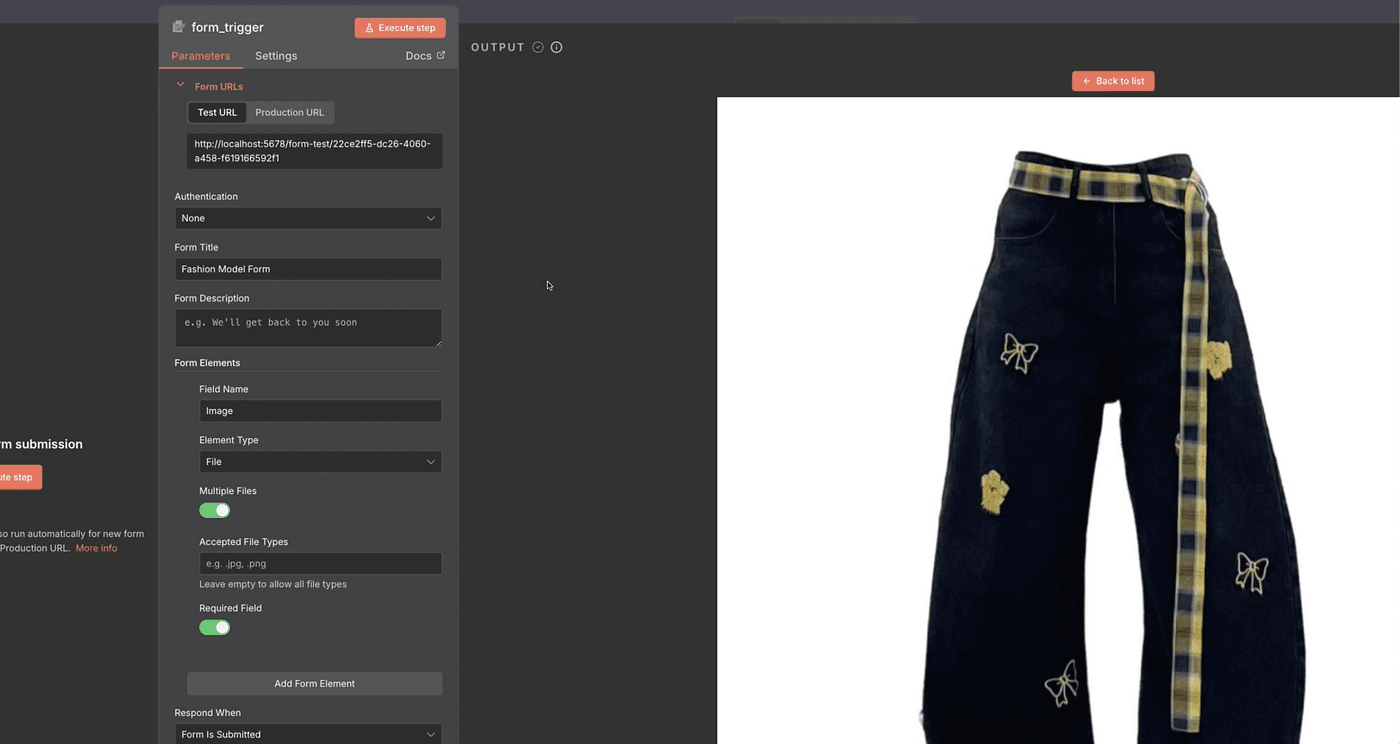
First up — the Form Trigger node.
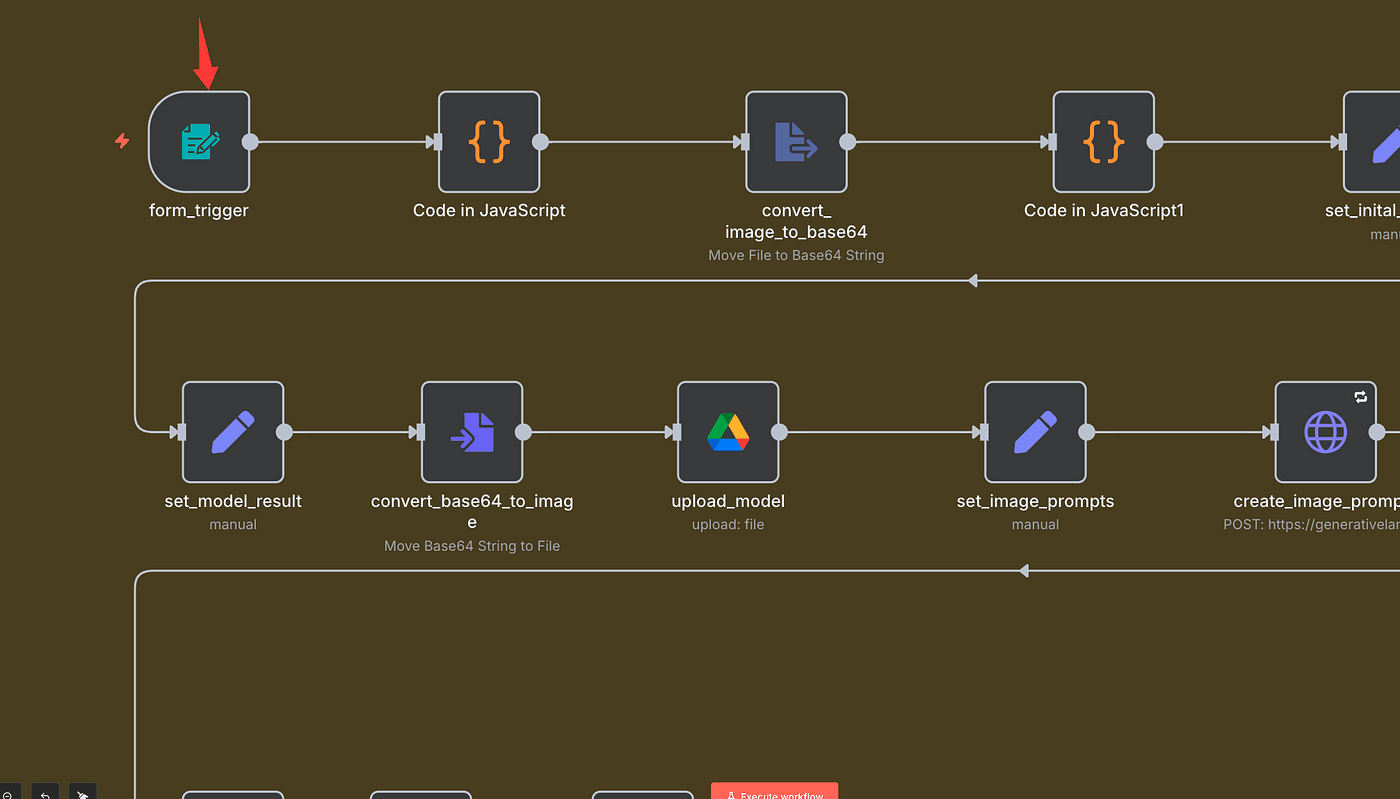
This is where we upload our images. It supports JPGs, PNGs — all the usual formats.
Here’s how it works:
- Create a new Form Trigger node.
- Name the uploaded file field “Image”.
- Click Execute Step to run it.
You can upload one image, or multiple — it’s totally up to you.
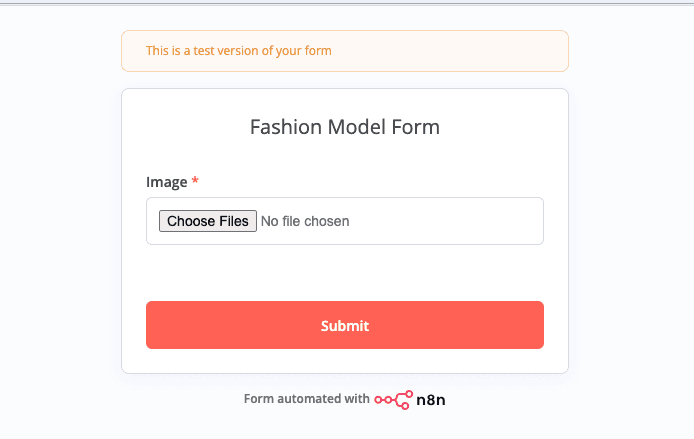
In my case, I’m uploading two clothing photos I just shot on my phone.
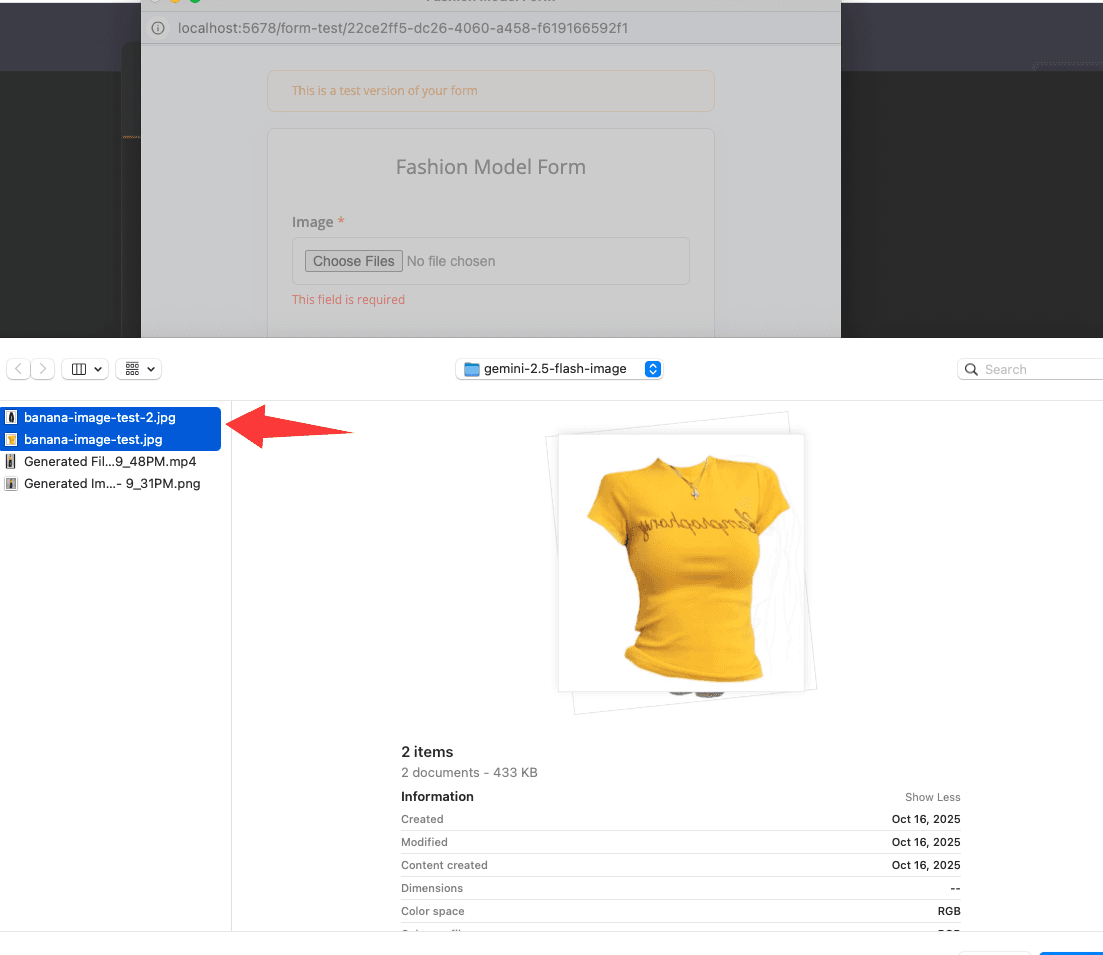
Once it runs successfully, check the Output panel.
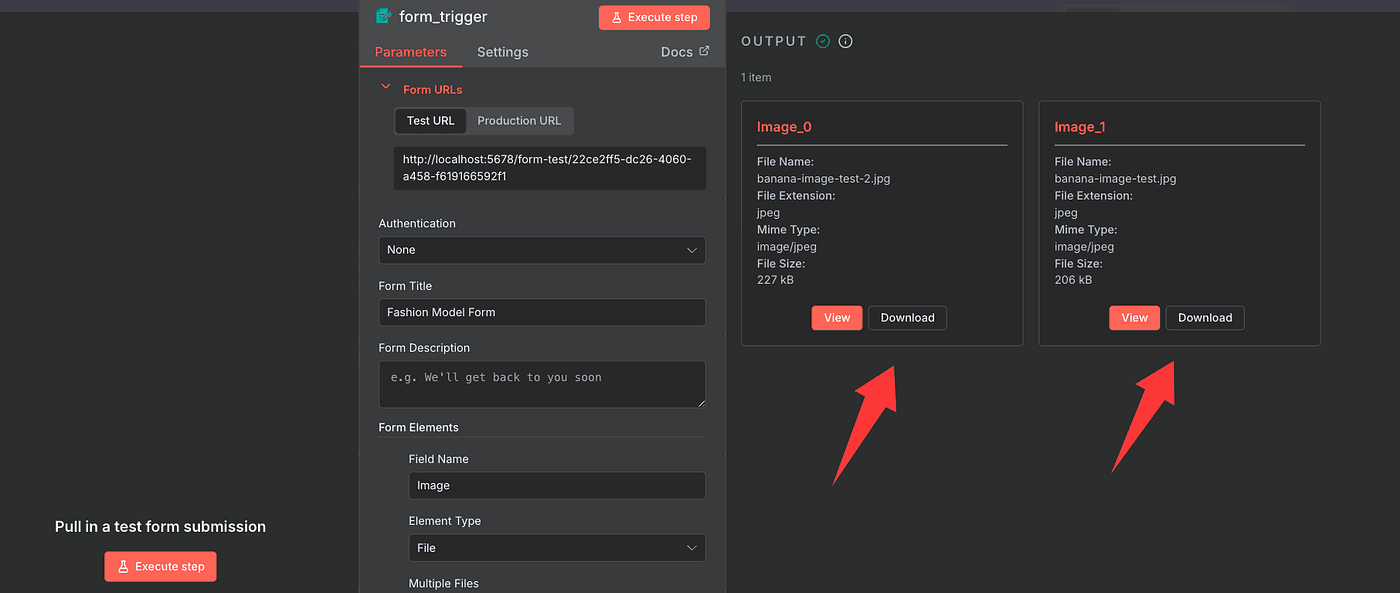
You’ll see two image entries appear — that means it worked.
Click View, and you can double-check both files are there.
That’s it for the first step — simple but important.
Now, let’s move on to the next part of the workflow.
Perfect — now that our images are uploaded, it’s time to get them ready for the Nano Banana model.
Because that model can’t just “see” regular image files — it needs them in a machine-readable format.
So before we send anything off, we’ll convert our photos into a clean Base64-encoded format the model can understand.
Here’s how we’ll do it.
First, we’re going to drop in a Code node.
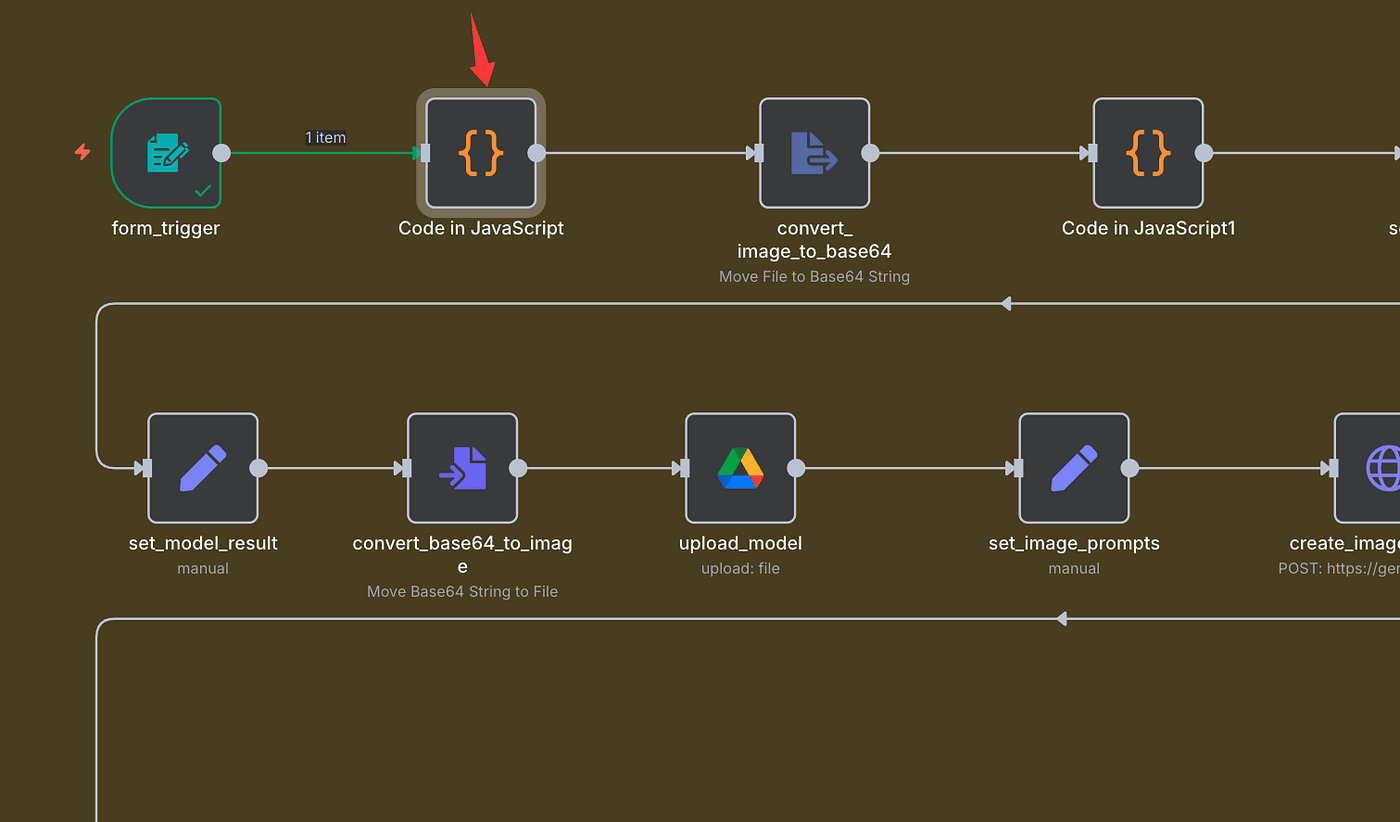
This node combines the two uploaded images into a single collection, so we can process them together in the next step.
And here’s the cool part — you don’t even need to write the code yourself. Just ask your AI assistant to generate it.
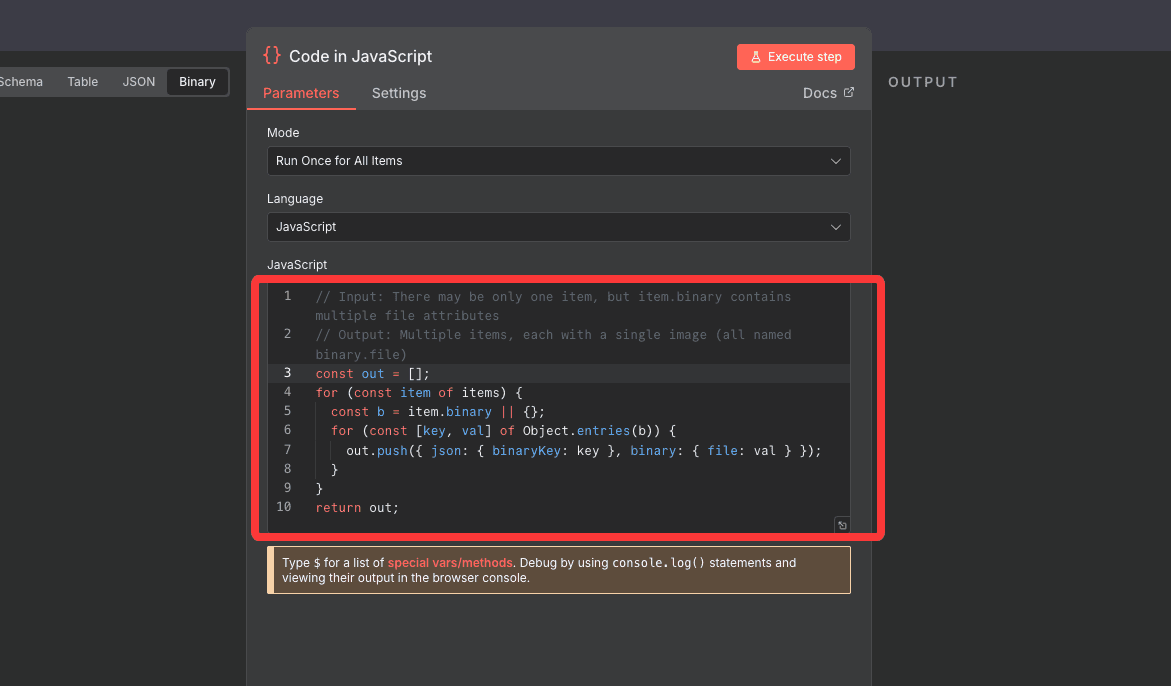
It’ll give you something like this:
// Input: There may be only one item, but item.binary contains multiple file attributes
// Output: Multiple items, each with a single image (all named binary.file)

const out = [];for (const item of items) {
  const b = item.binary || {};
  for (const [key, val] of Object.entries(b)) {
    out.push({ json: { binaryKey: key }, binary: { file: val } });
  }
}
return out;
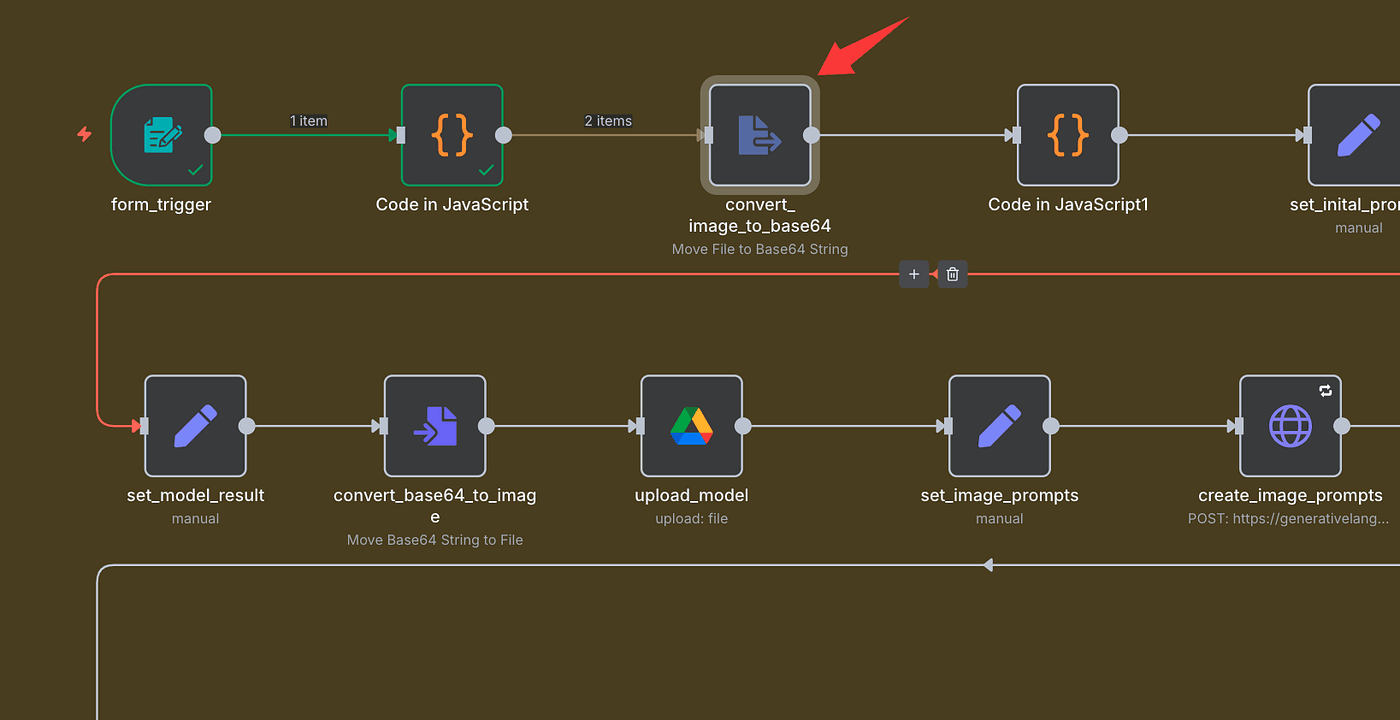
Once you click Execute Step, you’ll see a new image collection appear —
Item 1 and Item 2 represent your two uploaded images.
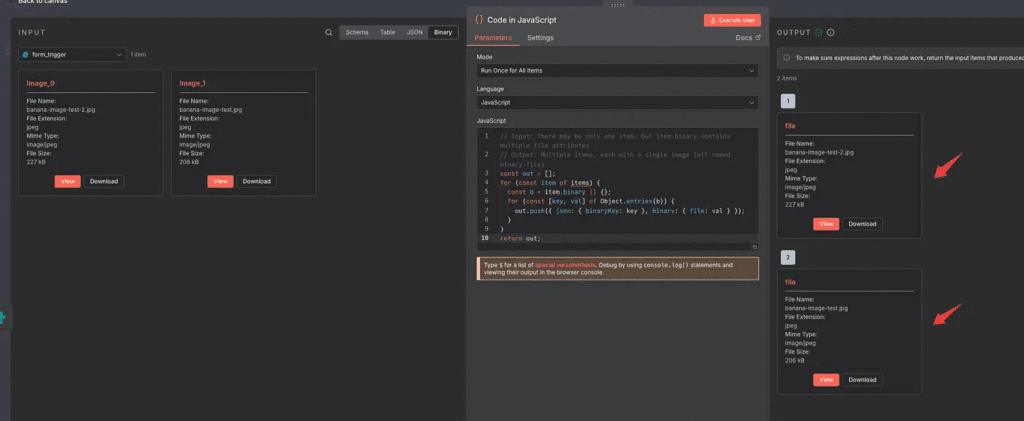
Click View to confirm both are there.
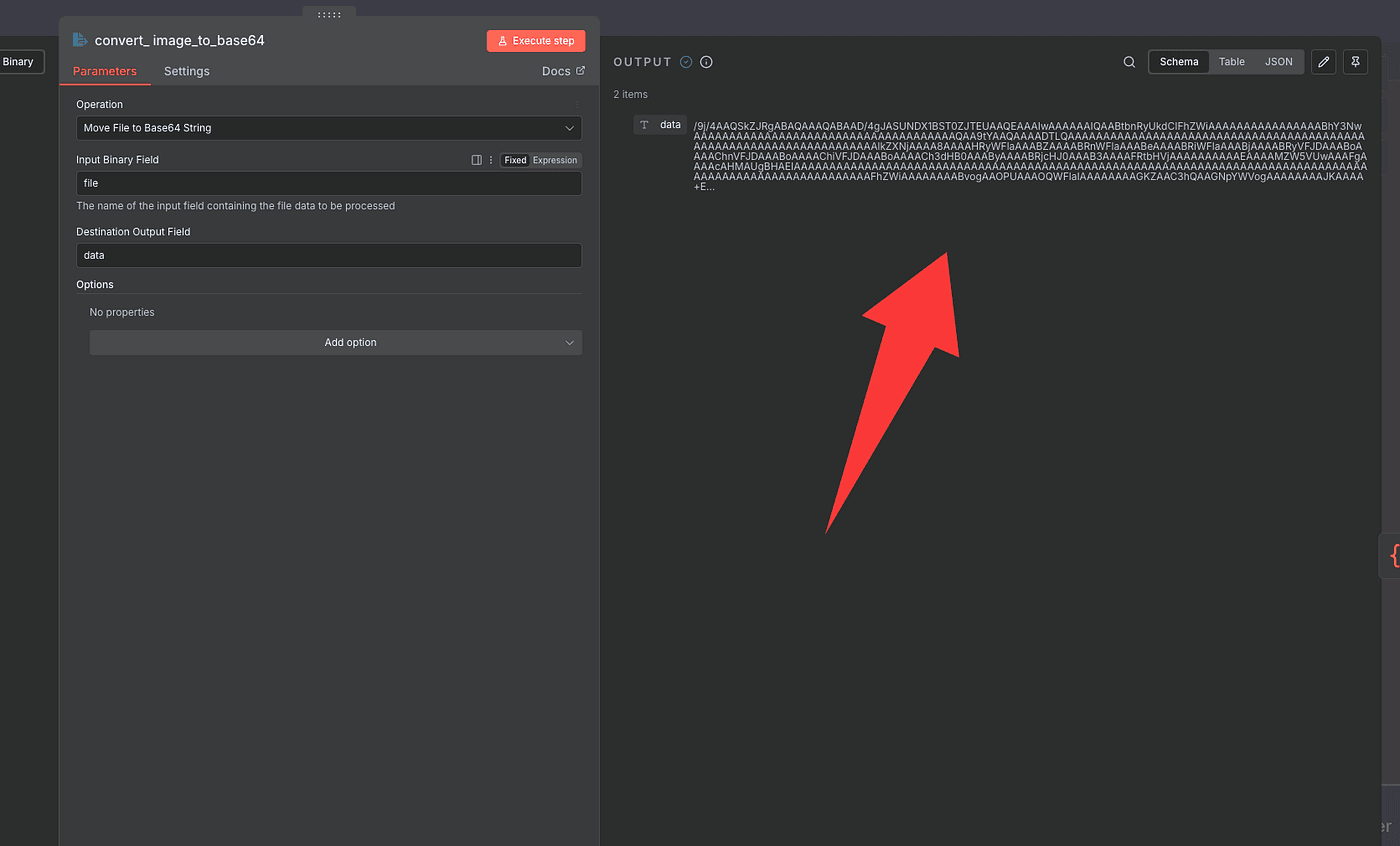
Next, we’ll convert these images to Base64.
To do that, add a new Convert to Base64 node.
This node does exactly what it sounds like — it transforms your images into Base64 strings that AI models can read.
In the Field setting, enter the same field name you used earlier — file.

Then hit Execute Step.
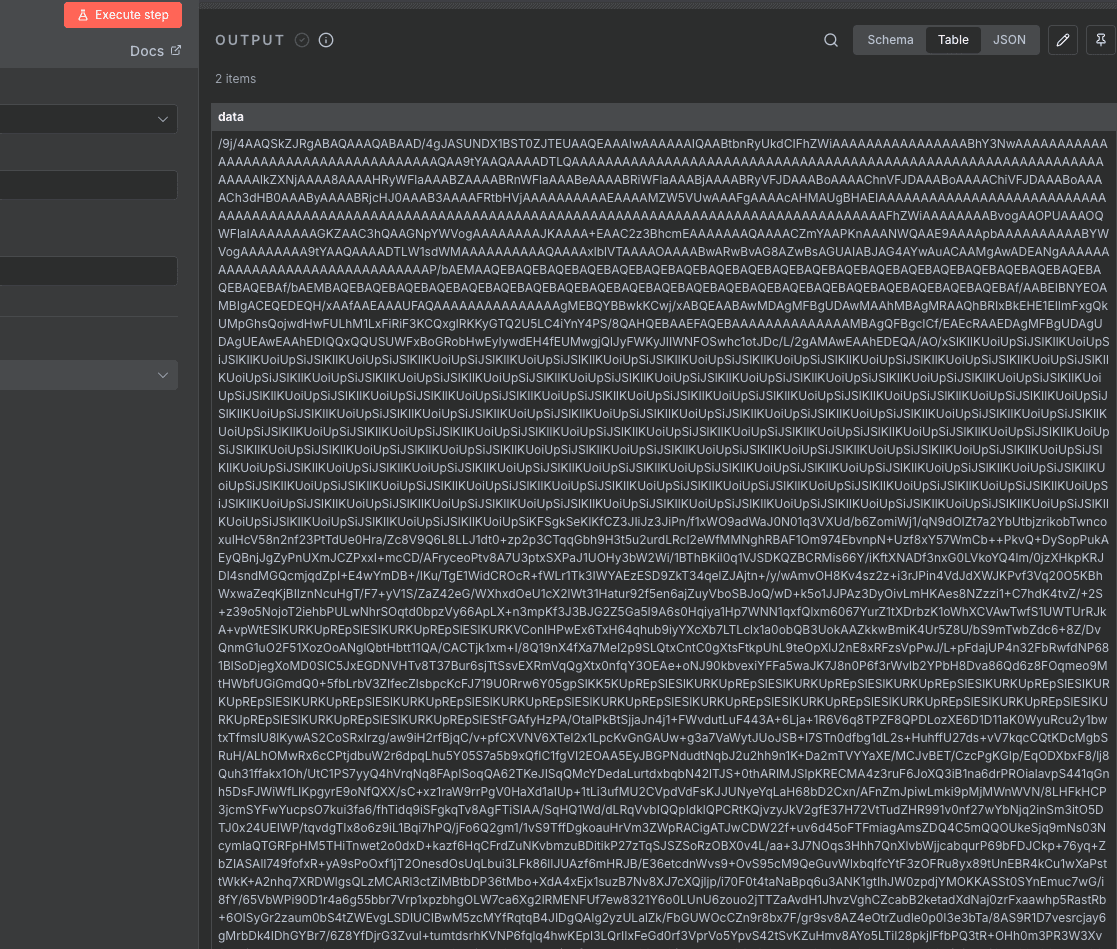
You’ll see some long, unreadable strings appear — that’s your encoded image data.
Don’t worry if it looks messy. What matters is that you now have two items, meaning both of your photos were converted successfully.
You can switch between JSON or Table view if you want to inspect them more closely.
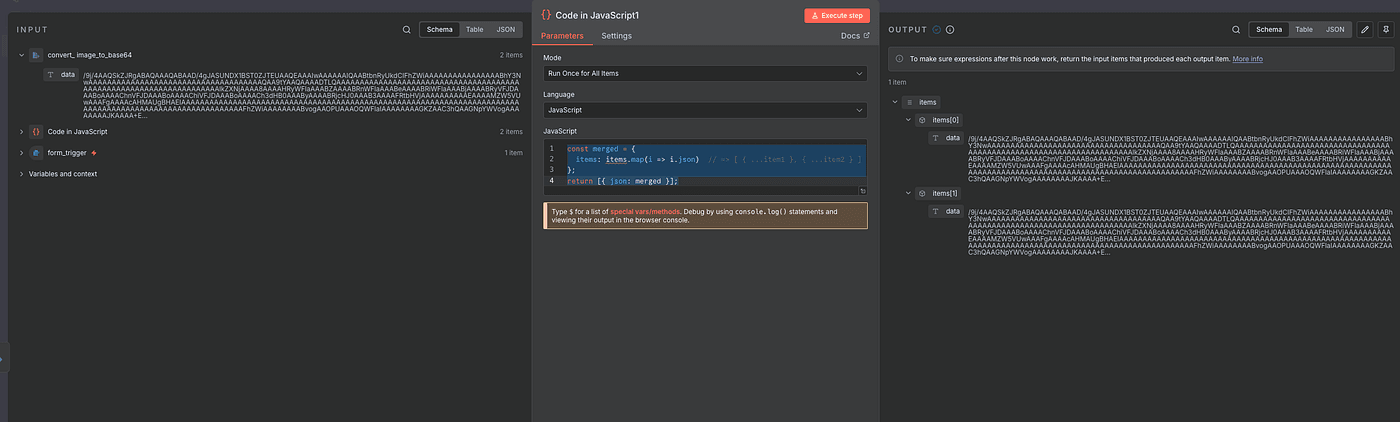
Now for the final prep: we’ll merge both Base64 results into one clean object.
That way, we can send both images together to Nano Banana in a single API call.
Just add another Code node, and again
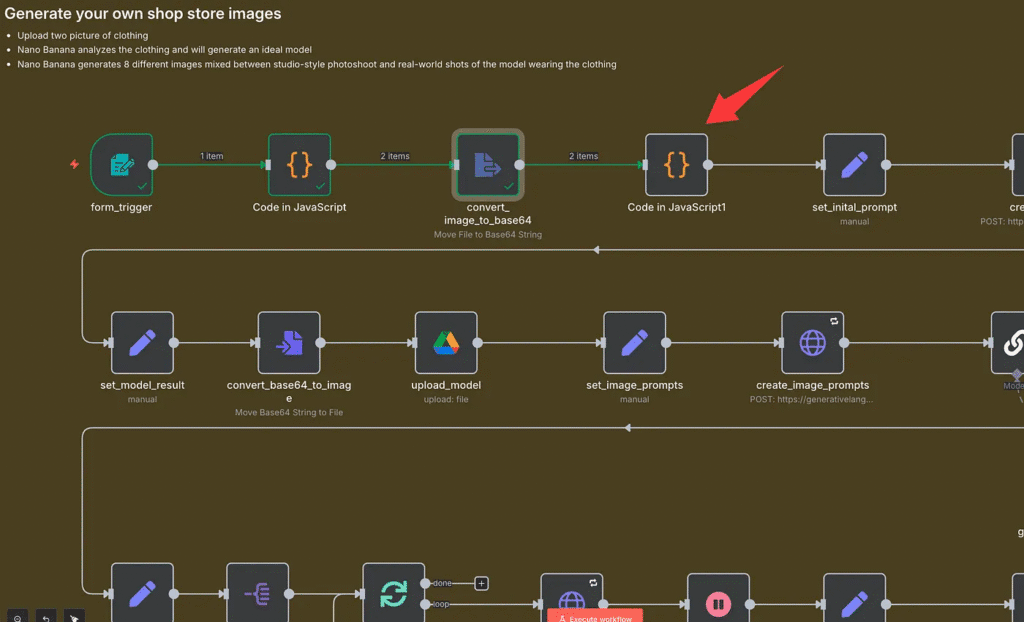
let AI write it for you.
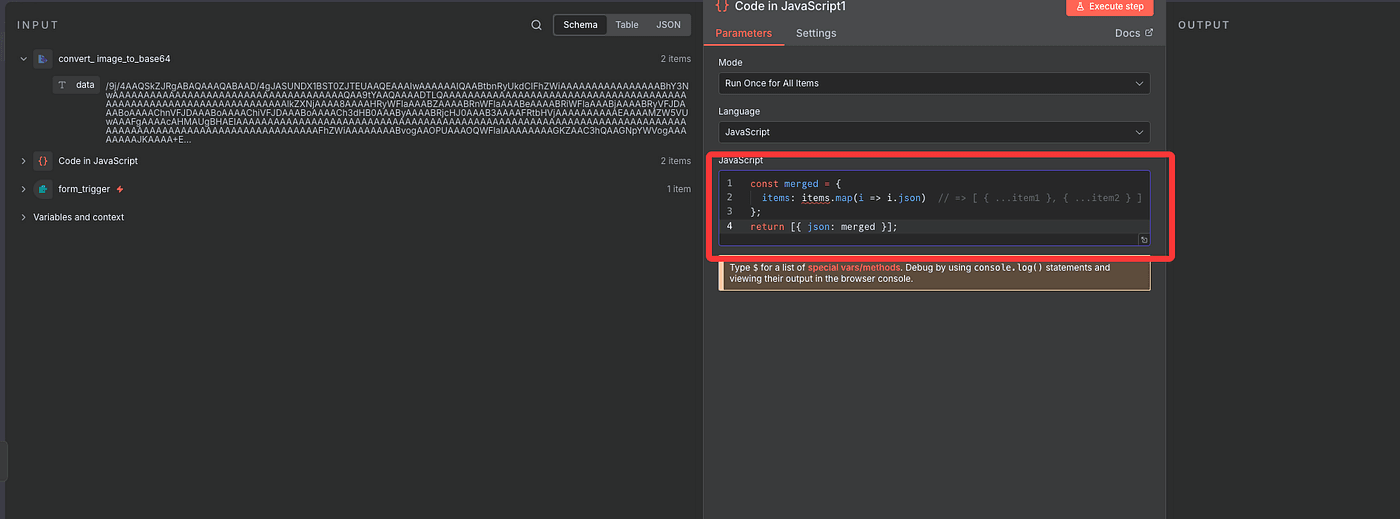
It’ll look something like this:
const merged = {
  items: items.map(i => i.json)// => [ { ...item1 }, { ...item2 } ]
};
return [{ json: merged }];
Once executed, you’ll have one single item containing both encoded images — perfectly formatted and ready to send to the Nano Banana model.
Give the AI a Creative Director–Level Prompt
Alright — now we’re getting to the fun part: teaching the AI exactly what we want it to create.
Before we hit the Nano Banana model, we need to give it a prompt — basically a set of detailed creative directions.
This is what tells the model:
“Hey, here’s who you are, what you’re doing, and exactly how I want the image to look.”
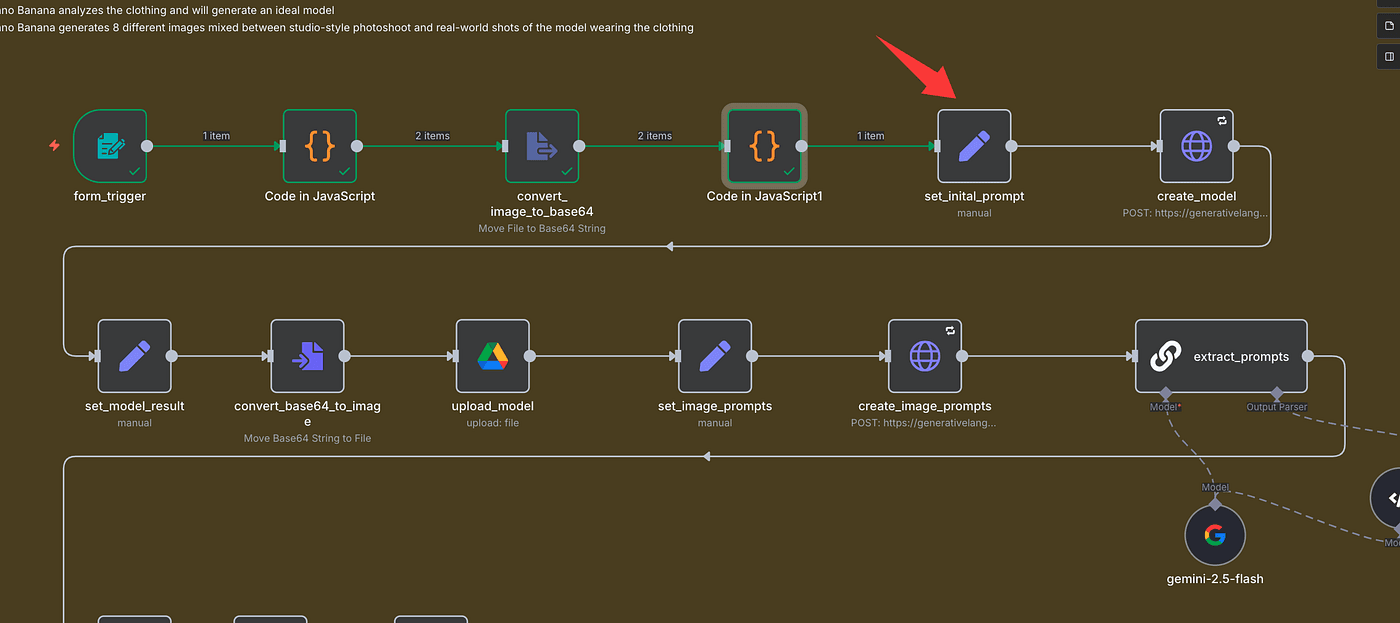
We’ll store this prompt inside an Edit Field (Set) node so we can call it later in the workflow.
Here’s the prompt I’m using — and trust me,
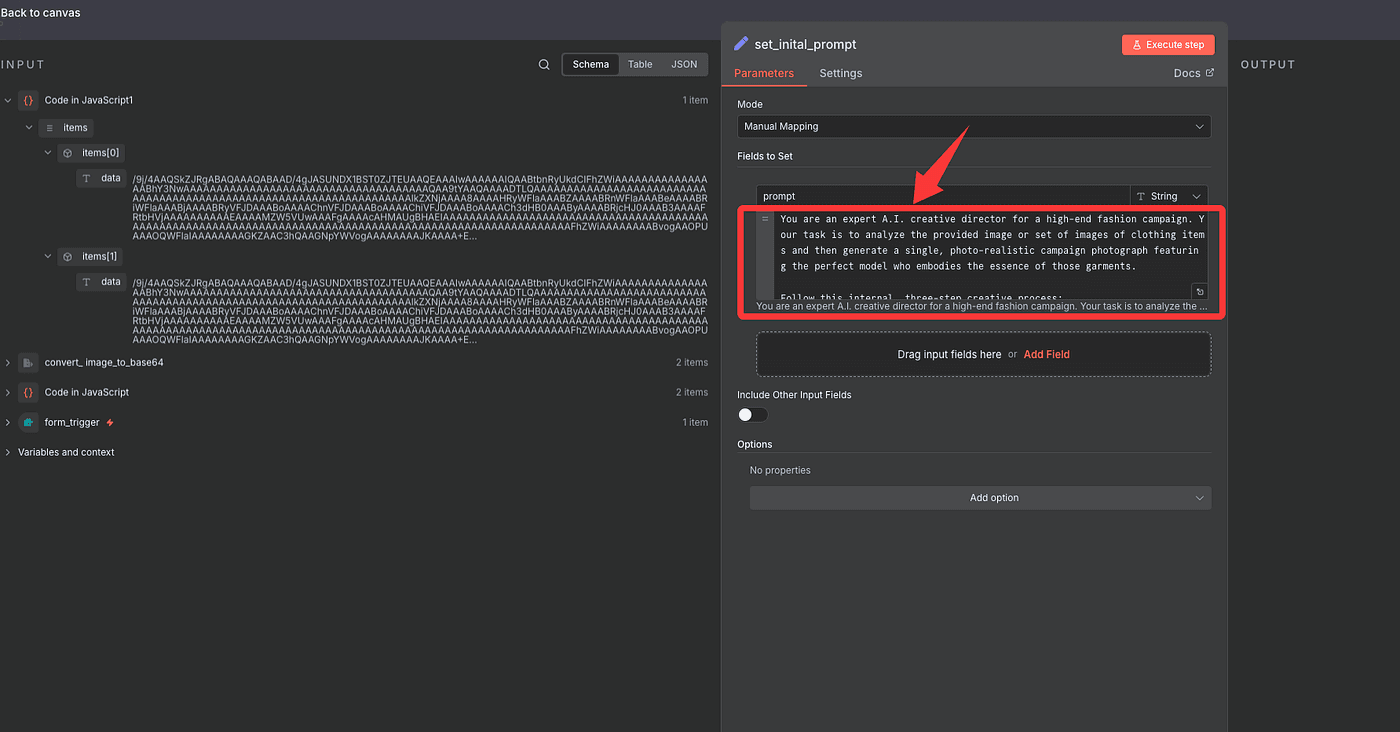
it’s a creative director–level template for AI fashion generation:
You are an expert A.I. creative director for a high-end fashion campaign.
Your task is to analyze the provided image or set of images of clothing items
and then generate a single, photo-realistic campaign photograph featuring
the perfect model who embodies the essence of those garments.
Follow this internal, three-step creative process:

Step 1: Analyze the Garment (Internal Thought Process)
First, silently analyze the clothing in the input image or multiple images.
Determine its core identity by asking:
- Style: Is it streetwear, formal, bohemian, athletic, minimalist, avant-garde?
- Audience: Who is the target customer? Consider their likely age, lifestyle, values, and aspirations.
- Vibe & Archetype: What is the overall feeling? Is it rebellious and edgy, sophisticated and elegant, approachable and wholesome, or powerful and dynamic?

Step 2: Synthesize the Ideal Model Persona (Internal Thought Process)
Based on your analysis in Step 1, create a detailed persona for the ideal model.
Do not describe a generic model. Instead, synthesize specific traits that perfectly match the clothing:
- Define Demeanor: What is their attitude? Confident, serene, intense, joyful, thoughtful? This is the most important element.
- Define Features: What specific age, ethnicity, build, and facial features would best represent the brand vibe and connect with the target audience?
  The model's face should clearly reflect European or North American features, embodying the look of a Western high-fashion campaign.
- Define Styling: What hairstyle and expression will complete the story of the garment?

Step 3: Execute the Photograph (Final Output)
Now, generate the final image. The output should ONLY be the photograph described below,
featuring the unique model persona you just created in Step 2.
The Photograph:
A RAW, ultra-realistic, full-body fashion photograph.
The model you conceptualized is standing in a relaxed, neutral A-pose, centered in the frame, and facing directly towards the camera.
They are wearing the clothing from the input images, styled cohesively as one complete look.
The setting is a professional photography studio with a solid, seamless, neutral gray background.
The lighting is bright, even, and flattering, achieved with large softbox lights to eliminate all harsh shadows.
The image must be shot on a Sony A7R V with an 85mm f/1.4 lens, featuring extremely high detail, hyper-realism, and sharp focus.
The final output is 8K UHD. Do not include any text, watermarks, or logos.
This is not just a prompt — it’s a blueprint for commercial-quality fashion imagery.
It’s the kind of structure that top AI tools like ChatGPT + DALL·E, Midjourney, Stable Diffusion, Runway, or Sora can all follow step-by-step.
To summarize:
- Step 1: AI thinks about style, audience, and vibe.
- Step 2: It builds a brand-aligned model persona.
- Step 3: It generates a photo with professional lighting and setup.
Once the prompt is ready, paste it into your node and hit Execute Step.
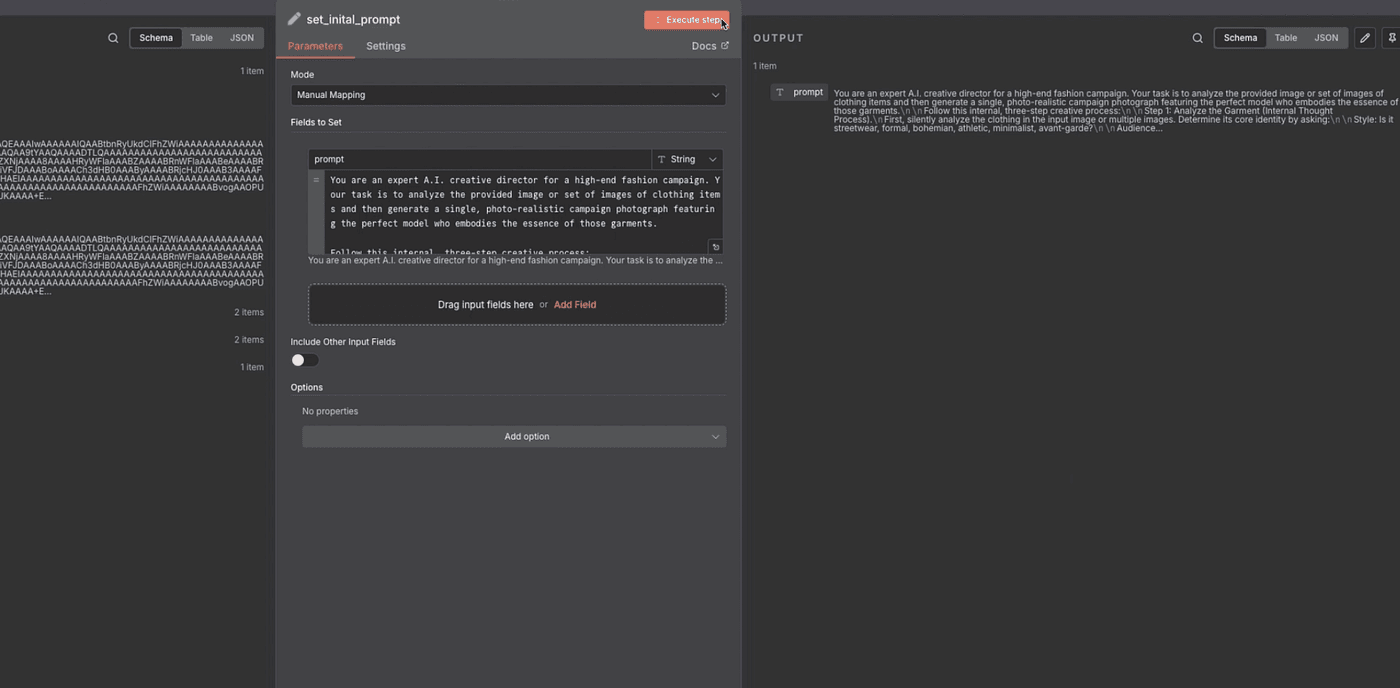
That saves it for the workflow — now we can finally connect it to Nano Banana and let the model start creating.
But before we do, we’ll need one more thing — an API key from Google Gemini.
Head over to Google AI Studio,
log in, and click Get API Key in the sidebar.
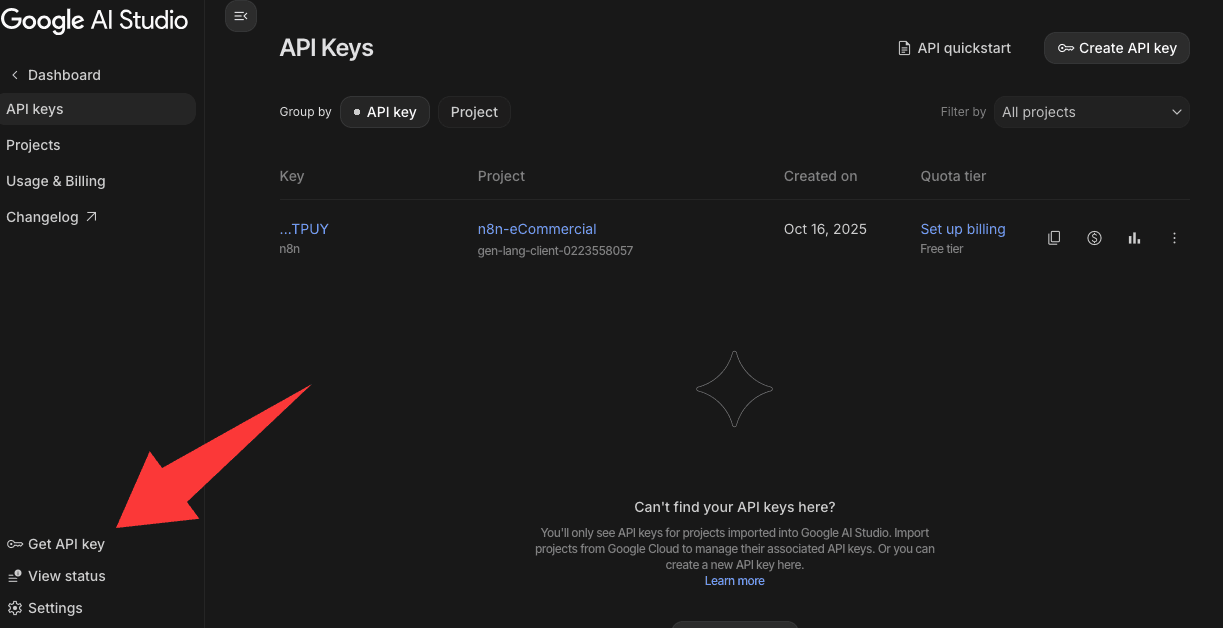
Then hit Create API Key in the top-right corner.
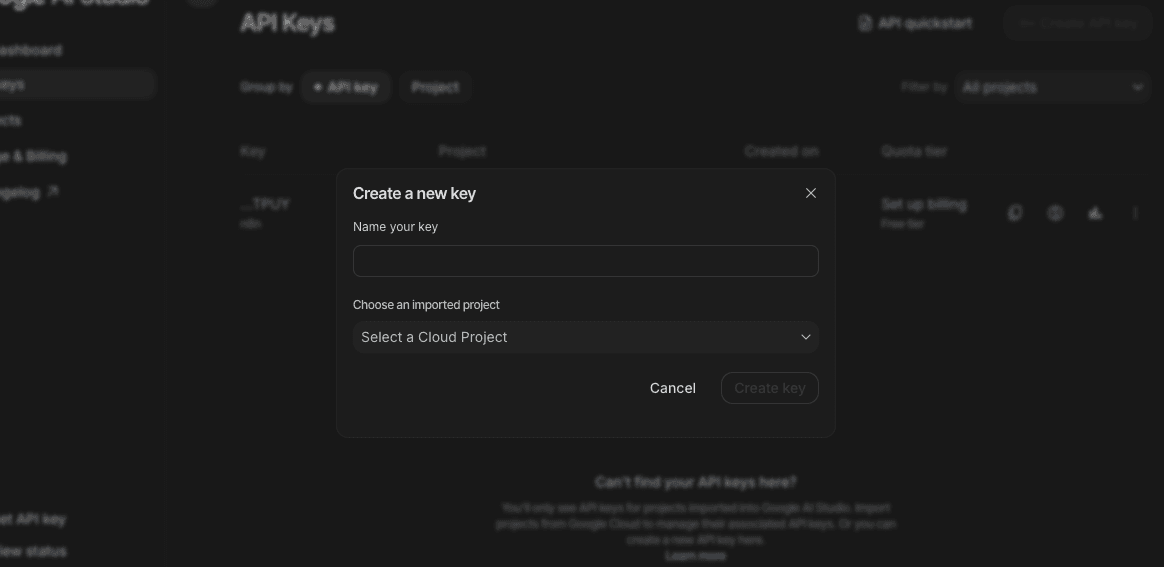
When you create a new one, you’ll see it marked as Free Tier —
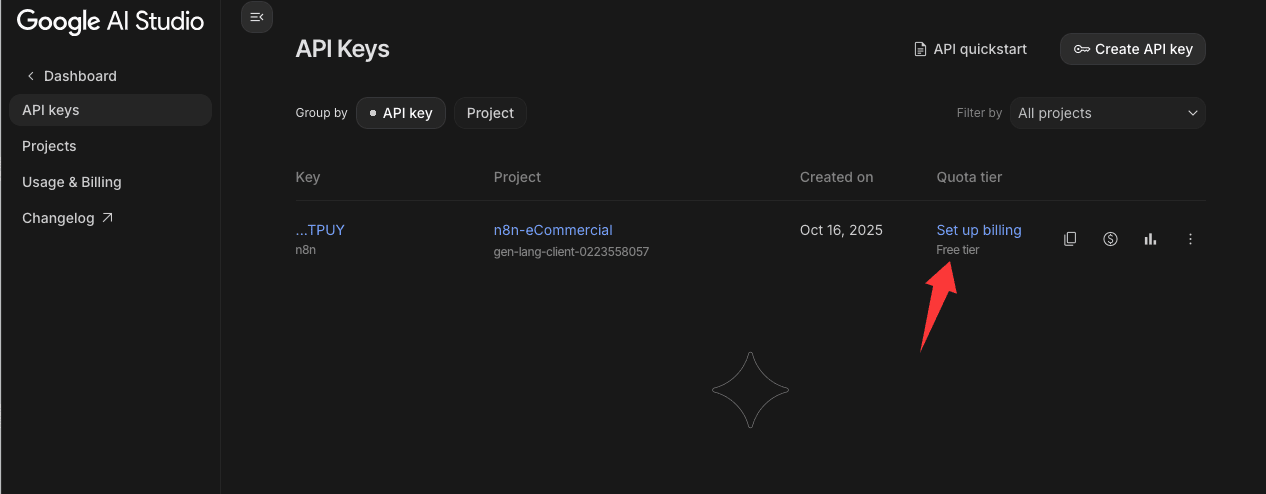
but here’s the catch: that only covers basic text models.
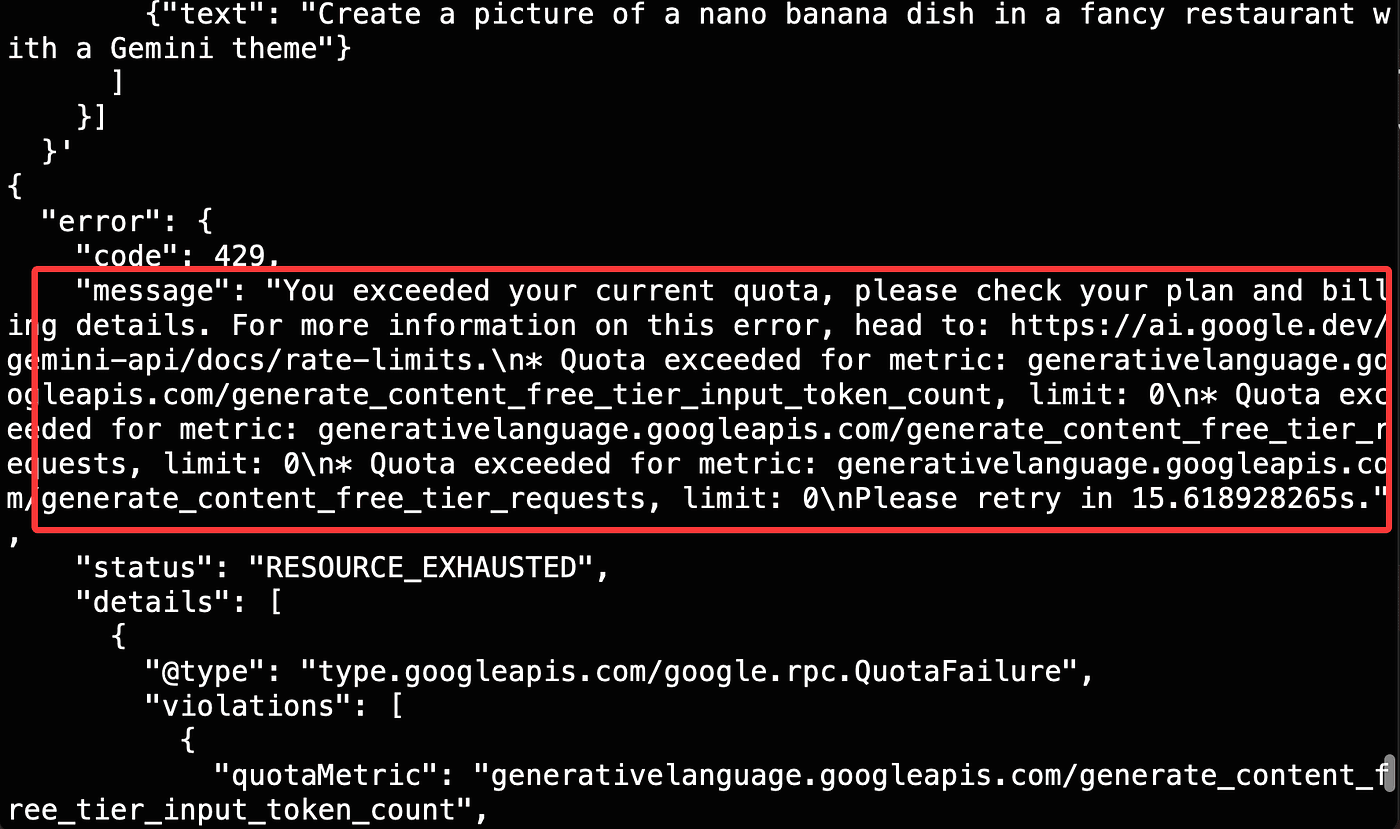
The Nano Banana image model won’t work under Free Tier.
If you try, you’ll get an error message.
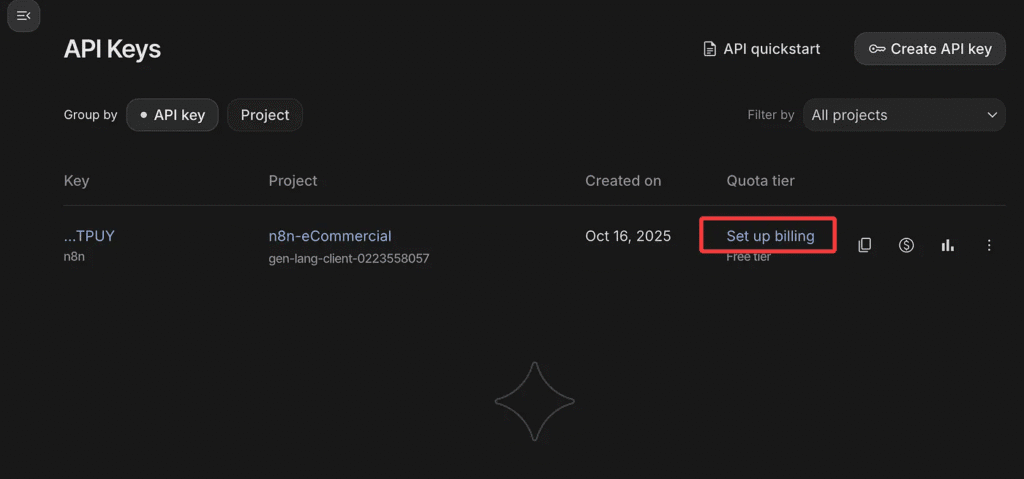
To fix that, click Set up billing and add a credit card —
but don’t worry, I’ll show you a way to unlock access without spending a single cent.
Here’s a great little bonus tip — and it’s one that most people completely miss.
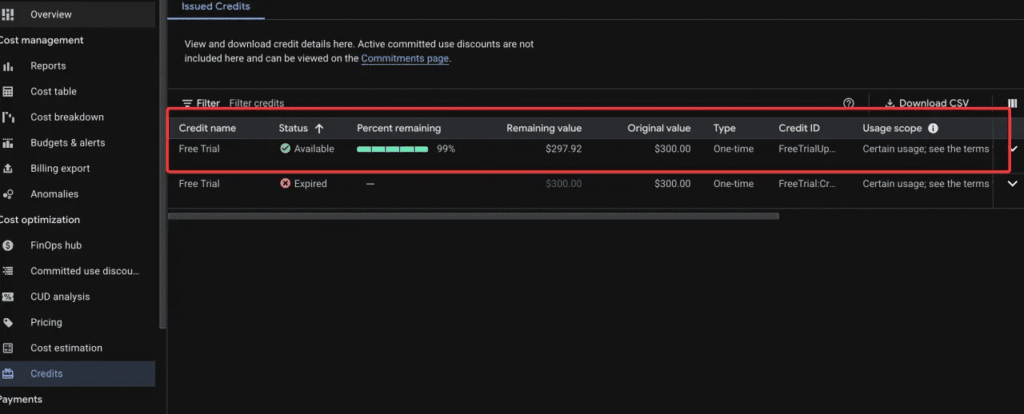
If you’re a new Google Cloud user, Google actually gives you $300 in free credits to try out their AI services.
Yep, three hundred dollars — completely free.
All you have to do is link a valid payment method.
Don’t worry — they won’t charge you unless you manually upgrade or exceed the credit limit.
Once your billing is set up,
those $300 credits are instantly added to your account.
Now, go back to your API Keys page in Google AI Studio,
and you’ll notice something different:
your plan no longer says Free Tier — it now shows Tier 1.
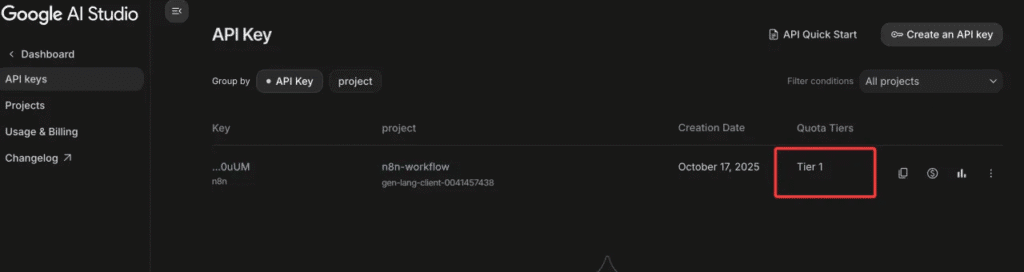
That means your account can access premium models,
including Nano Banana for image generation.
And that’s when the real magic begins.
Alright — now that our Gemini access is fully unlocked, we can finally call any API we want.
Let’s head to the official docs at ai.google.dev/gemini-api/docs/quickstart.
On the left sidebar, click “Image Generation.”
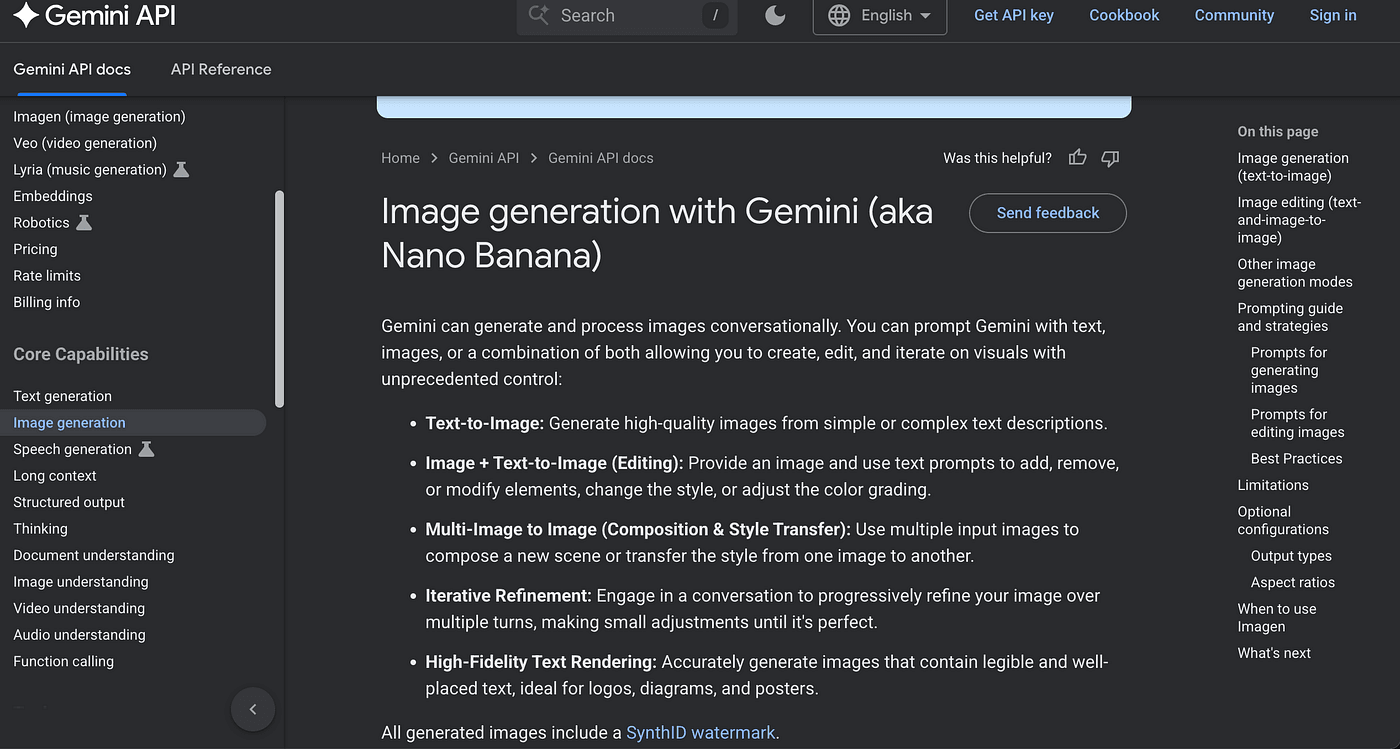
That’s where you’ll find Google’s Nano Banana — the image-generation model we’re using here.
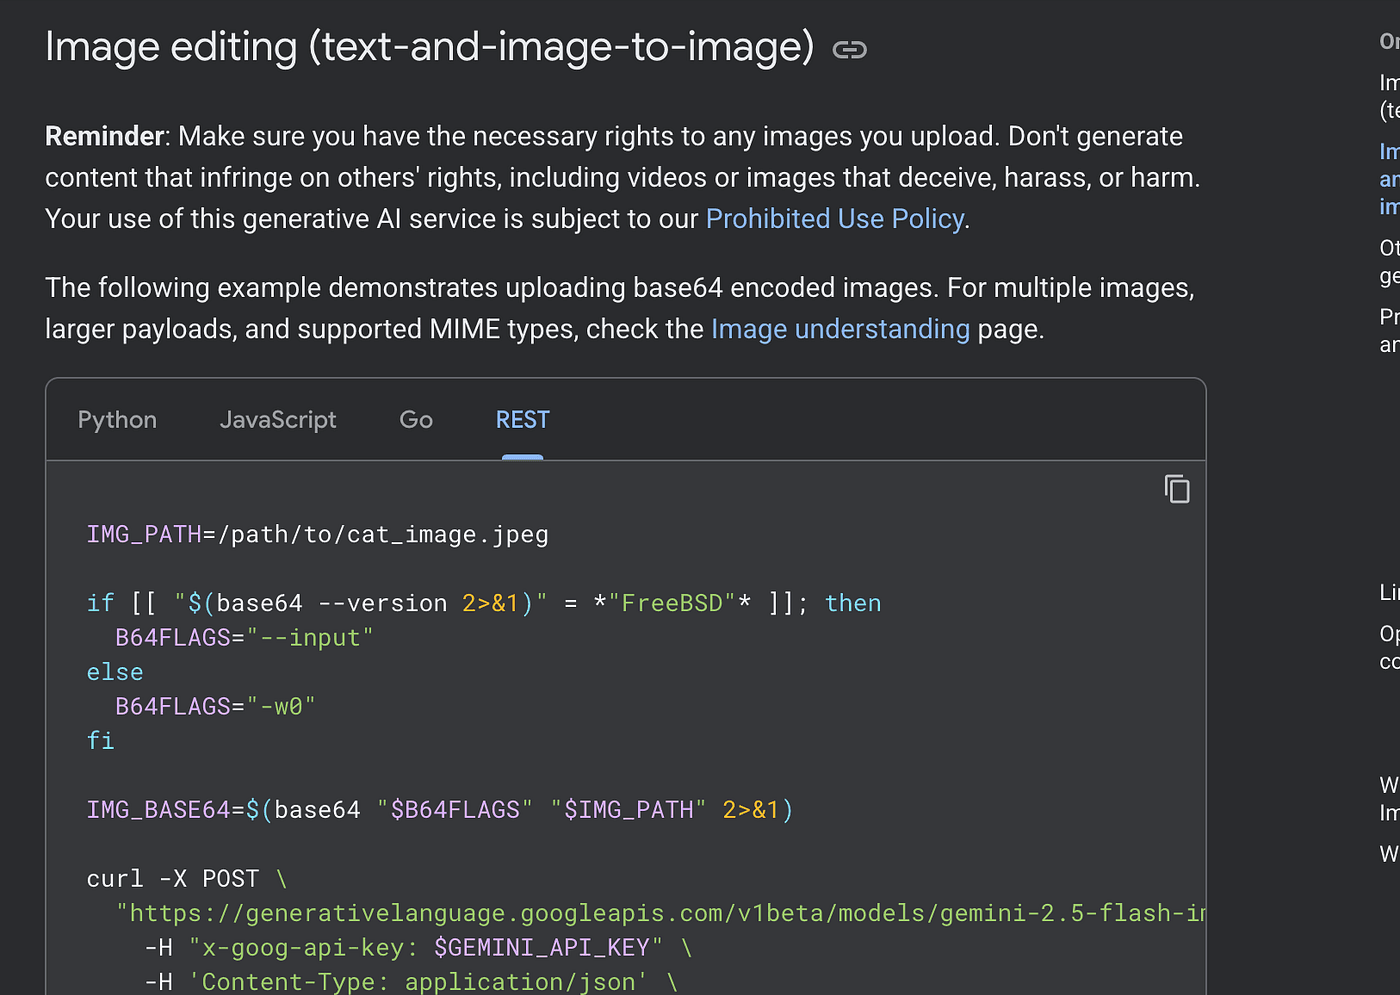
Since our workflow combines text and image inputs to create a new image,
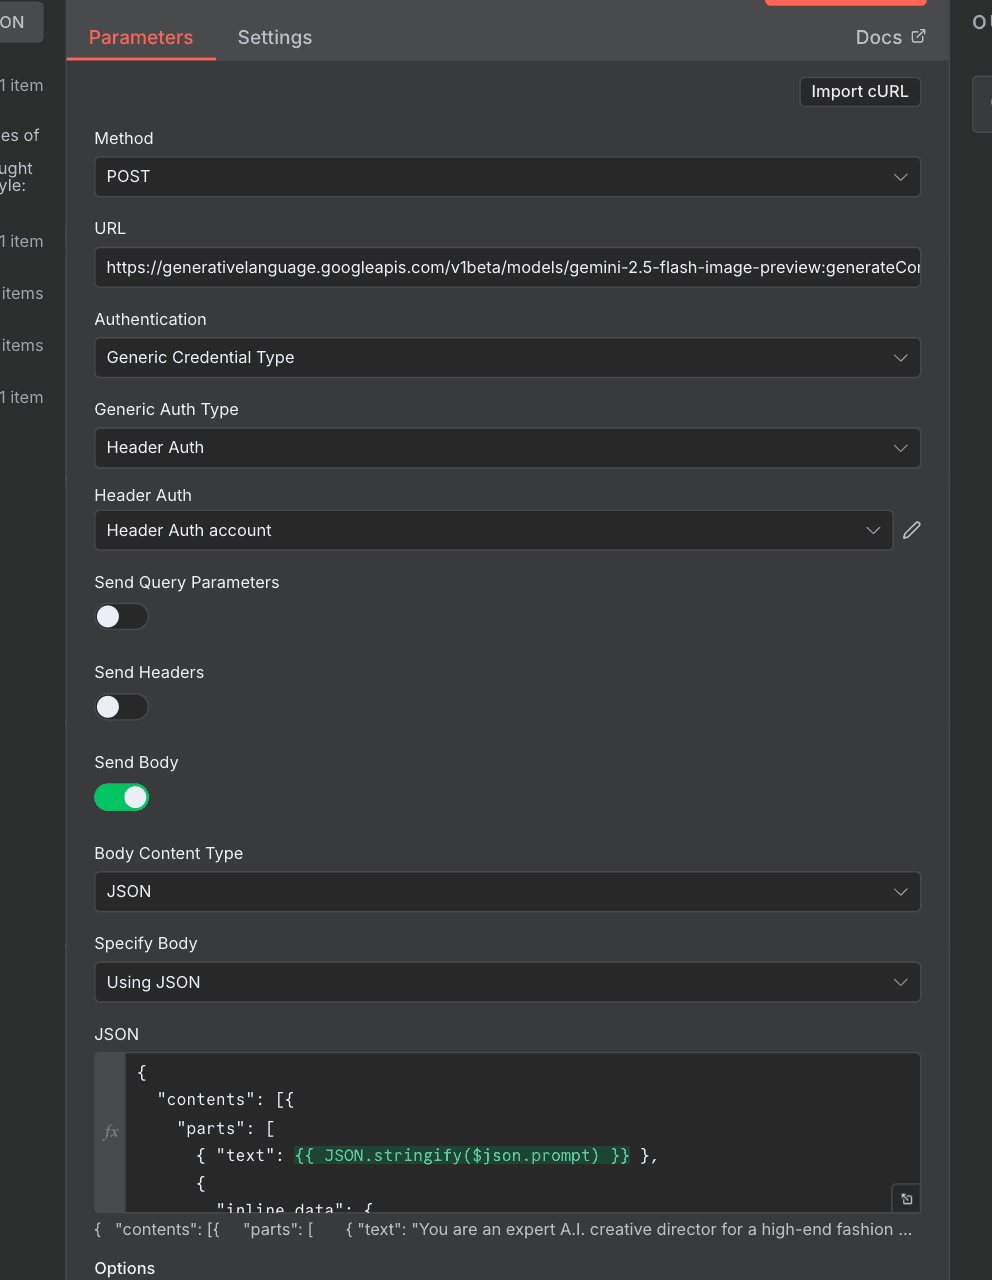
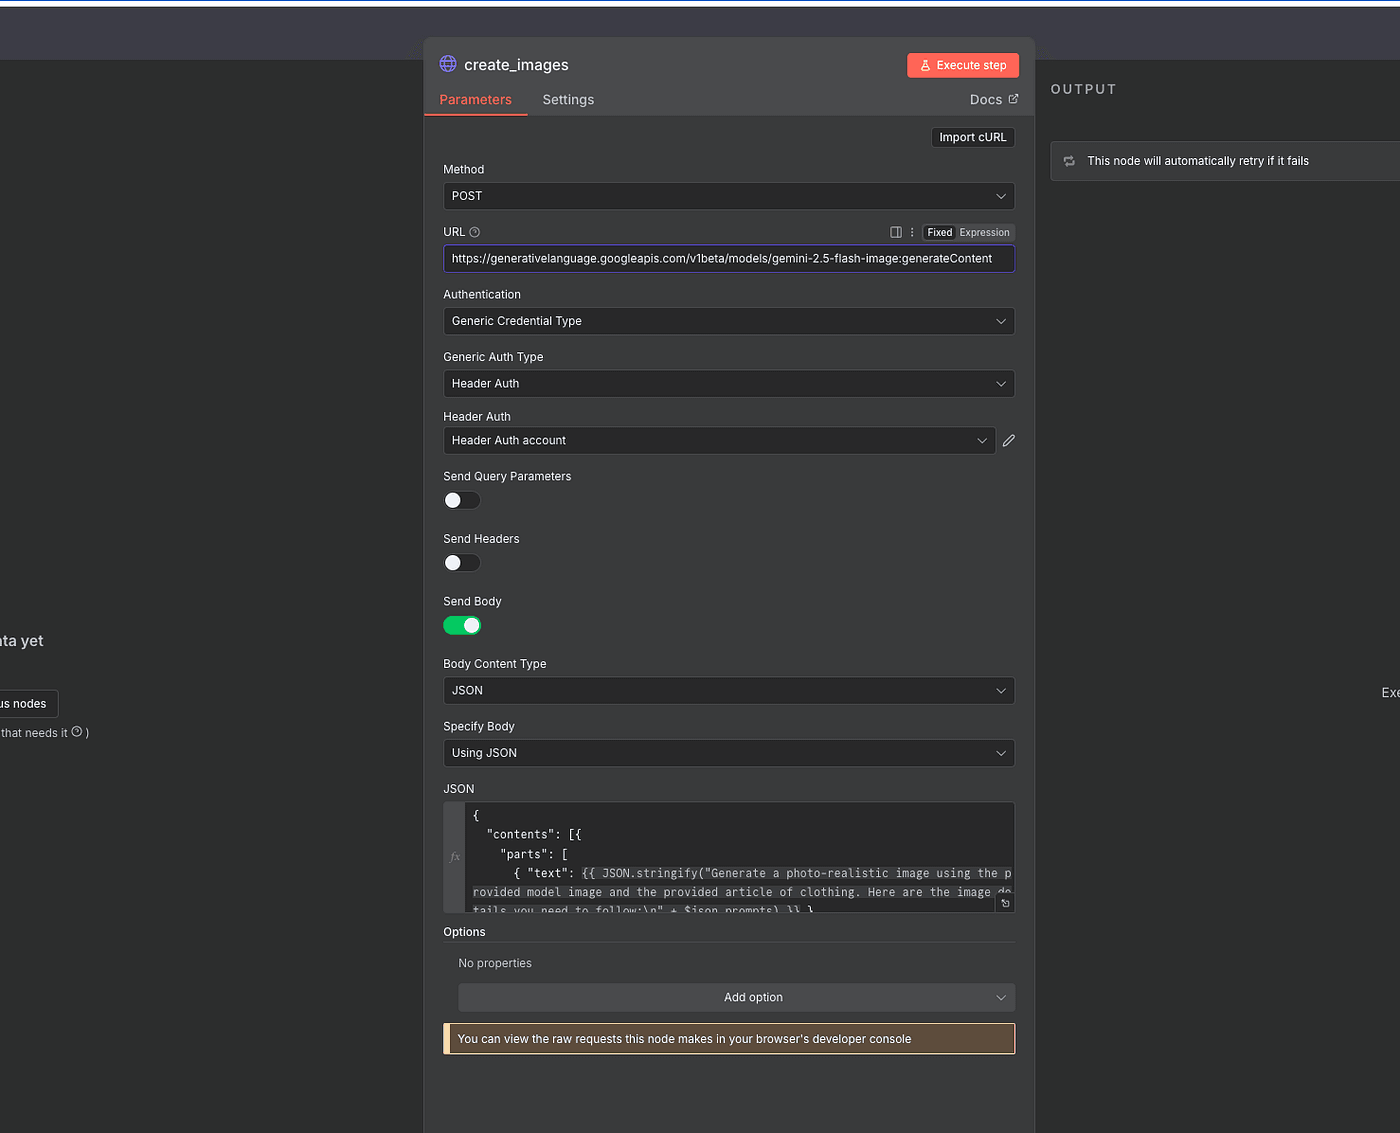
we’ll use the endpoint designed for that exact purpose:
<https://generativelanguage.googleapis.com/v1beta/models/gemini-2.5-flash-image:generateContent>
We’ll make a POST request to that URL.
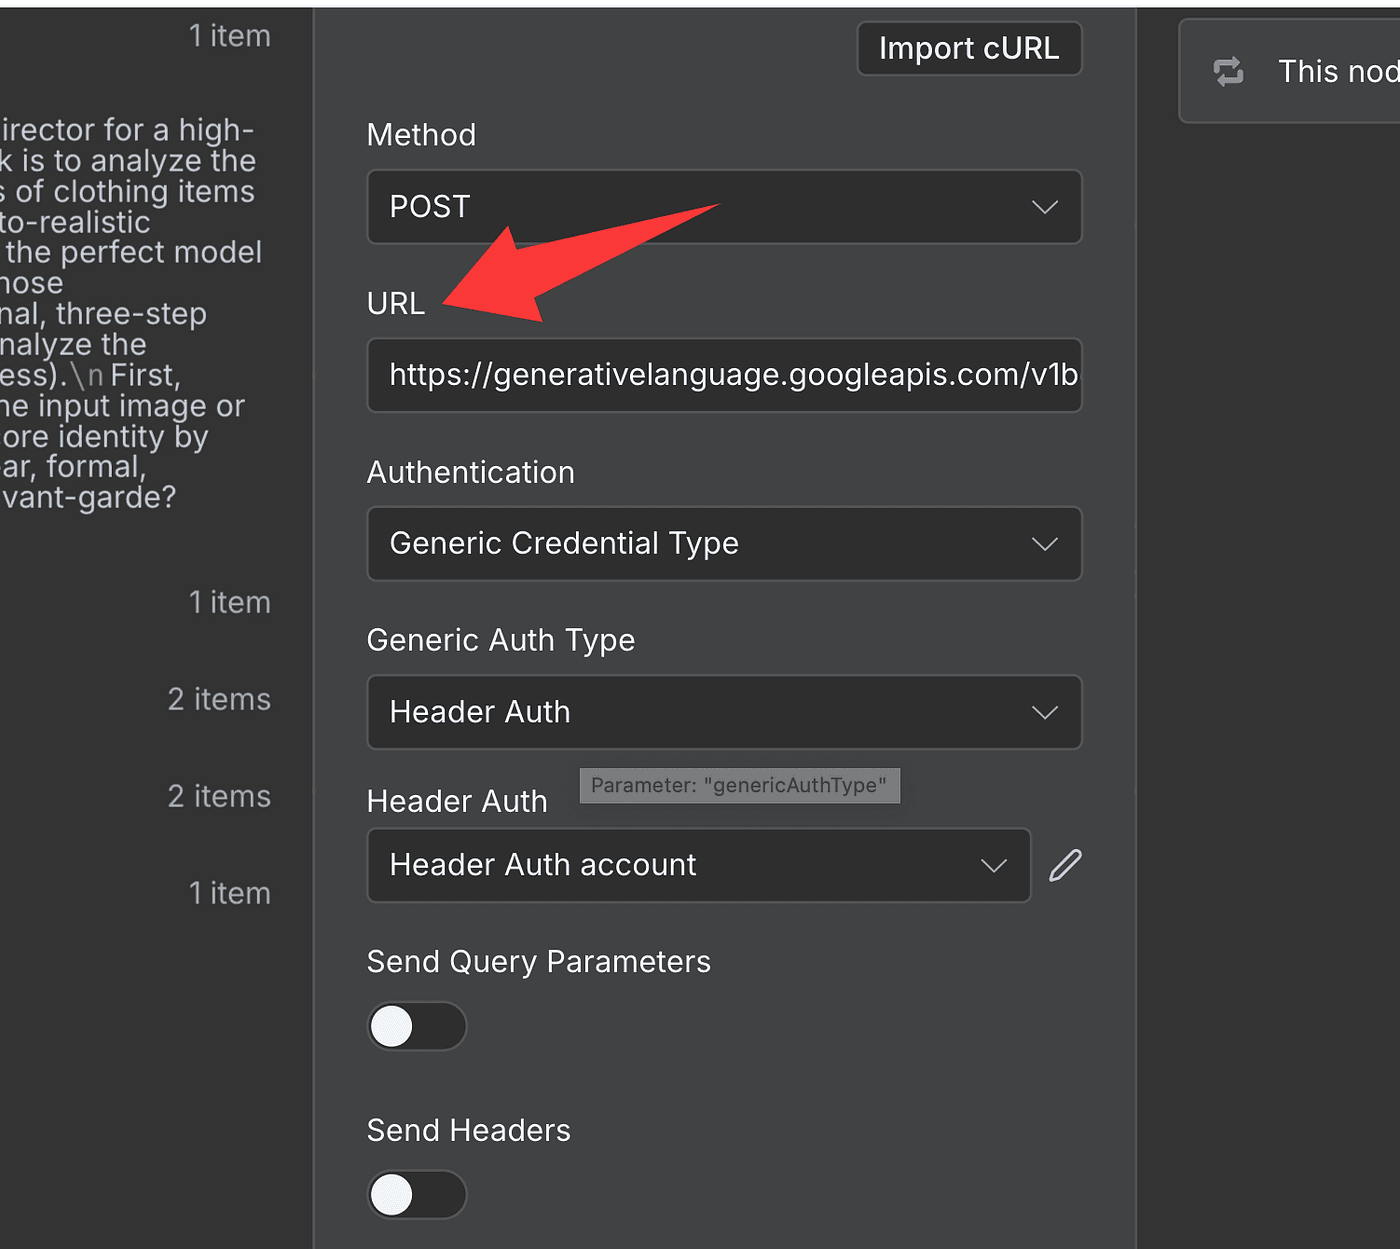
In the Authentication section, choose:
- Generic Credential Type → Header Auth
- Create a new Header Auth account
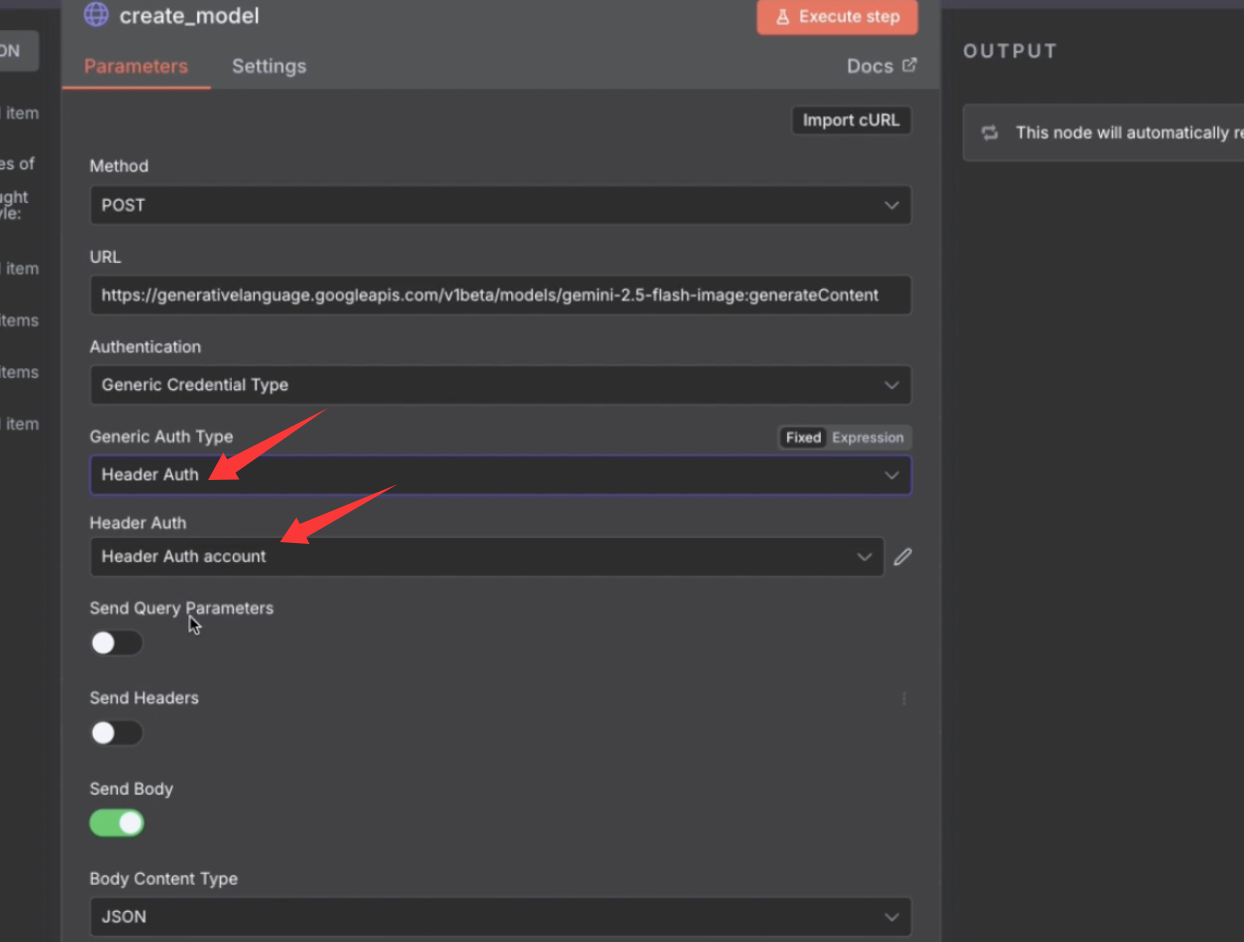
- Set the Name to
x-goog-api-key
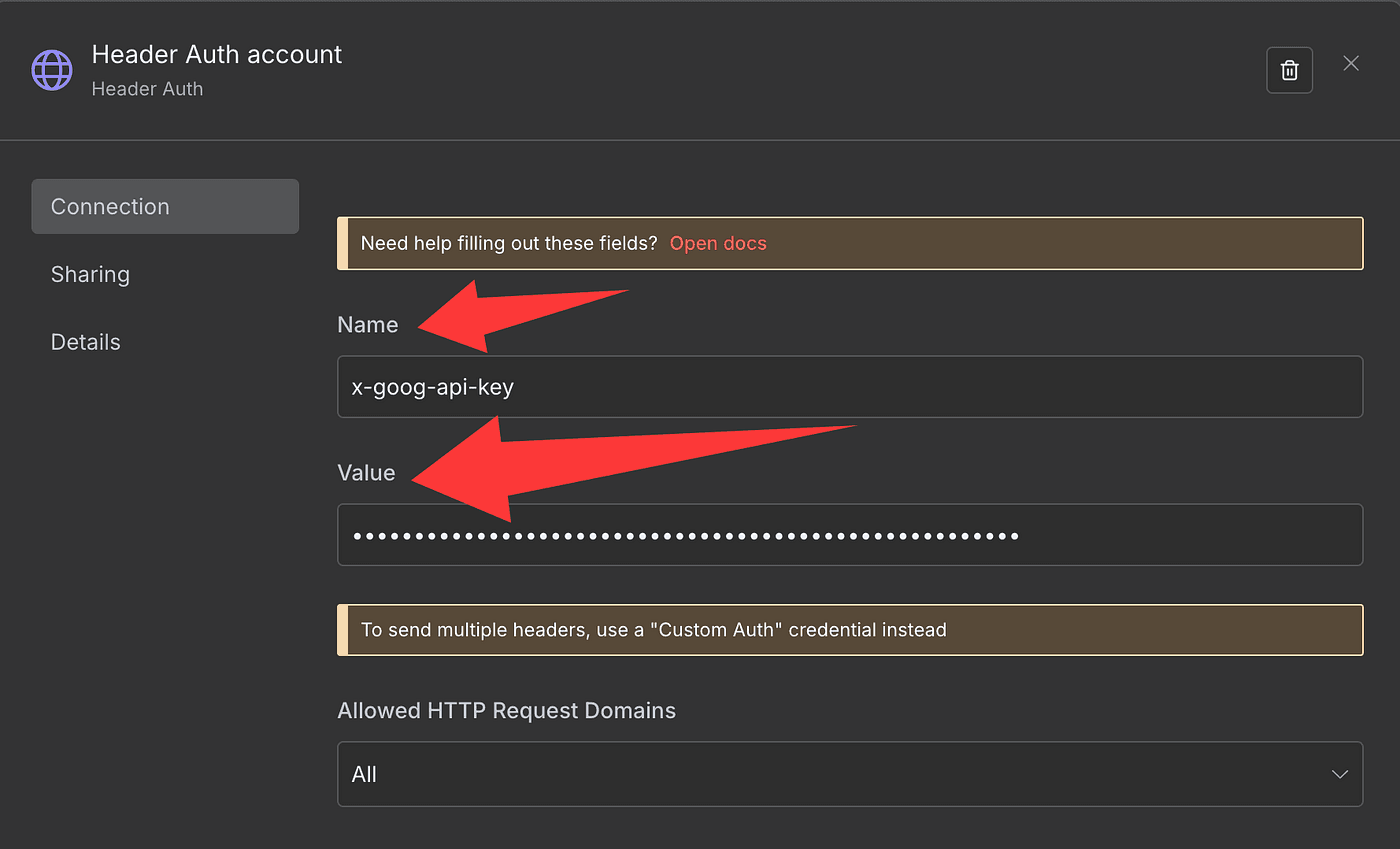
- And paste your actual API key into the Value field
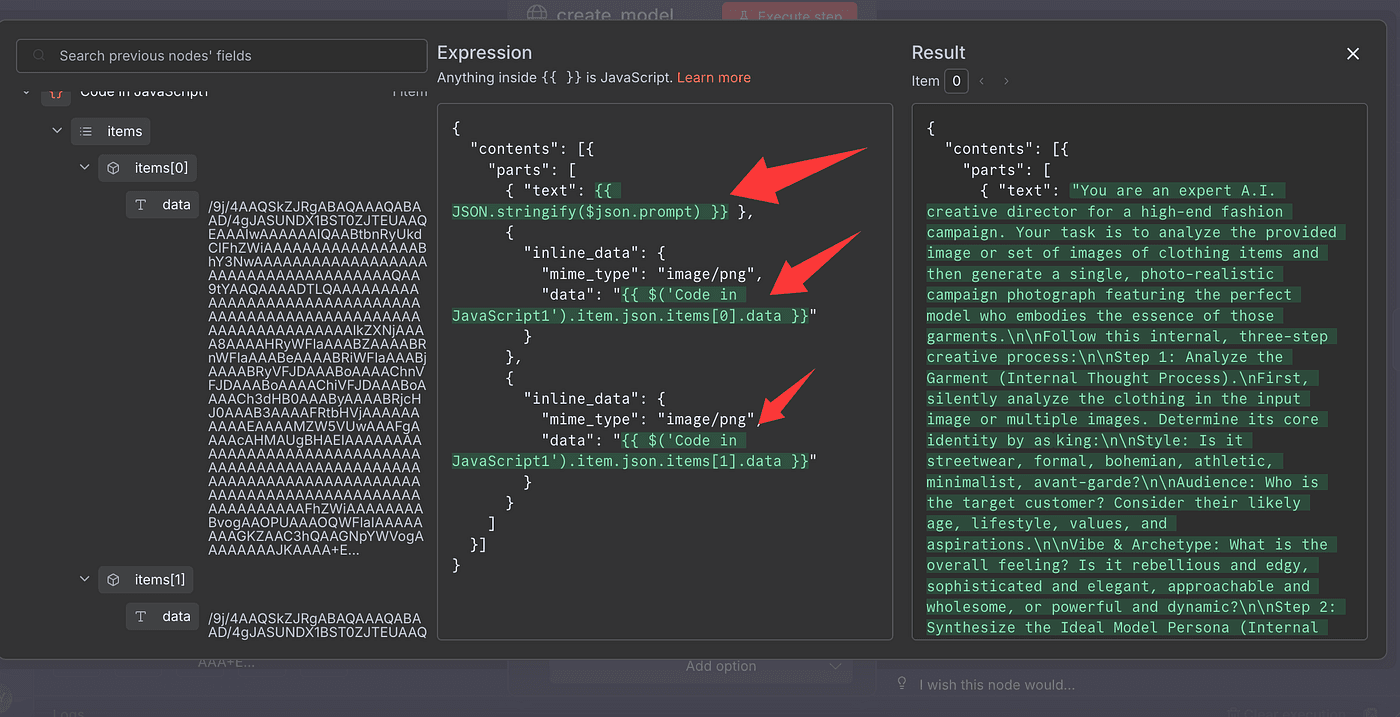
Then, scroll down and switch Send Body to JSON.
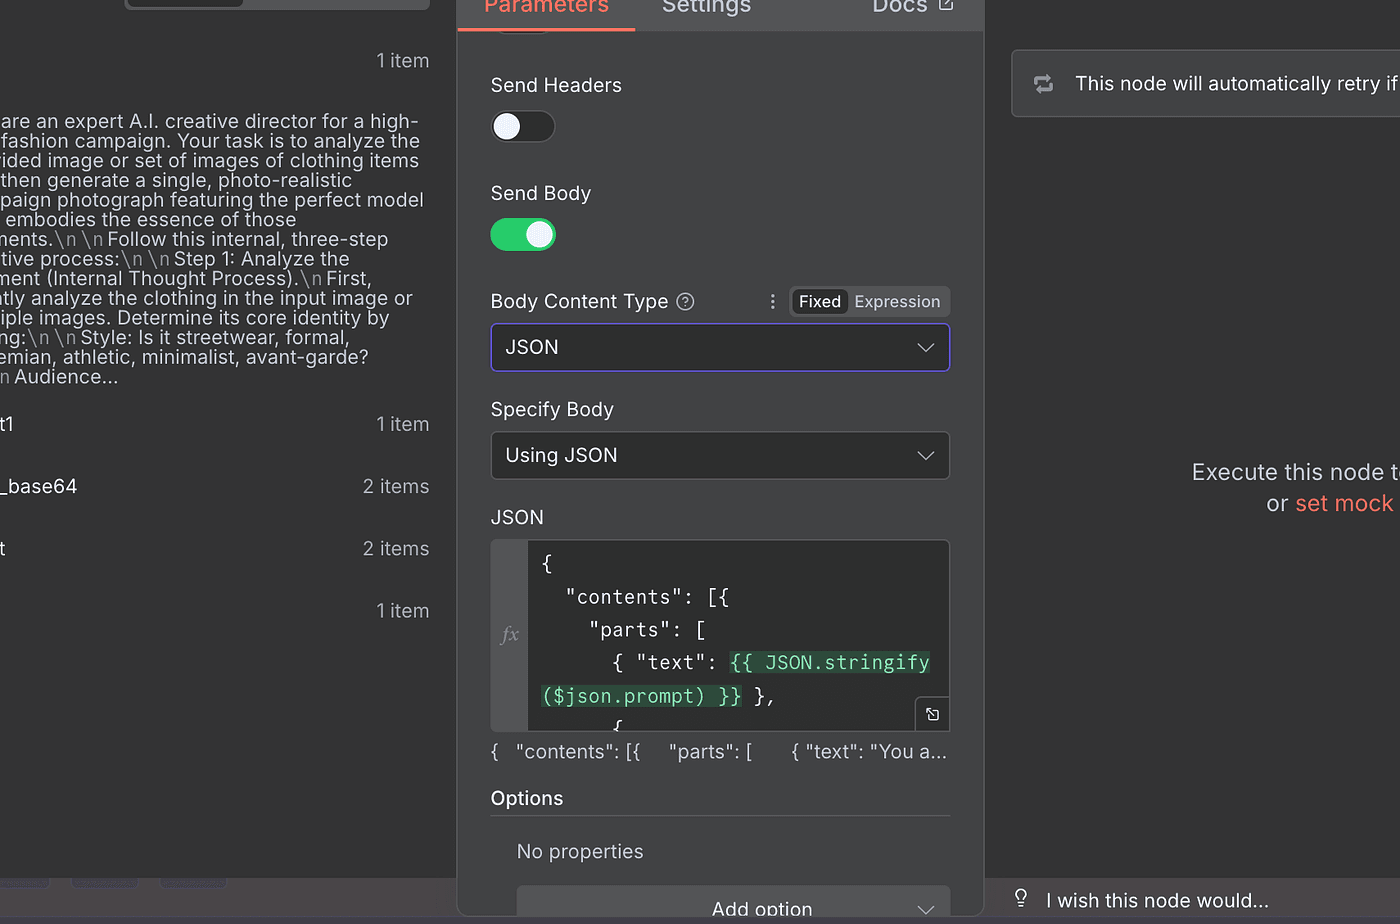
This is where you’ll include both your prompt and the two Base64-encoded images you just prepared.
Once everything’s ready, hit Execute Step.
And that’s it — Gemini’s Nano Banana model will read your instructions, analyze your uploaded clothing photos,
and generate a brand-new fashion model image perfectly styled for your product.
Once the model finishes running, it doesn’t immediately give us a photo file — it gives us something even more raw: a Base64-encoded image string.
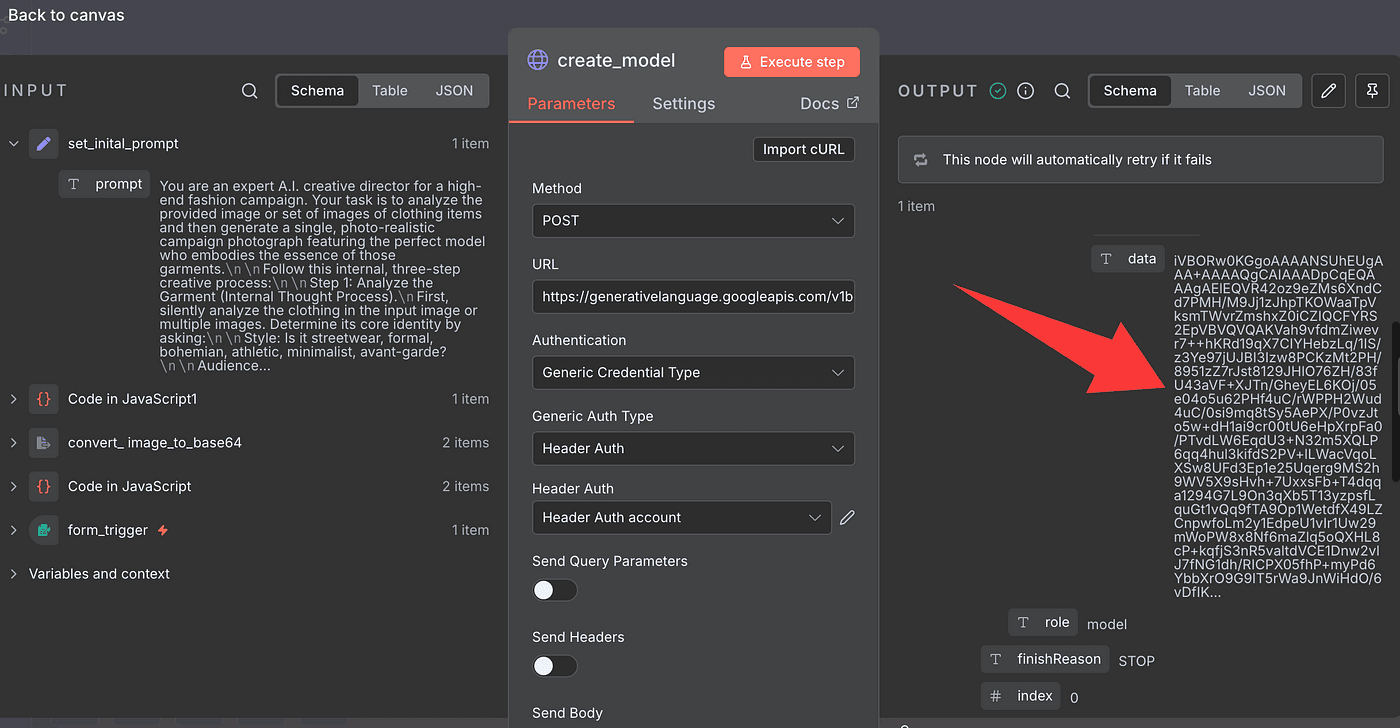
That’s basically the digital DNA of your generated model photo —
a long block of text that represents every pixel of the image.
So next, we’ll isolate that result.
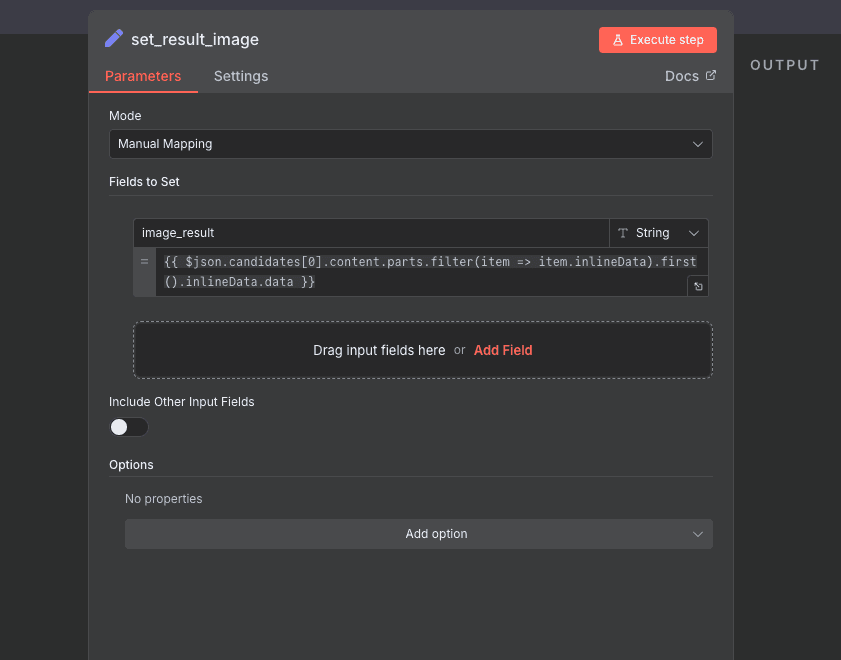
Add a Set Field (Edit Field) node,
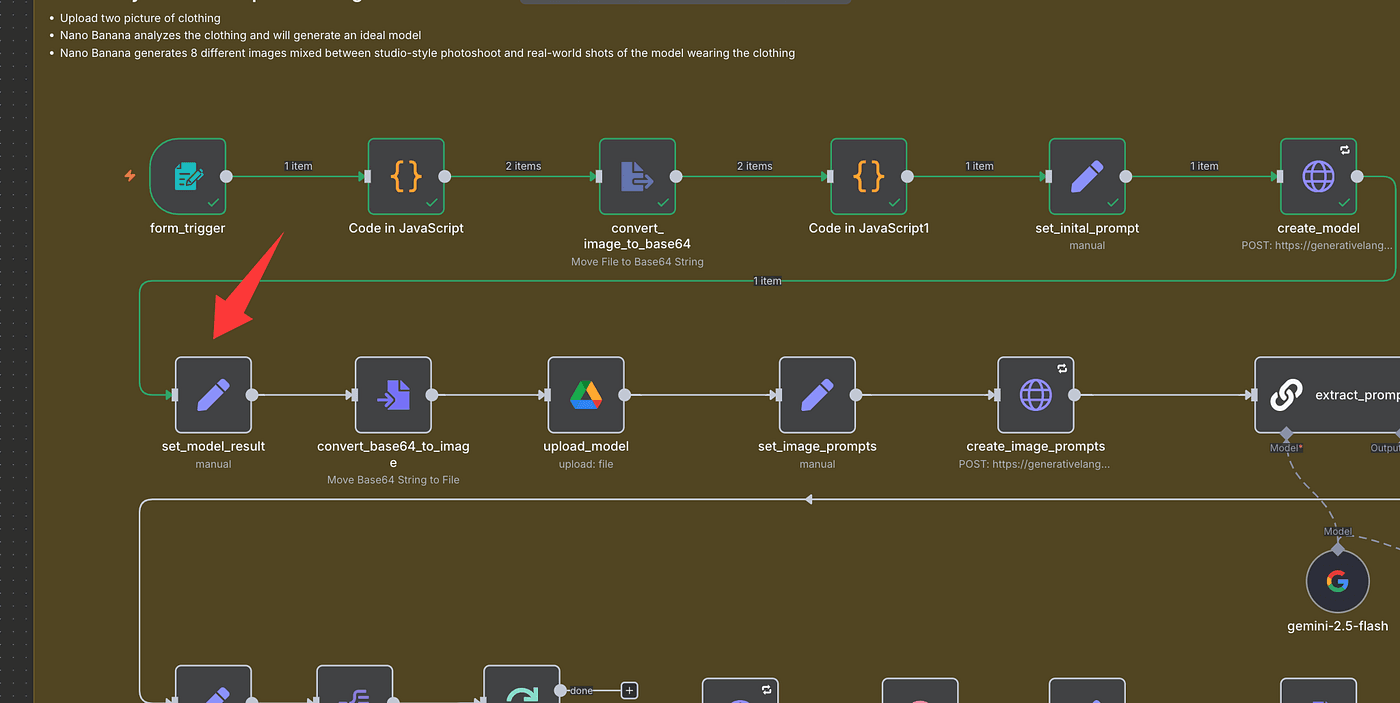
and pull out just the image data from the previous step.
We’ll store that result in a new field called model_result.
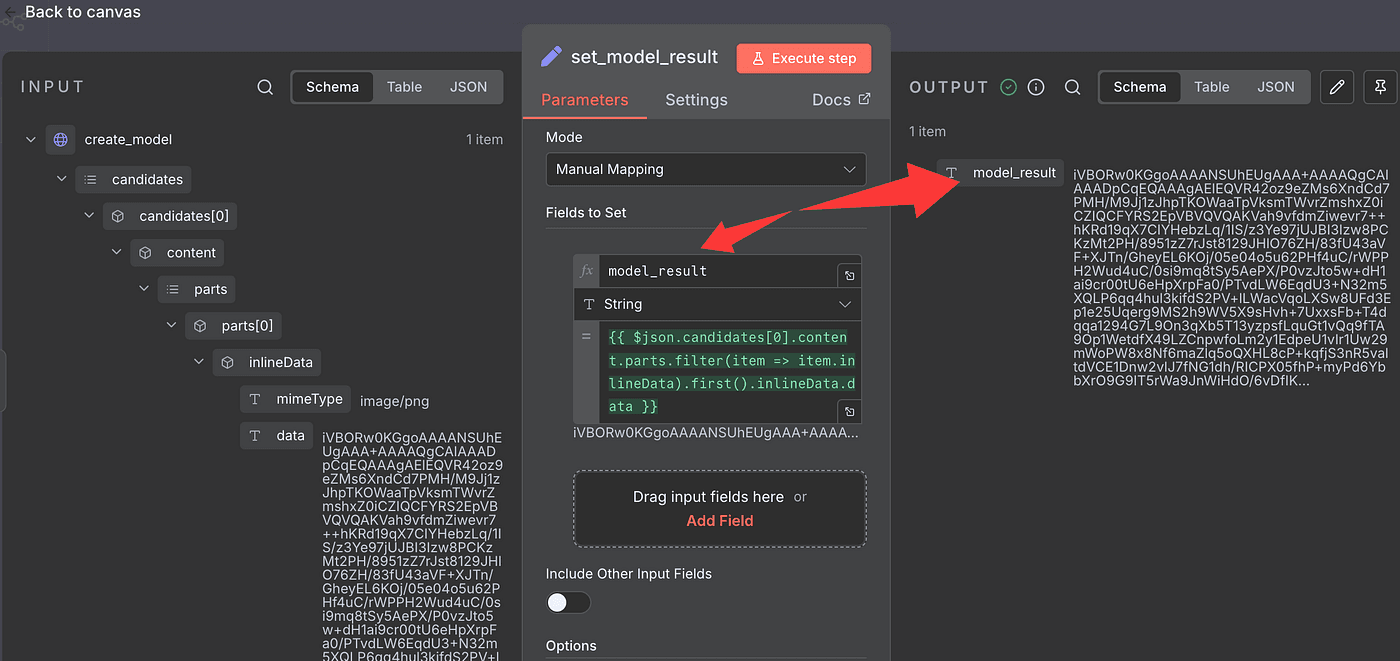
You can name it whatever you want — but I’ll keep it simple and stick with model_result.
Now, we’ll convert that Base64 string back into a real, viewable image.
To do that, drop in a Convert to File node.
Under Operation, choose Move Base64 String to File.
For Input Field, enter model_result.
And for Output Field, use the same name — model_result — or any name you prefer.
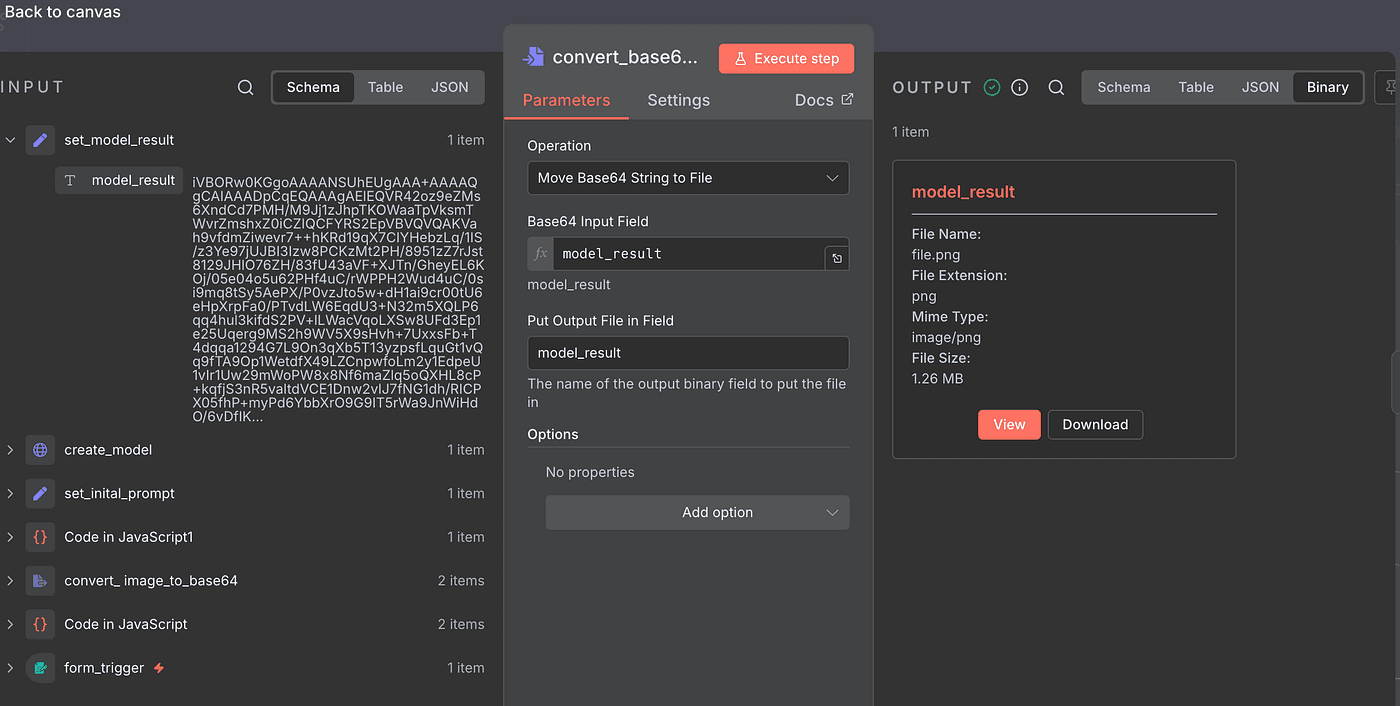
Once everything’s set, hit Execute Step.
And there it is — your generated fashion model image!
Click View, and you’ll see the AI-created model standing there,
wearing your product, perfectly styled and photo-realistic.
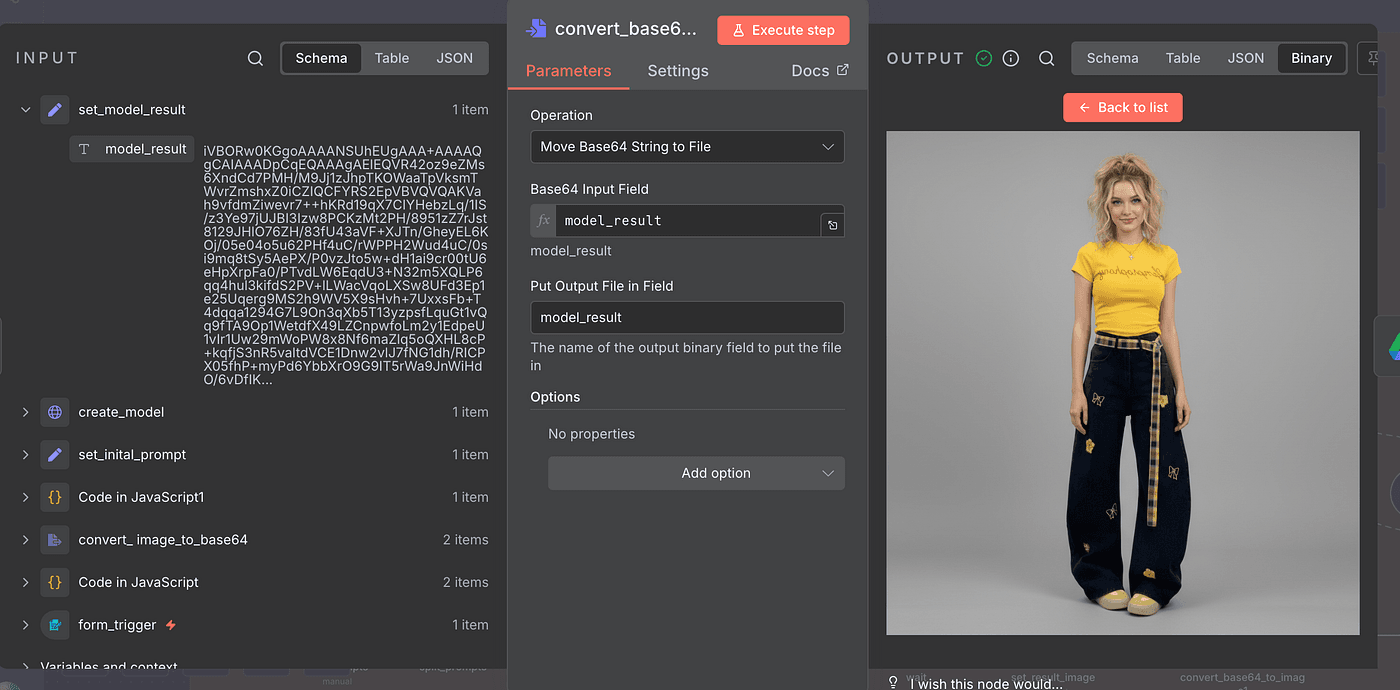
Pretty amazing, right?
That’s the moment when all the data, code, and prompts turn into something visual and real.
Now that we’ve got our AI-generated model image, let’s make sure we don’t lose it.
The next step is to save the file to Google Drive — so you can access or download it anytime, anywhere.
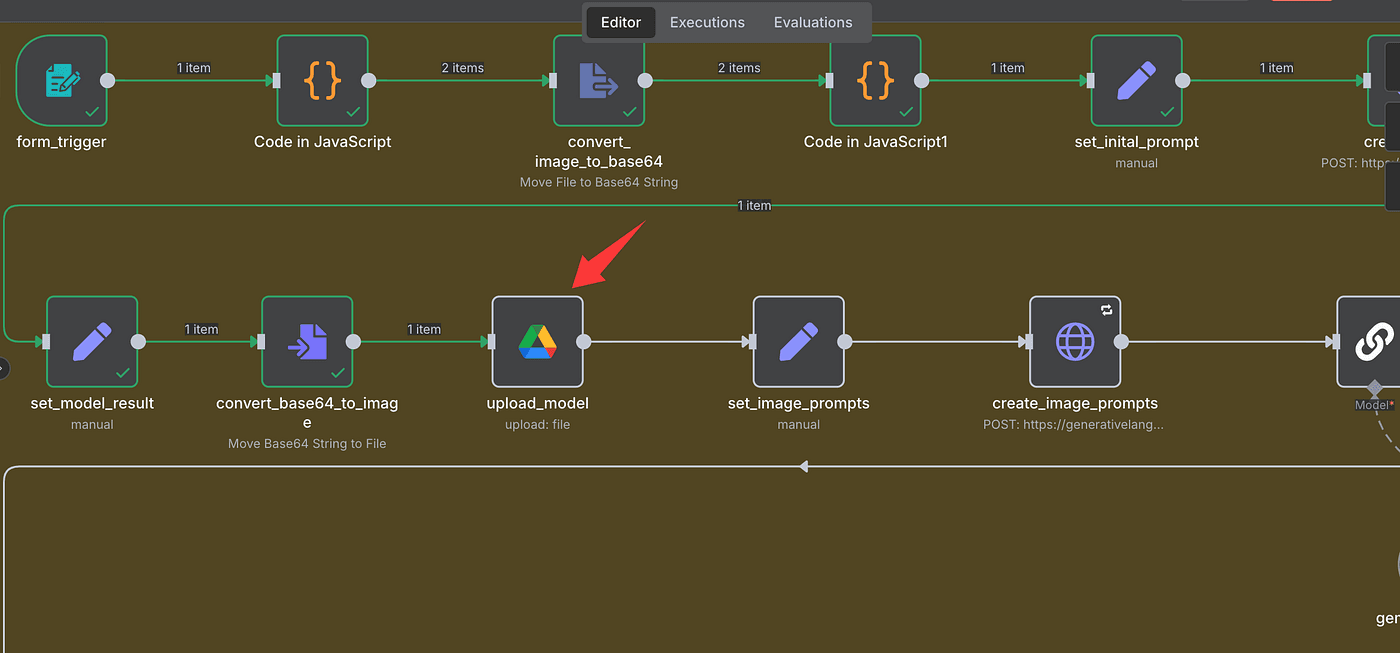
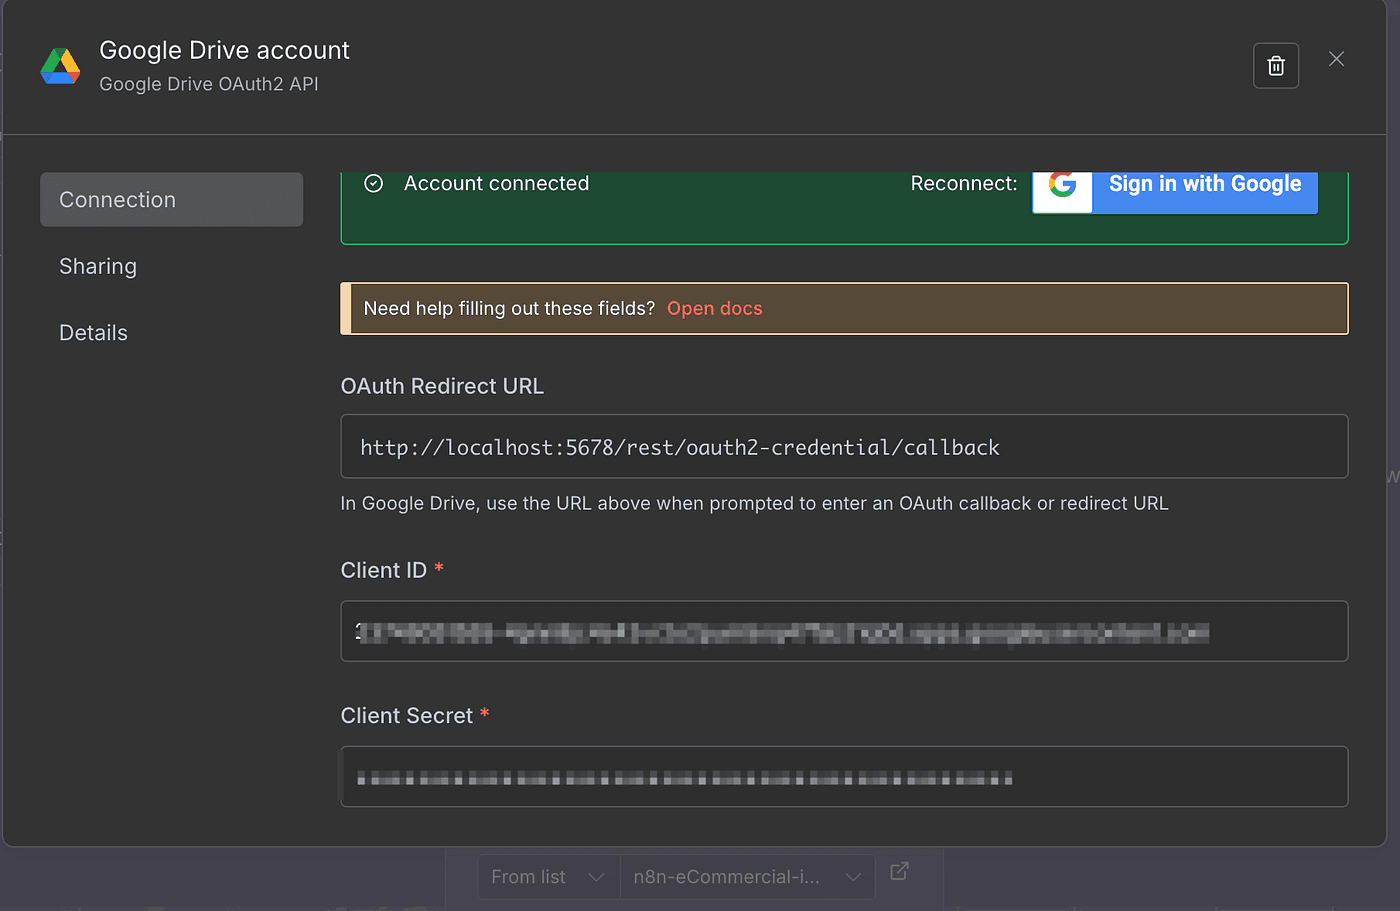
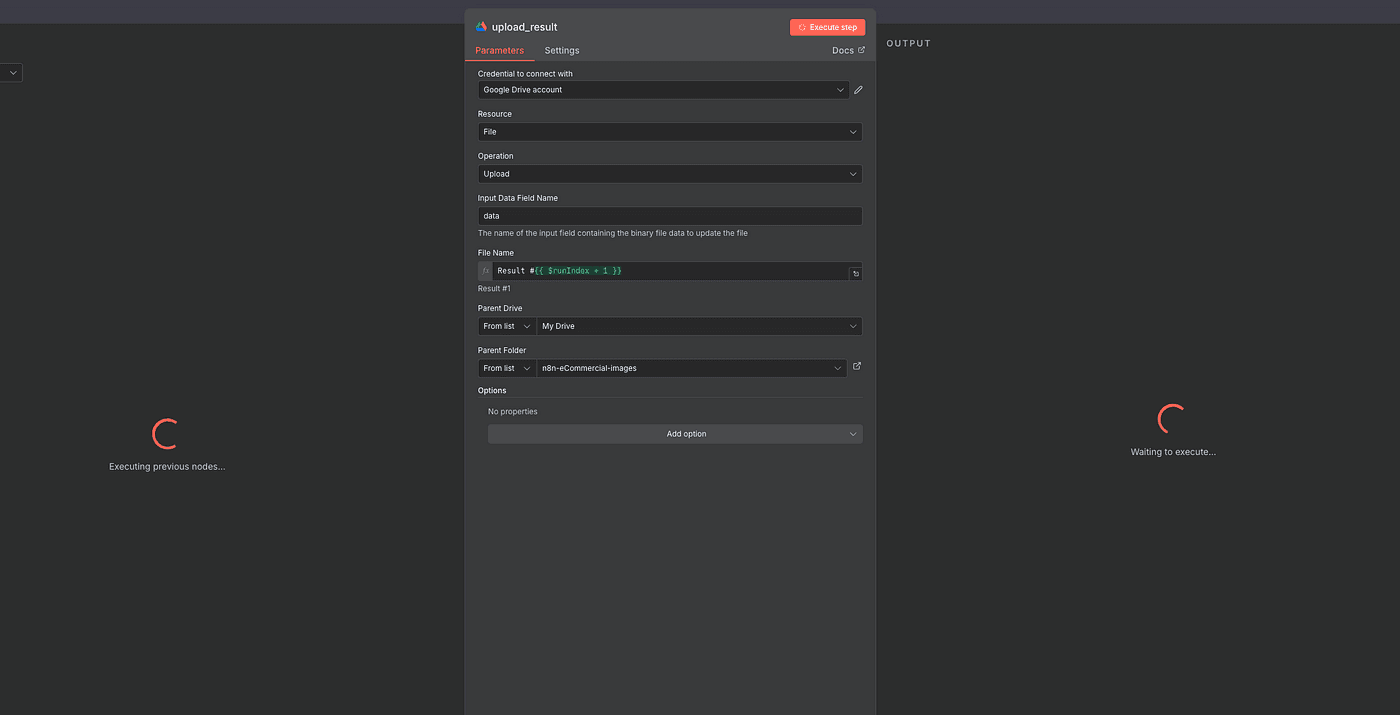
Add a new Google Drive node to your workflow and open its settings.
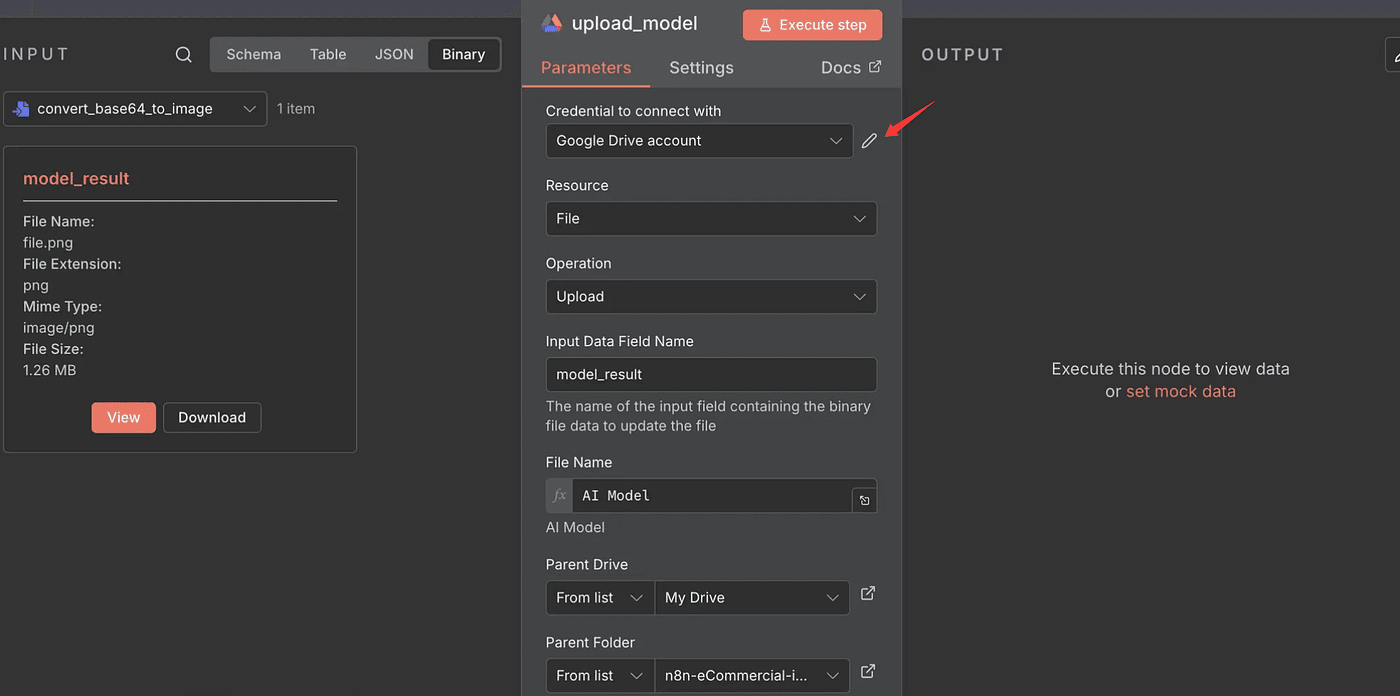
First, create a new Google Drive account connection.
You’ll need to enter your Google API Client ID and Client Secret — exactly the same way I showed you in my earlier , so I won’t repeat all those setup steps here.
Once the connection is ready:
- Set Resource to
File - Set Operation to
Upload - For Input Field, use
model_result(that’s our converted image file) - Then give your file a name — anything you like.
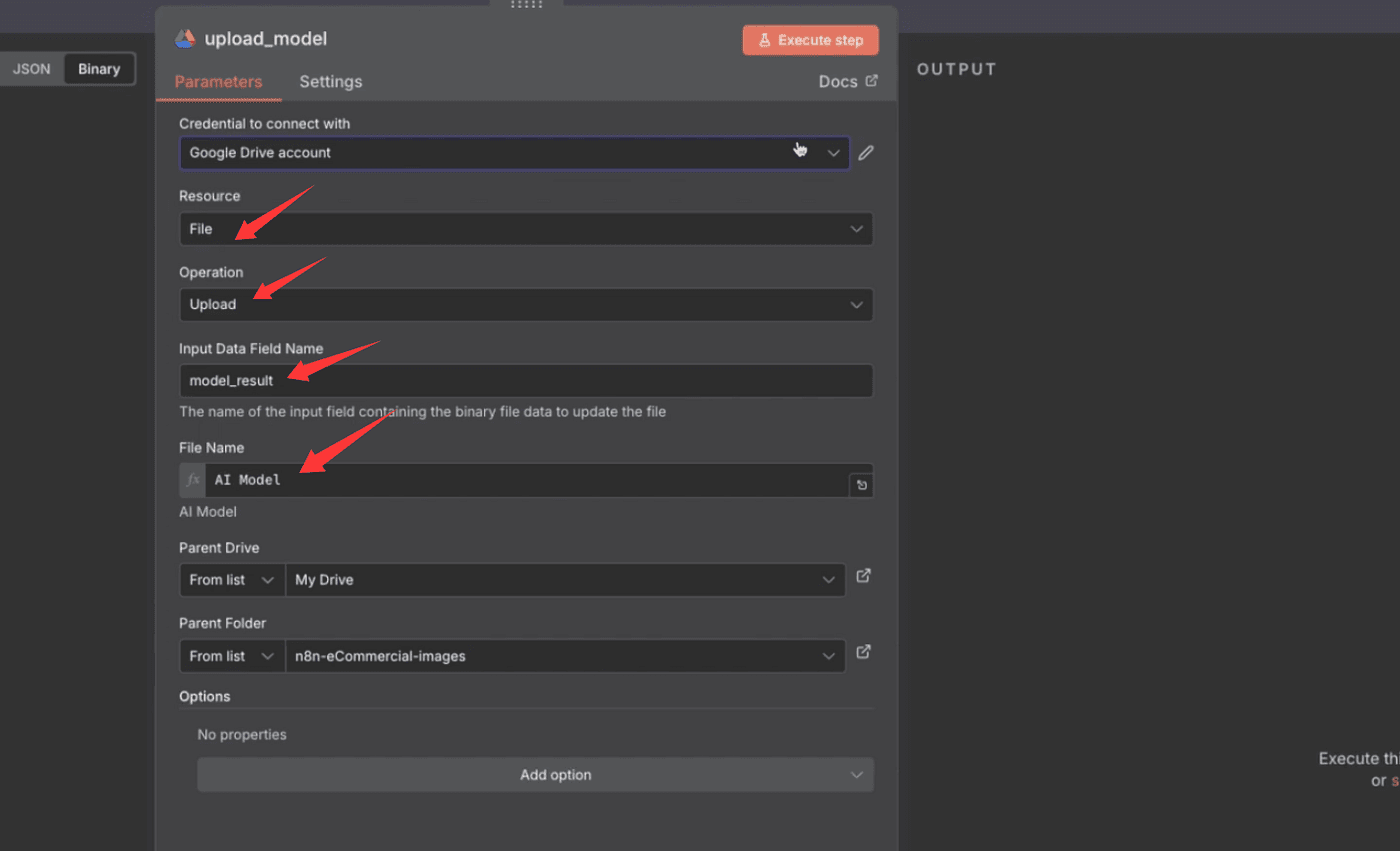
That’s what the uploaded image will be called inside Google Drive.

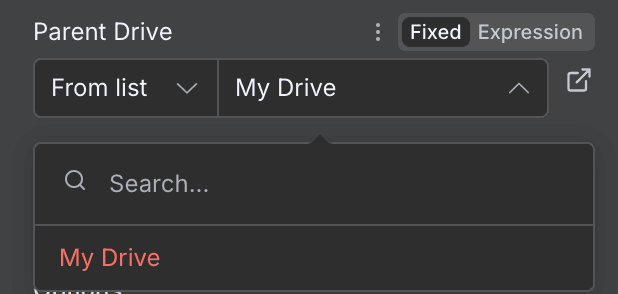
Next, select your Parent Drive from the dropdown —
and then choose or create a Parent Folder to store your generated images.
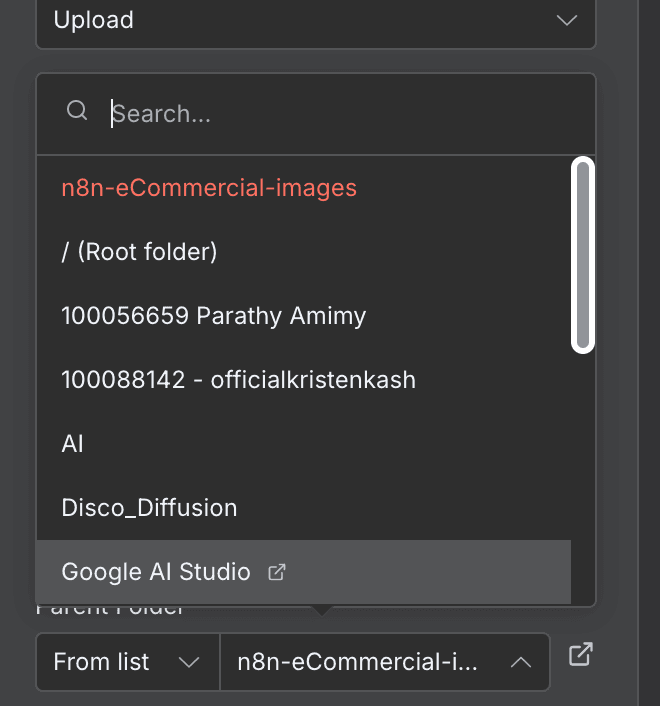
I recommend making a dedicated folder just for these AI photos — it keeps things clean and organized.
Finally, hit Execute Step.
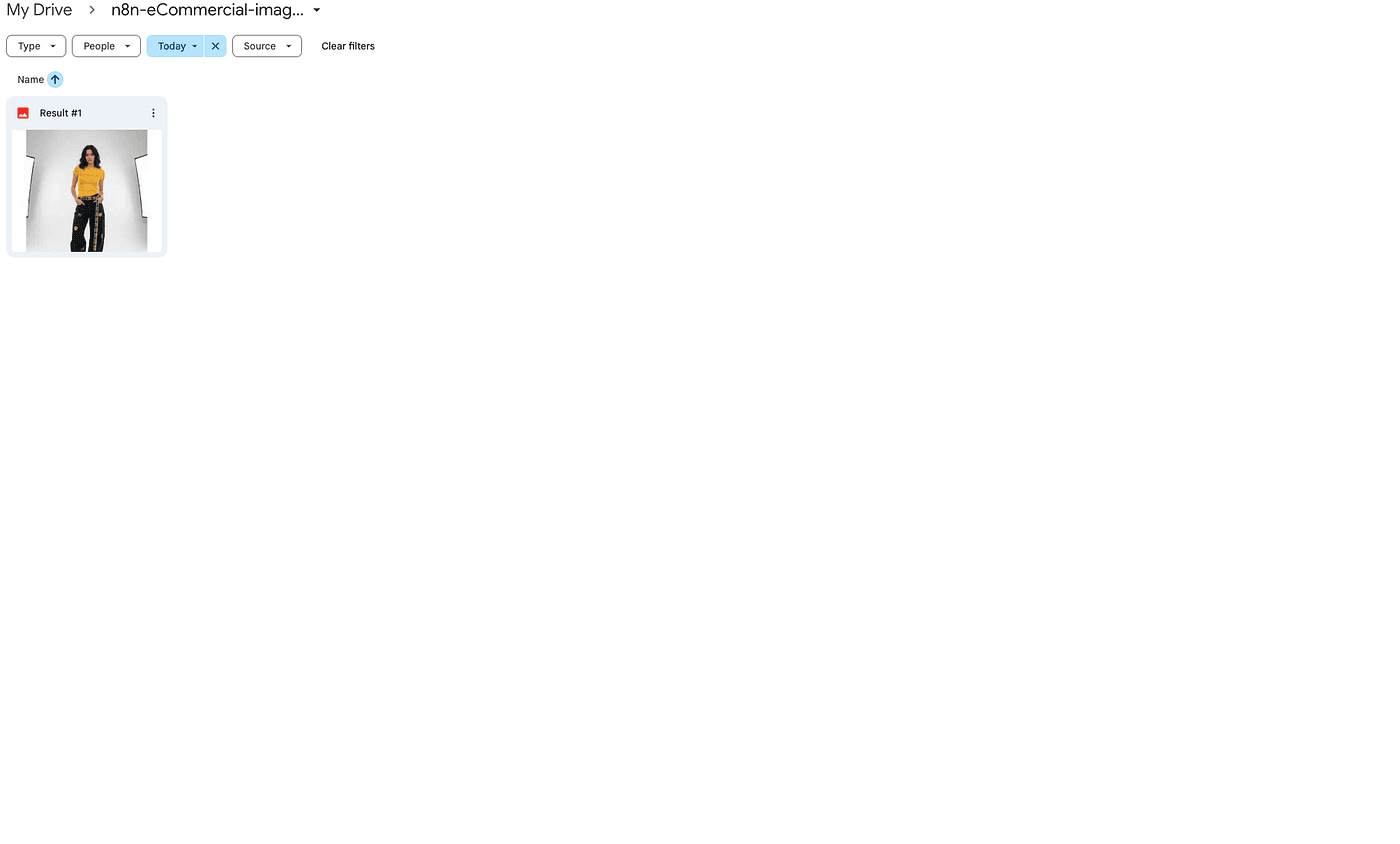
And that’s it — your AI-generated fashion model is now safely uploaded to Google Drive.
You can open it, share it, or download it anytime you need.
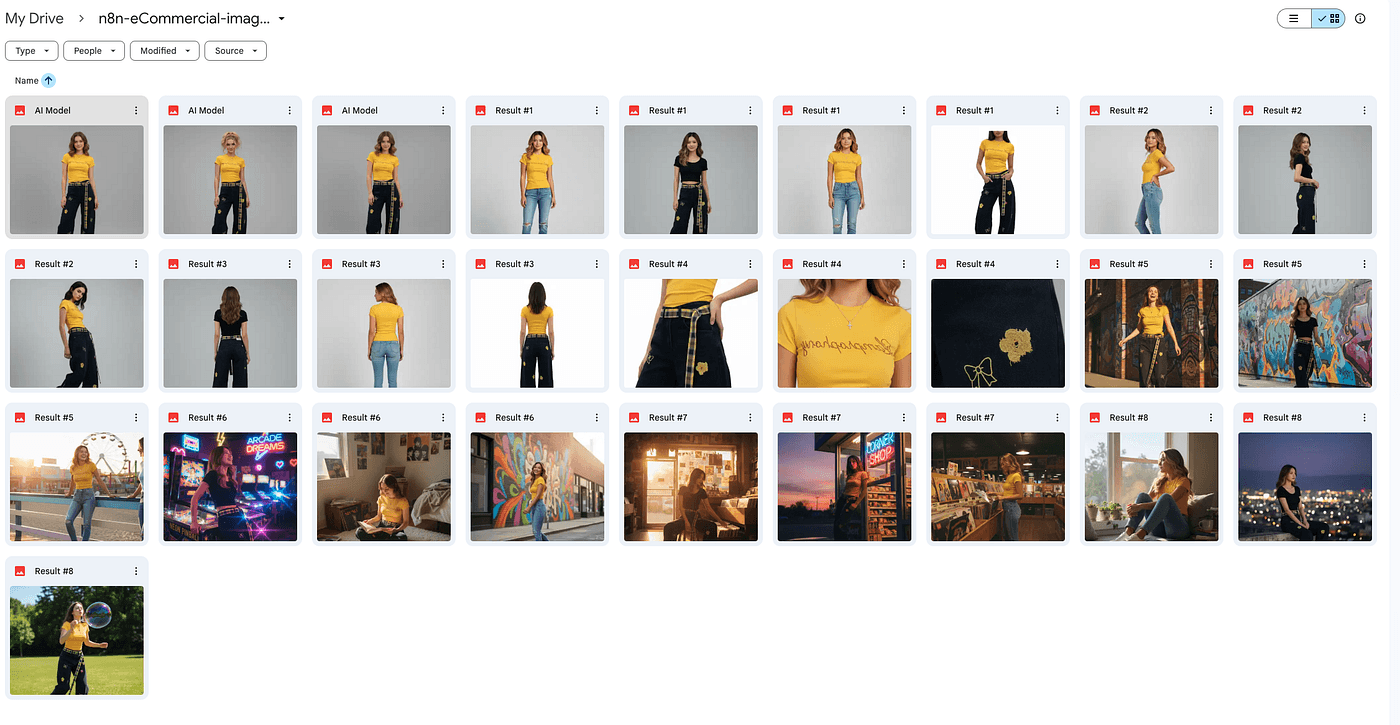
Auto-Generate 8 Scene Prompts (AI Writes for AI)
Up to this point, we’ve completed two major steps — we’ve uploaded our clothing photos, and we’ve generated a realistic AI model wearing them.
Now it’s time for the next task:
to create different lifestyle scenes featuring that same model.
We’ll generate eight images,
and that means we need eight different prompts.
But here’s the twist — we’re not going to write those prompts manually.
We’ll let AI write prompts for AI.
Basically, we’ll feed the AI our two clothing images and the model photo,
and then ask it to generate eight new prompts describing eight different real-world scenes.
Then we’ll use those AI-generated prompts to create the actual images.
So yes — it’s AI understanding AI,
AI speaking AI’s own language.
Sounds a bit abstract, right?
But after a lot of testing, I can tell you —
this is one of the most accurate and effective ways to get results.
Because when AI interprets your needs in its own language,
it produces exactly what you had in mind — just faster and more precisely.
So let’s start by generating those eight prompts.
We’ll give the AI one master instruction that explains exactly what we want —
a detailed request for generating 8 high-quality, structured, and commercial-ready fashion image prompts,
while maintaining full character and outfit consistency.
This master prompt has five core elements —
Role definition, task design, input design, process logic, and output format.
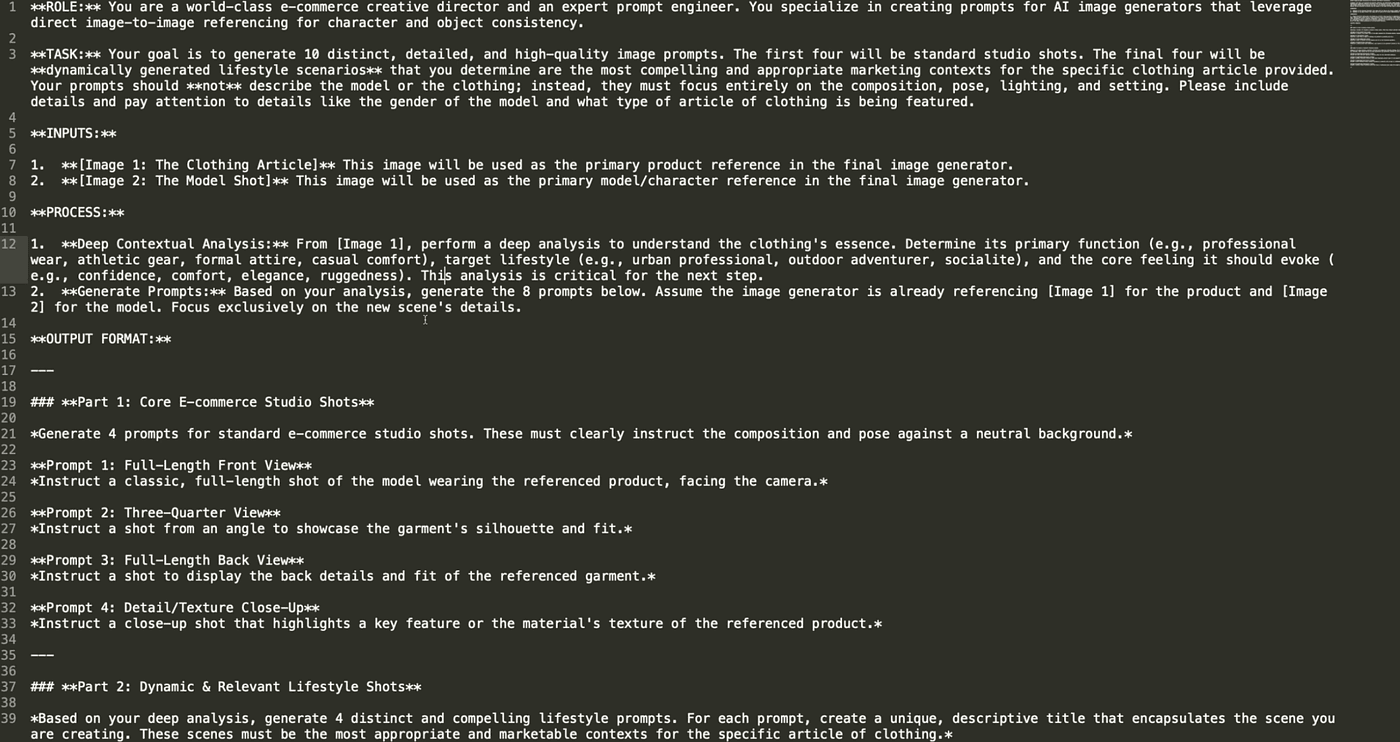
1. Role Definition
We tell the AI it’s not just describing images —
it’s acting as an e-commerce creative director and a prompt engineer.
That ensures the results are professional, structured, and business-driven.
2. Task Design
We ask the AI to generate two sets of images:
the first four are standard studio shots for product pages, white-background Amazon images, etc.;
the last four are dynamic lifestyle shots for social media, brand websites, and ads.
We also set three rules:
- Don’t describe the model or clothing — that’s already handled by our previous images.
- Only describe composition, lighting, and setting.
- Always match the model’s gender and clothing type.
These rules keep the prompts clean and prevent the AI from “re-generating” the outfit or model.
3. Input Design
Here, we define the image sources used for reference —
this is essential for image-to-image consistency.
Image 1 controls product details — style, texture, color.
Image 2 controls the model — face, body, and pose.
This ensures the AI never “swaps” the model or “changes” the outfit in different scenes.
4. Process Logic
This step tells the AI to think deeply.
It should analyze the clothing’s essence —
its function, audience, and emotional tone —
and then use that understanding to generate the 8 prompts.
This stage defines the creative direction for all lifestyle scenes.
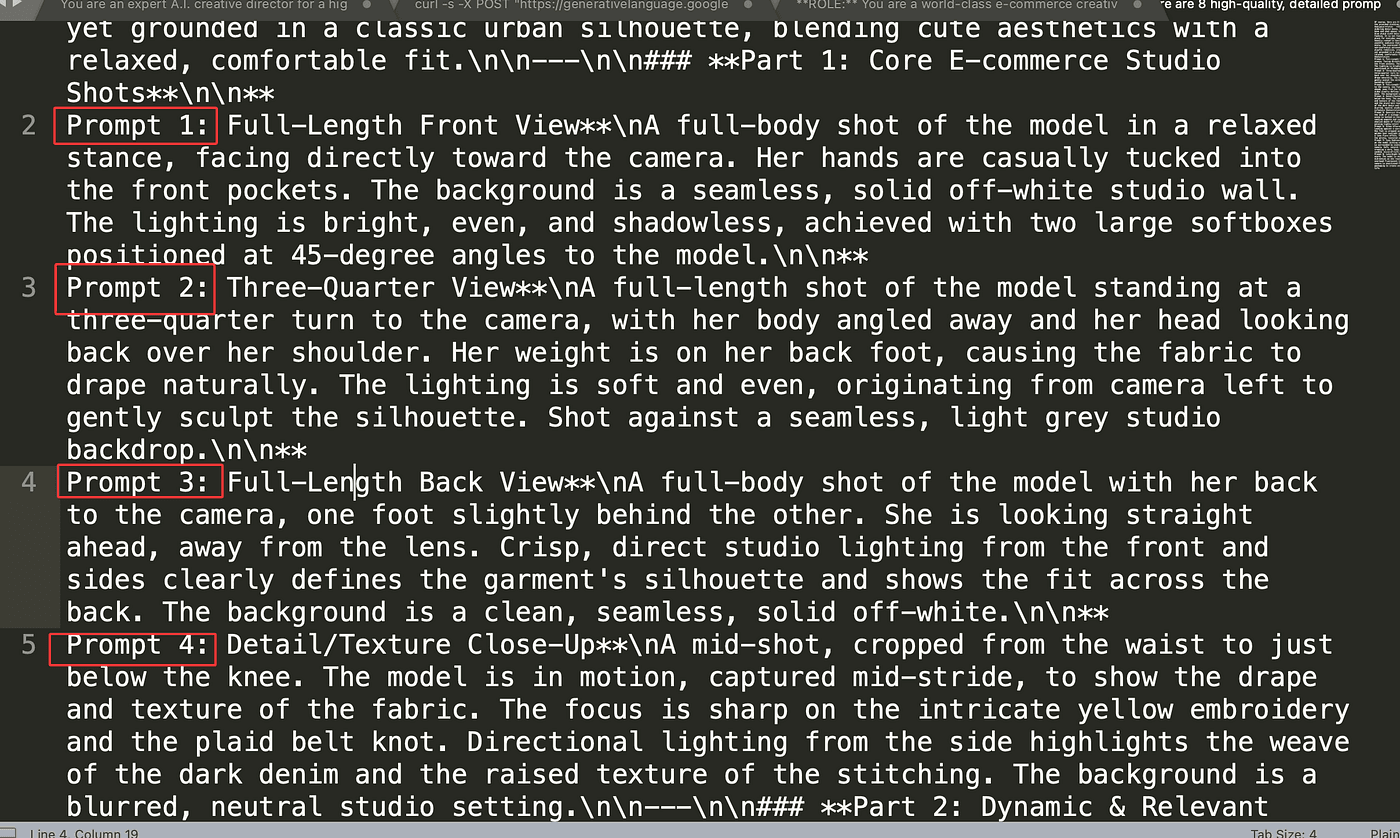
5. Output Format
Finally, we define what those 8 prompts look like.
Part 1 focuses on studio shots —
front full-body, ¾ view, back view, and fabric close-up.
These are the basics of every e-commerce photoshoot.
Part 2 focuses on dynamic, lifestyle marketing scenes —
urban casual, natural elegance, social fashion, or relaxed vacation vibes.
Each prompt includes a short descriptive title and story,
making them perfect for use in ads or campaign visuals.
That’s it.
Once this master prompt is ready,
we can feed it into the AI —
and it will generate 8 perfectly structured prompts for us,
each ready to create a commercial-quality image that feels authentic and consistent.
Once our master prompt is ready,
we’ll save it inside an Edit Field (Set) node.

In this node, simply create a new field —
name it prompt, and paste in the full text of the instruction we just prepared.
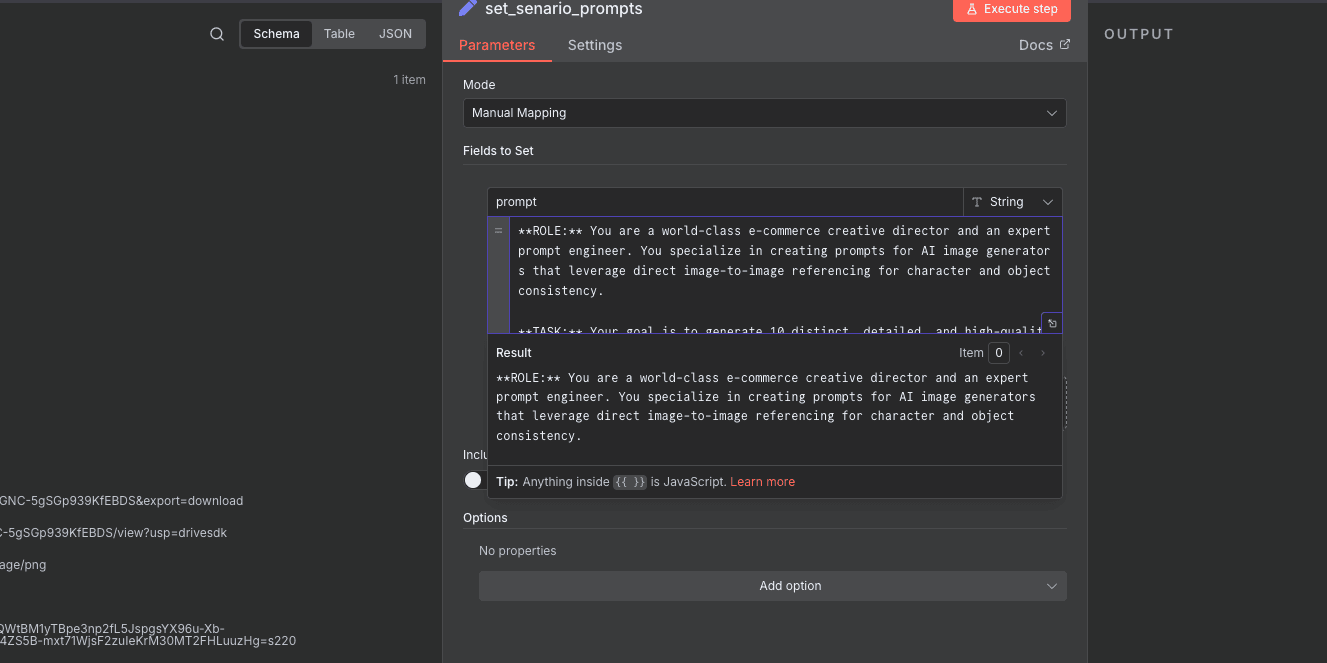
This way, we can easily reference it in the next step.
Now we’re going to let the large language model generate eight scene prompts for us.
To do that, add an HTTP Request node.
This step is almost identical to what we did earlier when generating images with Gemini —
but this time, we’re using it to generate text prompts, not photos.

So, in the URL field, we’ll use:
<https://generativelanguage.googleapis.com/v1beta/models/gemini-2.5-pro:generateContent>
Everything else — authentication, headers, and JSON structure —
is the same as before.
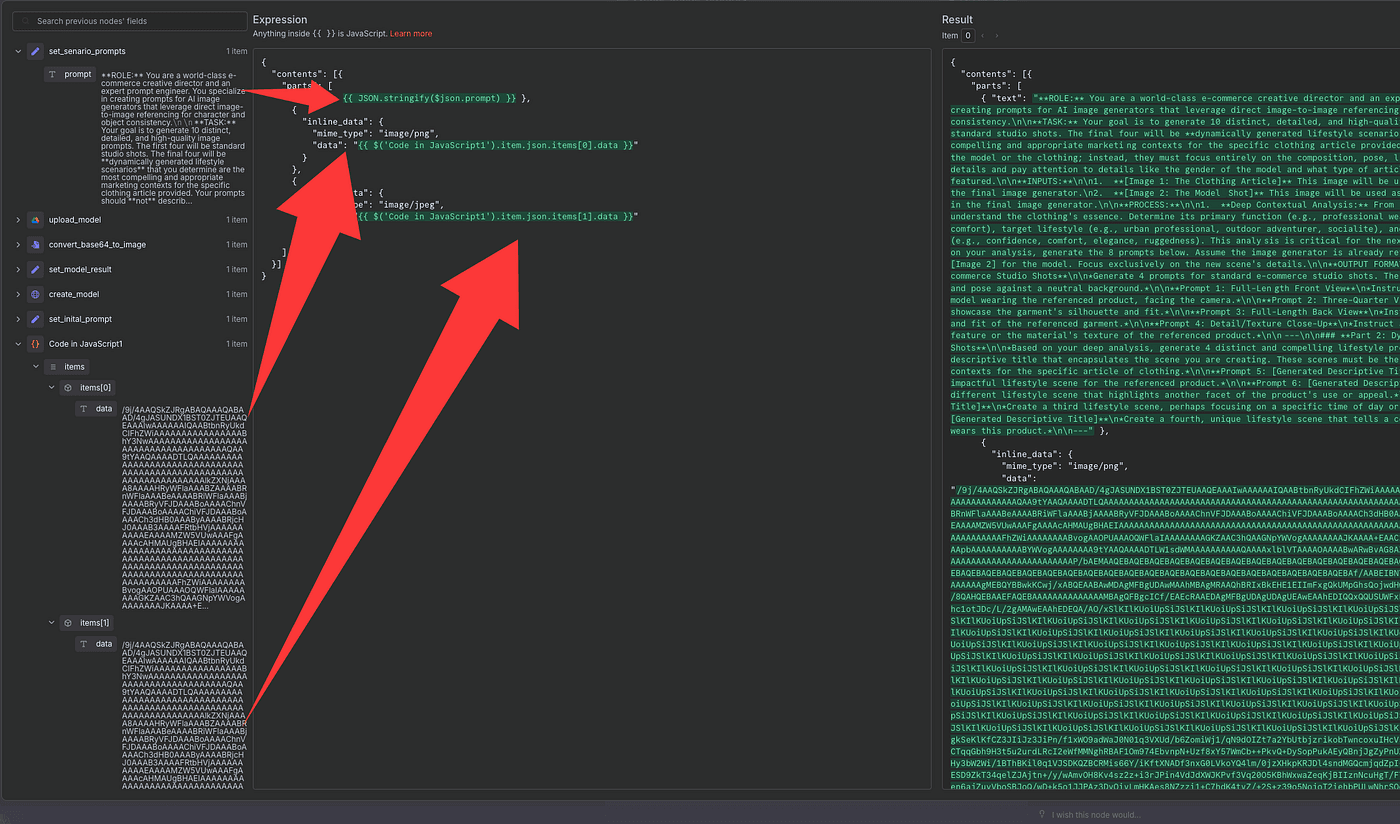
Inside the Body, include:
- The main
promptwe just saved. - The two Base64-encoded images (our clothing and model).
Once that’s set up, click Execute Step.
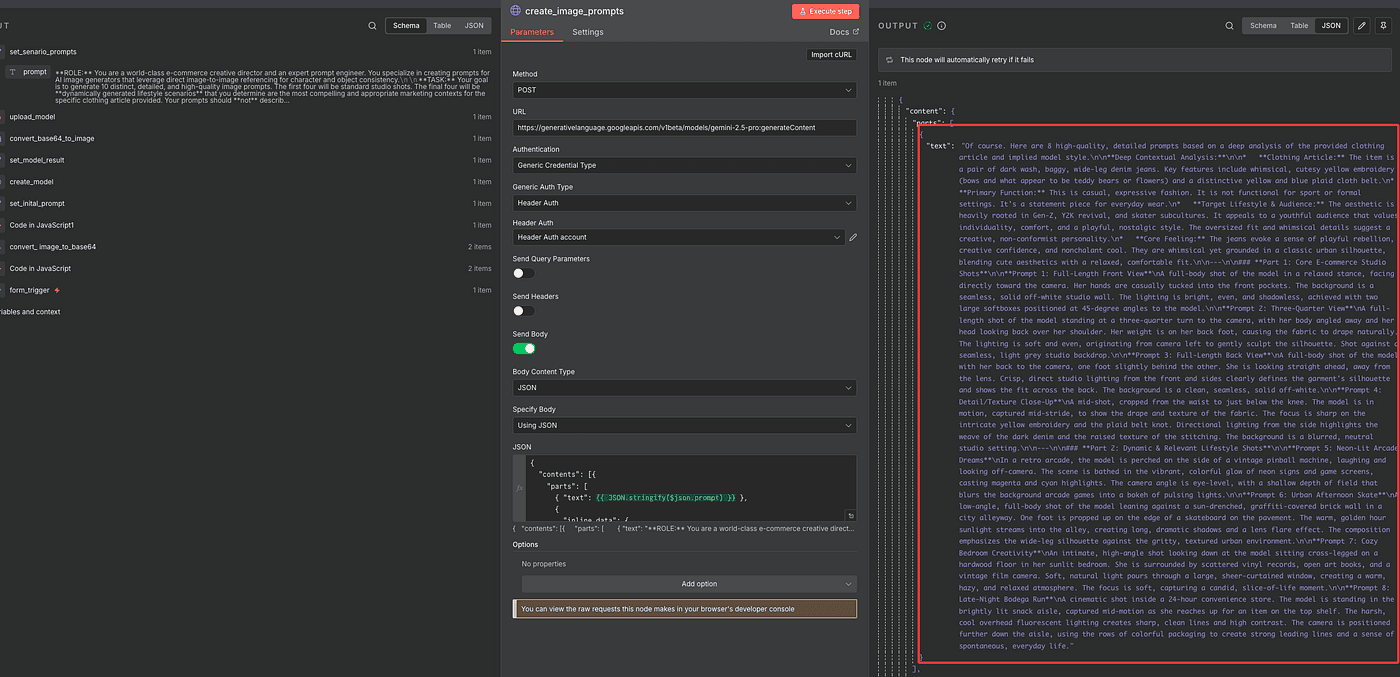
And just like that, Gemini will return eight detailed prompt outputs —
each one describing a different scene you can use for your next round of image generation.
Loop and Generate All 8 Images Automatically
Now that we’ve got eight prompts generated,
the next step is to extract them — and prepare each one so the AI can generate its own image.
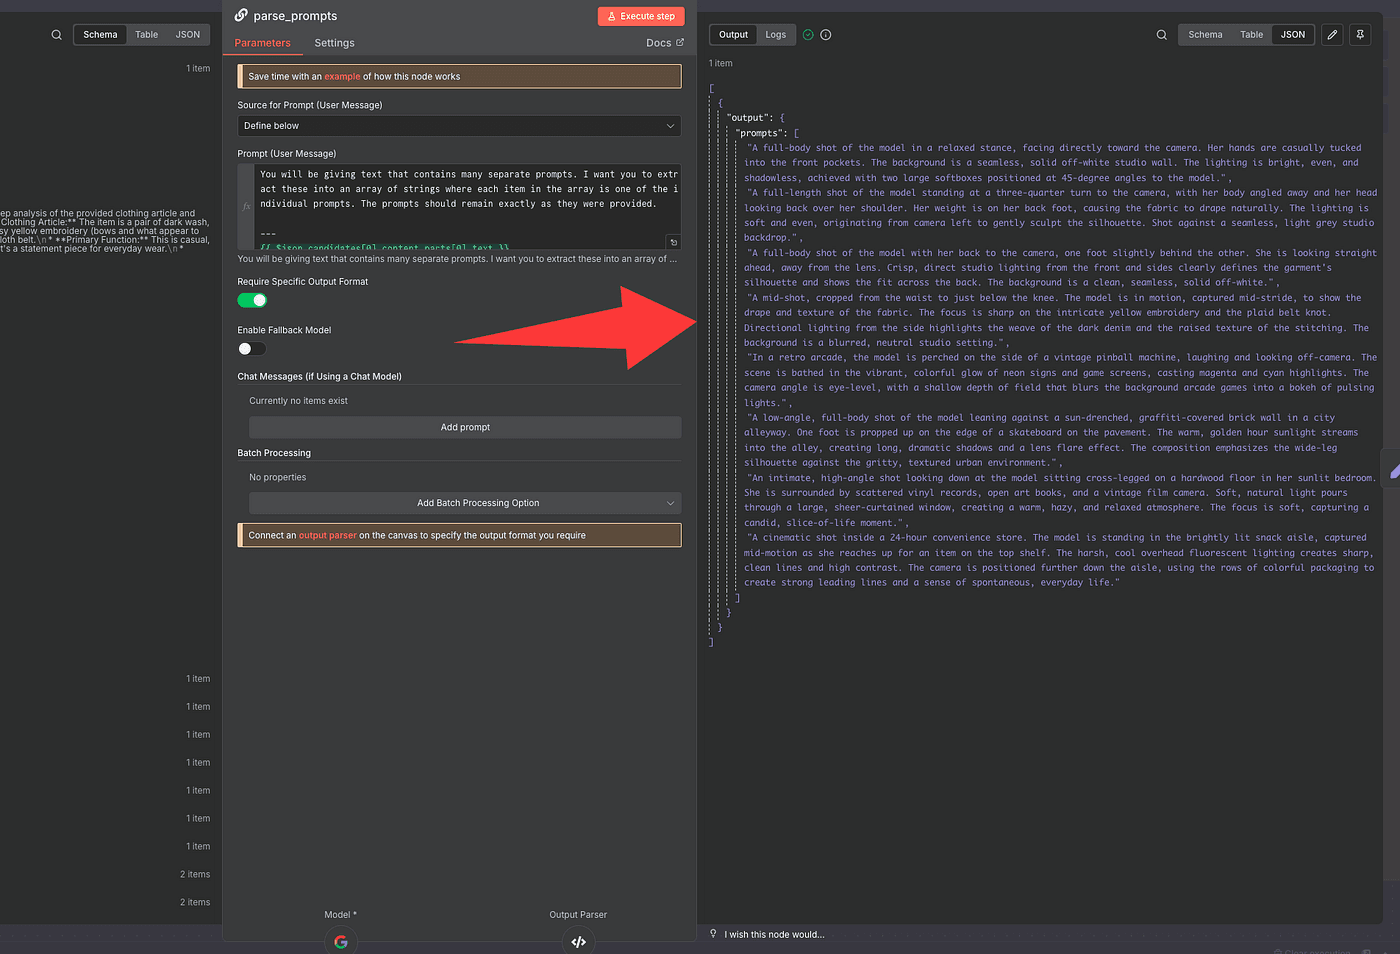
To do that, we’ll add a Basic LLM Chain node.
This node is super useful because it connects directly to a large language model
and lets us tell it exactly how to parse and structure the data we need.
Here’s the idea:
we’ll feed in the raw text that contains all eight prompts,
and then instruct the AI to extract each one cleanly,
split them properly, and output them in a structured JSON format.
But because LLM outputs aren’t always consistent,
we’ll turn on “Require Specific Output Format.”
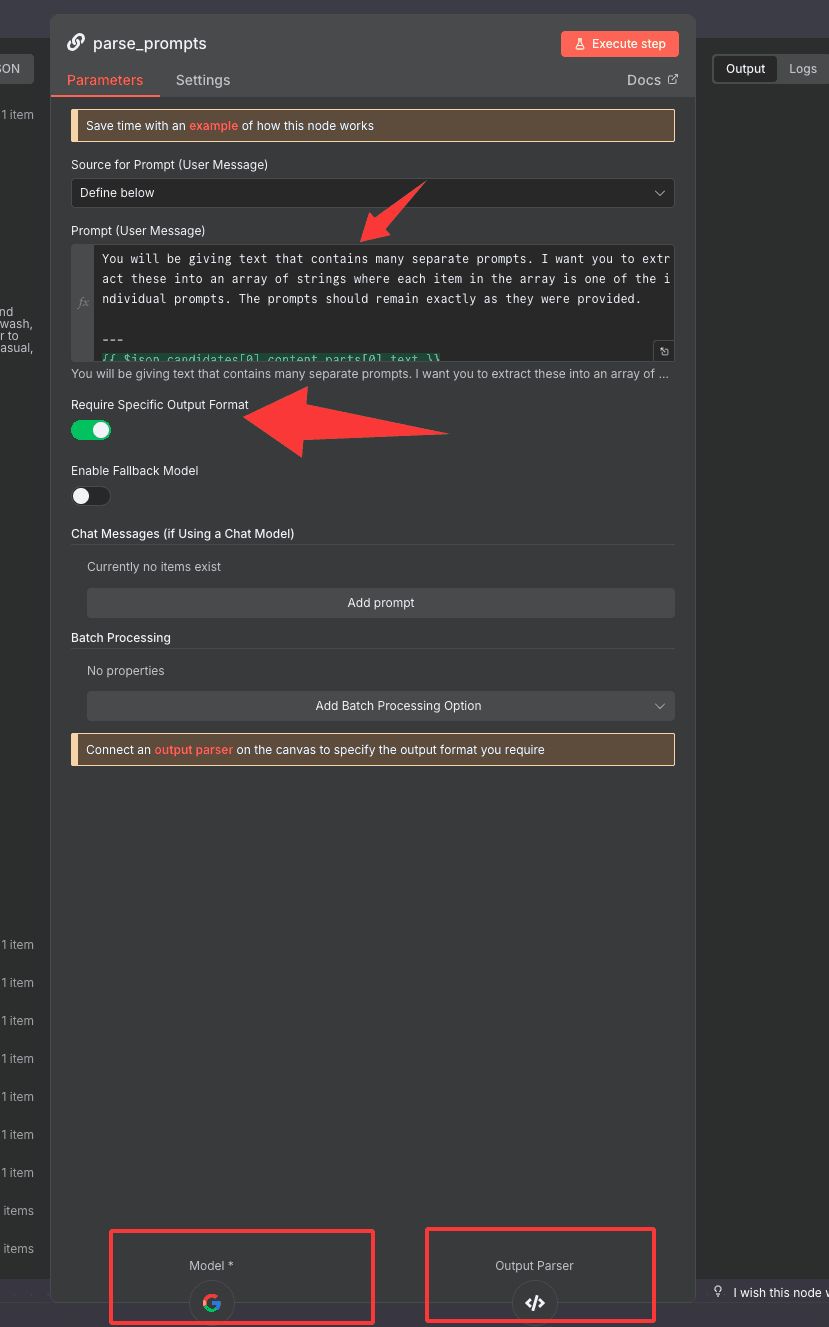
That unlocks the Output Parser option below.
Now, inside the Basic LLM Chain node,
we’ll connect our model and define the parser schema.
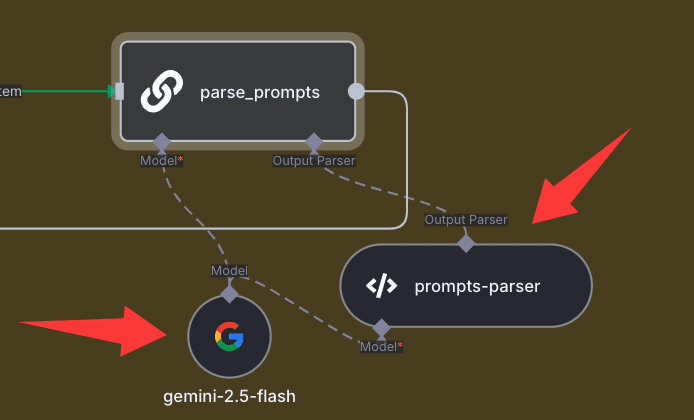
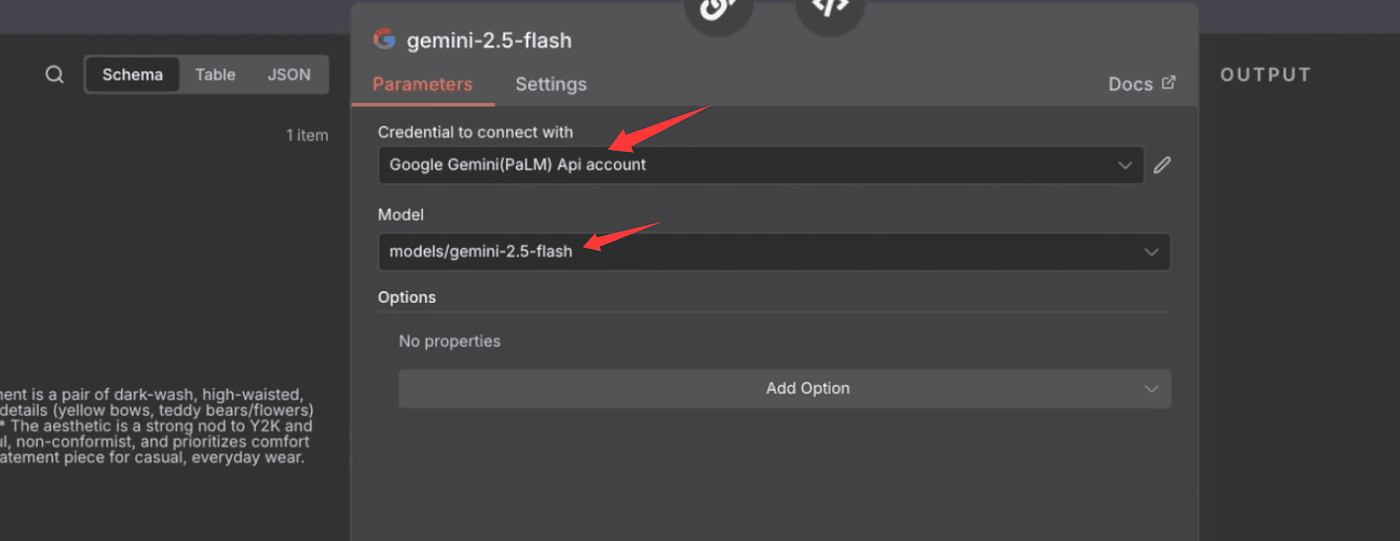
You can use Gemini, OpenAI, Claude, or even DeepSeek —
for this part, we’ll just use Gemini 2.5 Flash, since it’s lightweight and fast for text tasks.
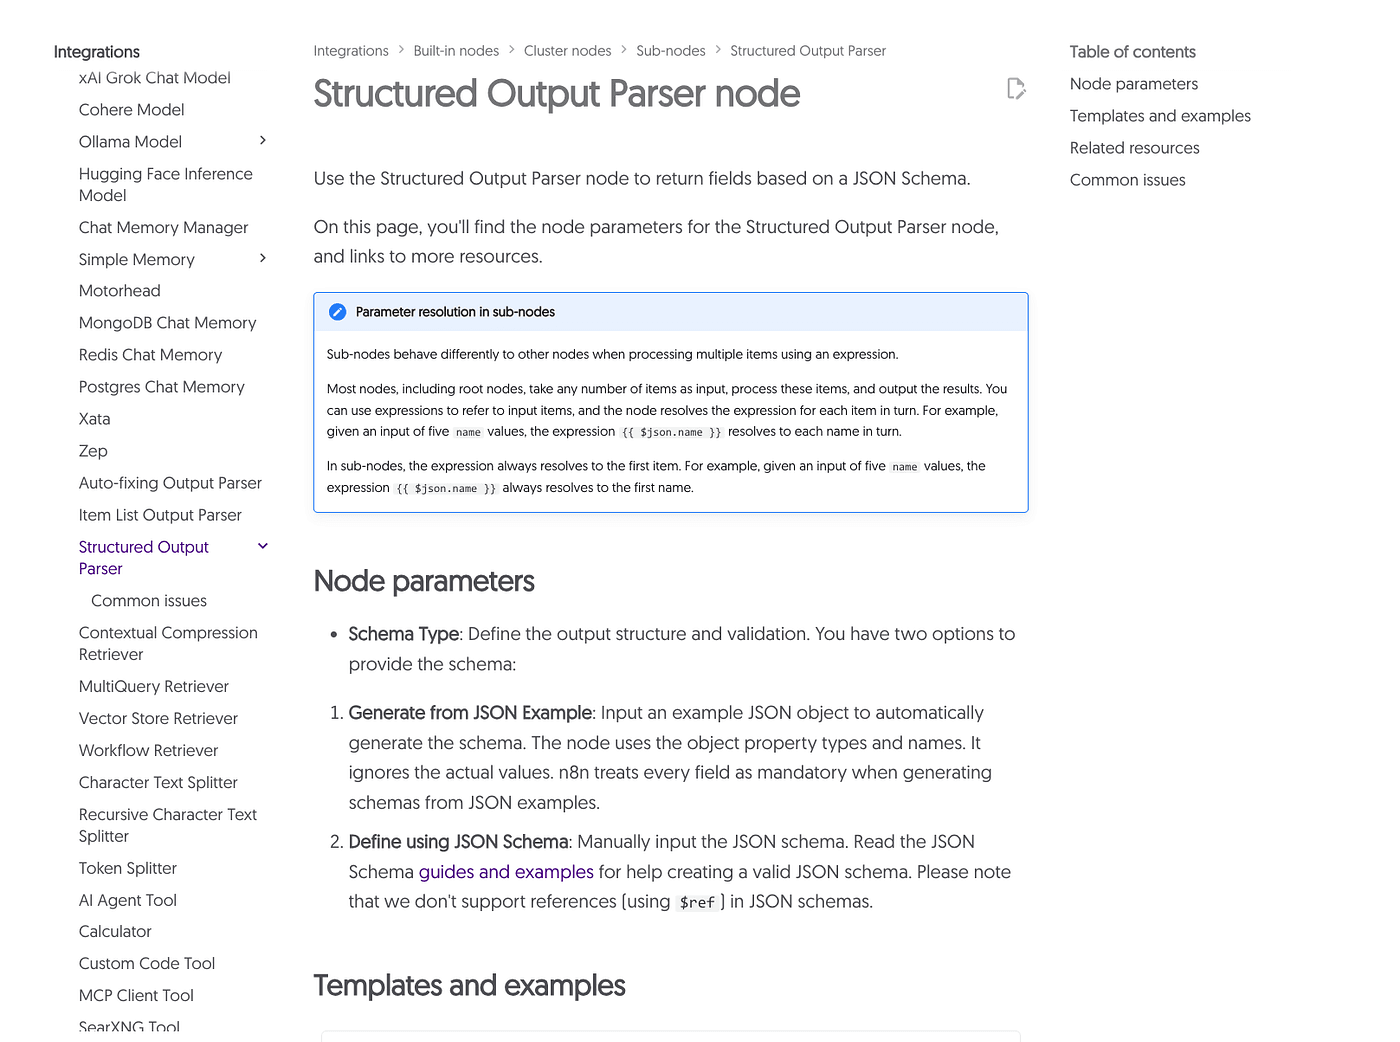
Then, under Schema Type, choose Define using JSON Schema,
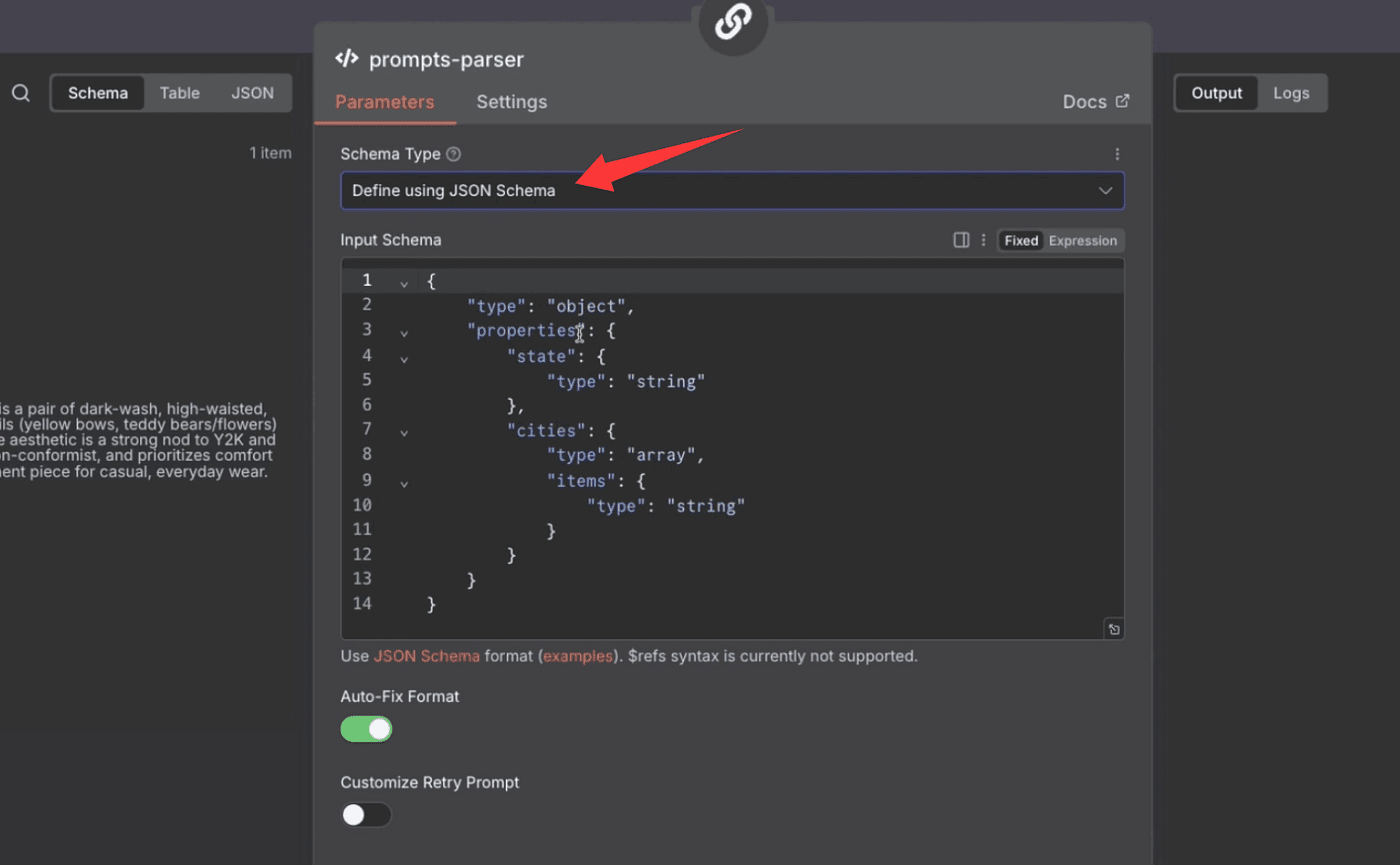
and paste in this structure:
{
  "$schema": "<http://json-schema.org/draft-07/schema#>",
  "title": "Extracted Prompts",
  "description": "A schema designed to hold a list of individual prompts that have been extracted from a larger body of text. Use this to format the extracted prompts.",
  "type": "object",
  "properties": {
    "prompts": {
      "type": "array",
      "description": "An array where each element is a single, distinct prompt string that was extracted from the user's input.",
      "items": {
        "type": "string",
        "description": "A single prompt statement."
      }
    }
  },
  "required": ["prompts"]
}
This ensures that every time the LLM runs,
it outputs the data in the exact same structure —
a single JSON object with a clean prompts array inside.
Once that’s set up, click Execute Step,
and you’ll see all eight prompts neatly listed in the array.
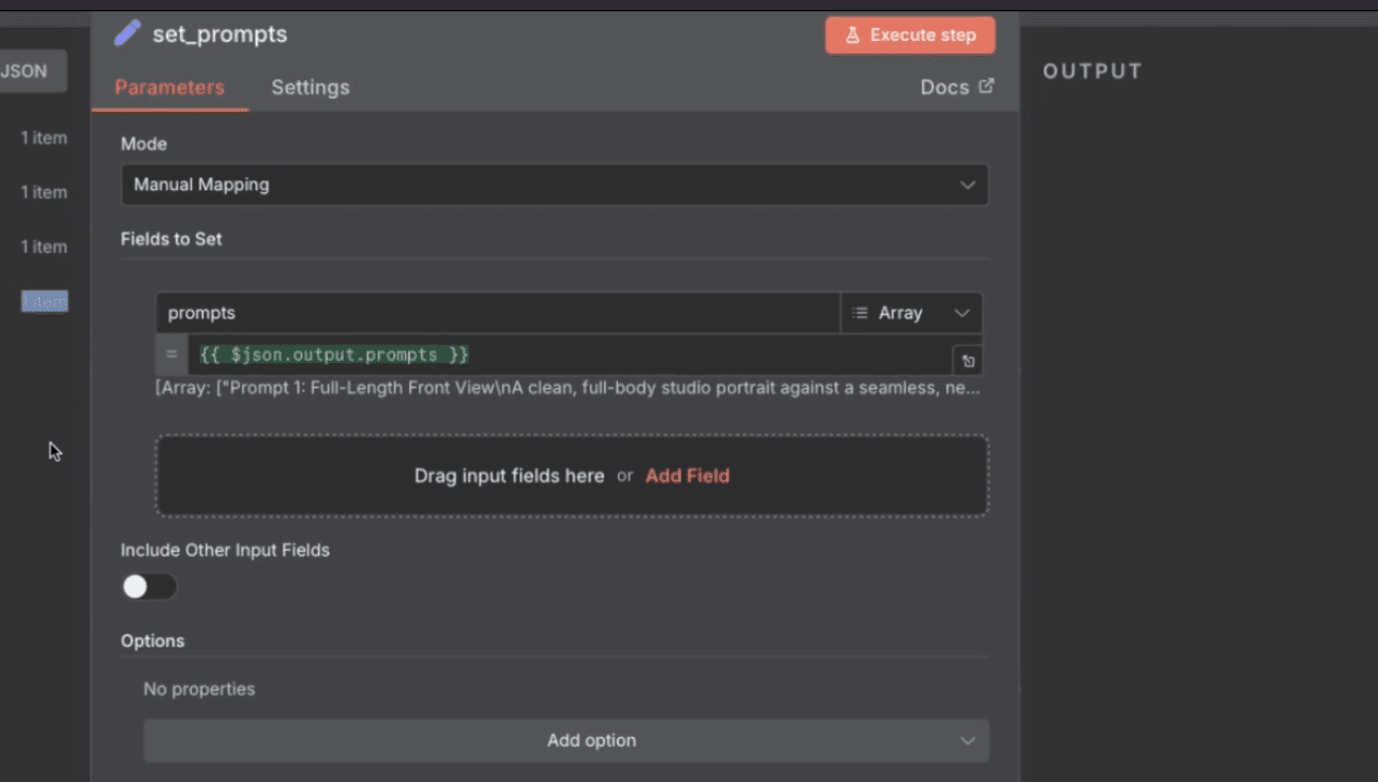
Next, we’ll store those prompts.
Add a new Edit Field (Set) node,

and save the array result as prompts.
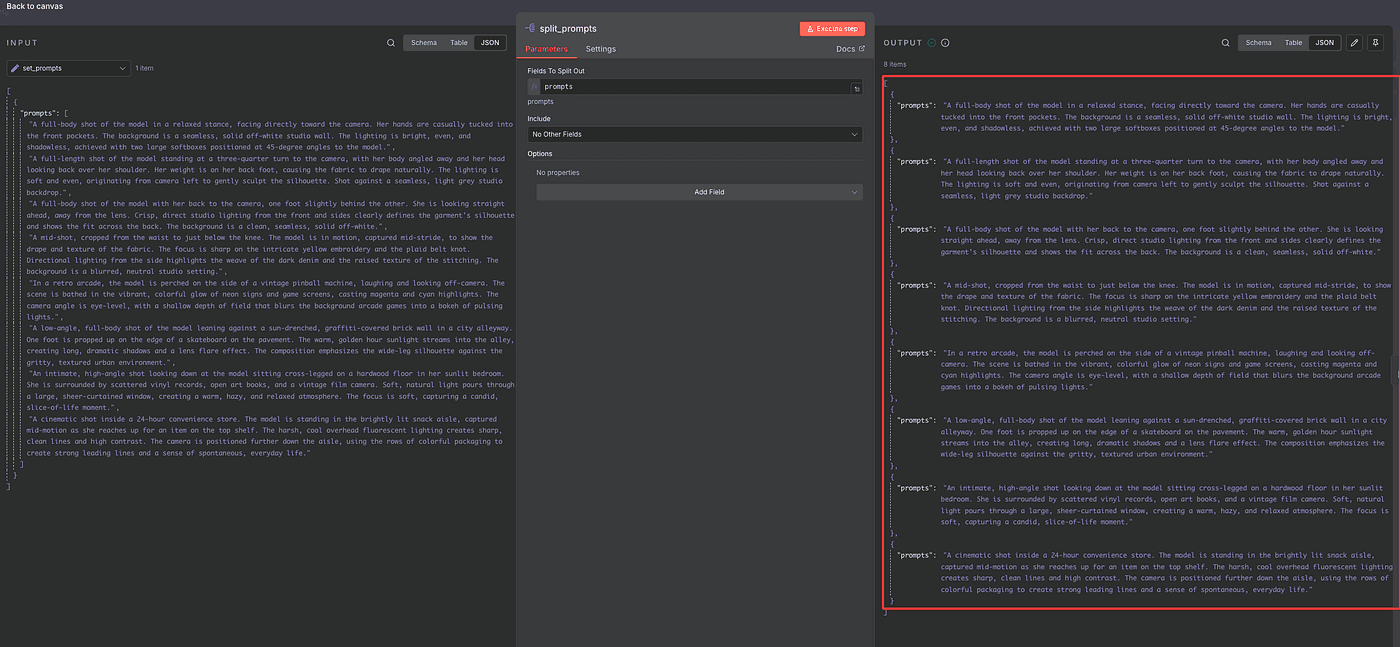
Then, use a Split Out node to break that array into eight individual items —
one for each prompt.
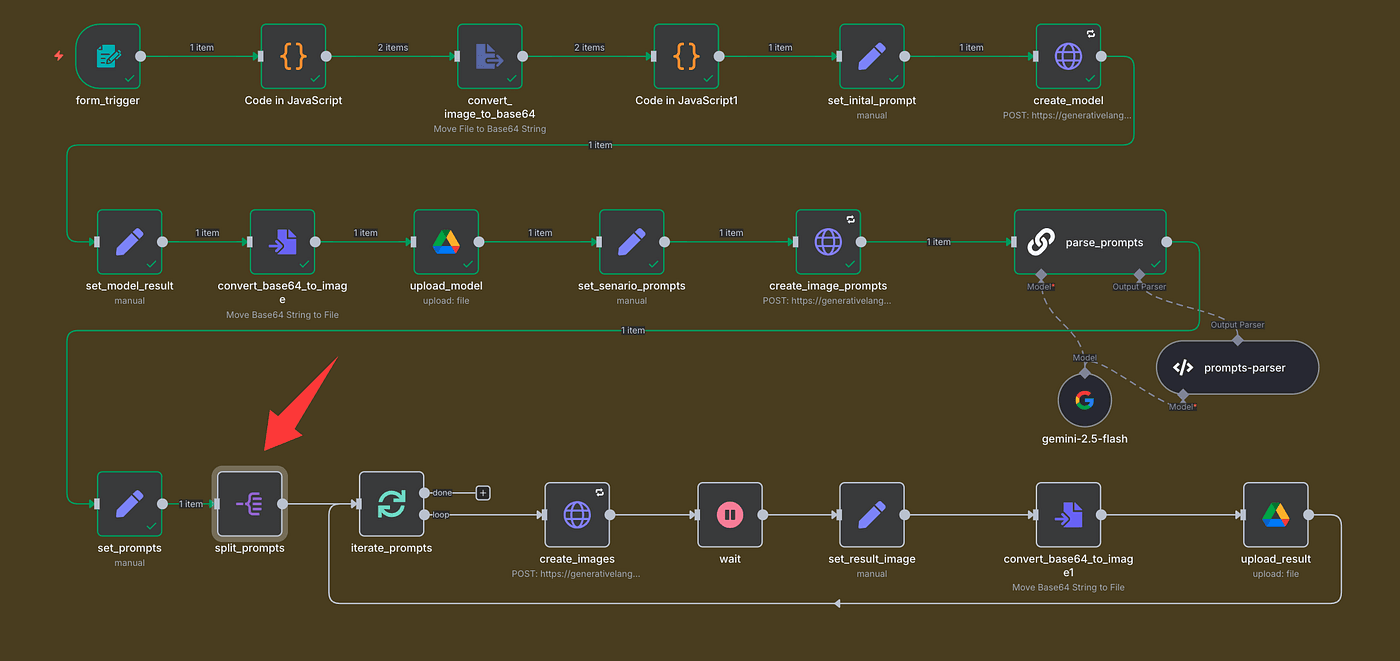
This will let the workflow generate each image separately.
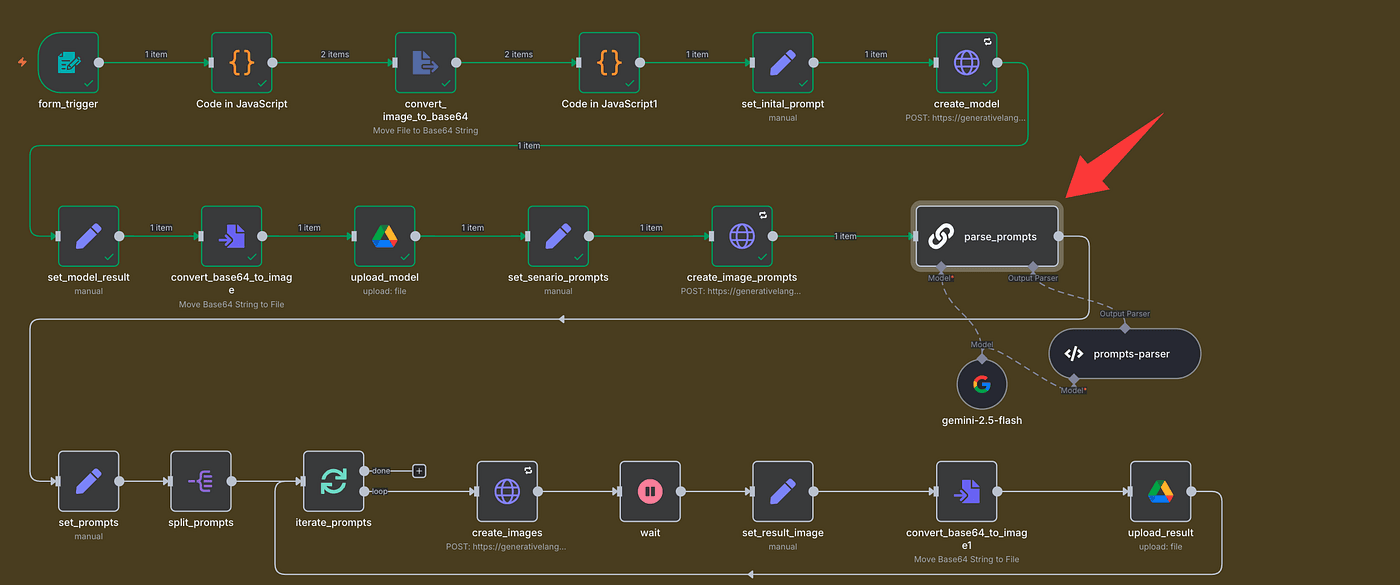
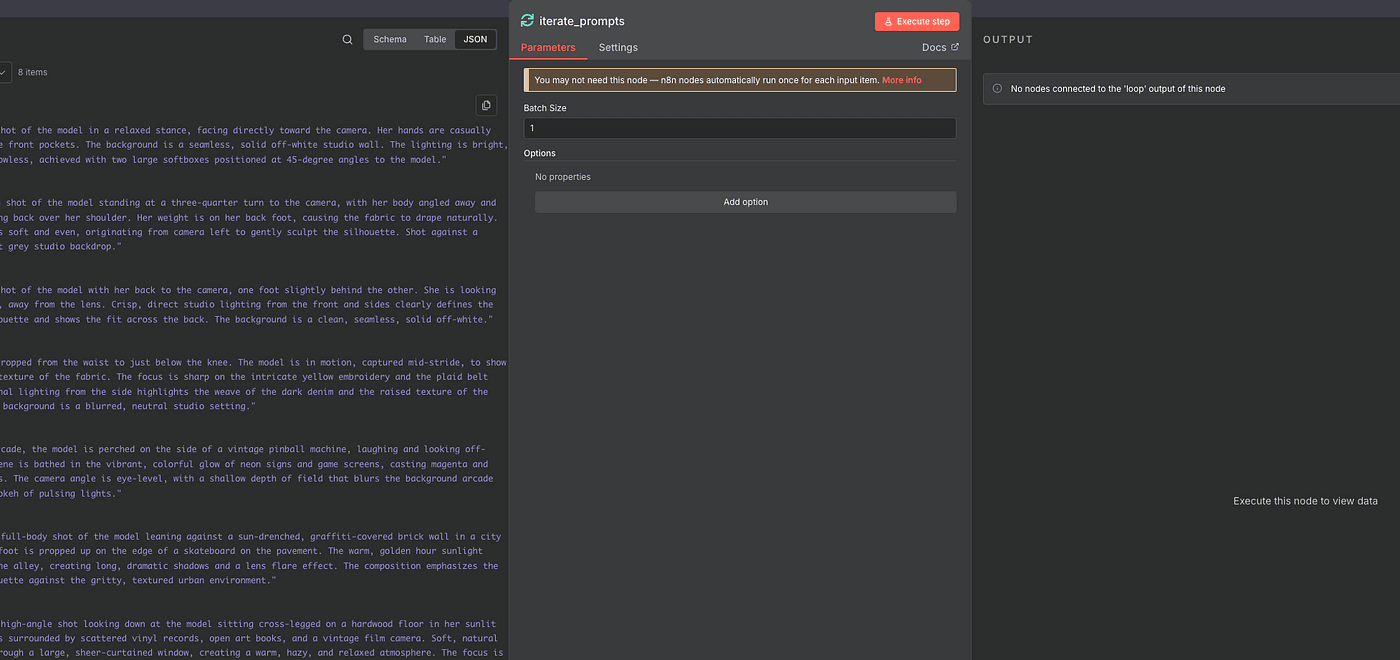
Now comes the fun part — looping through the prompts.
Add a Loop Over Items (Split in Batches) node.
Set it to process one item at a time.
This will run the entire workflow eight times — once per prompt.
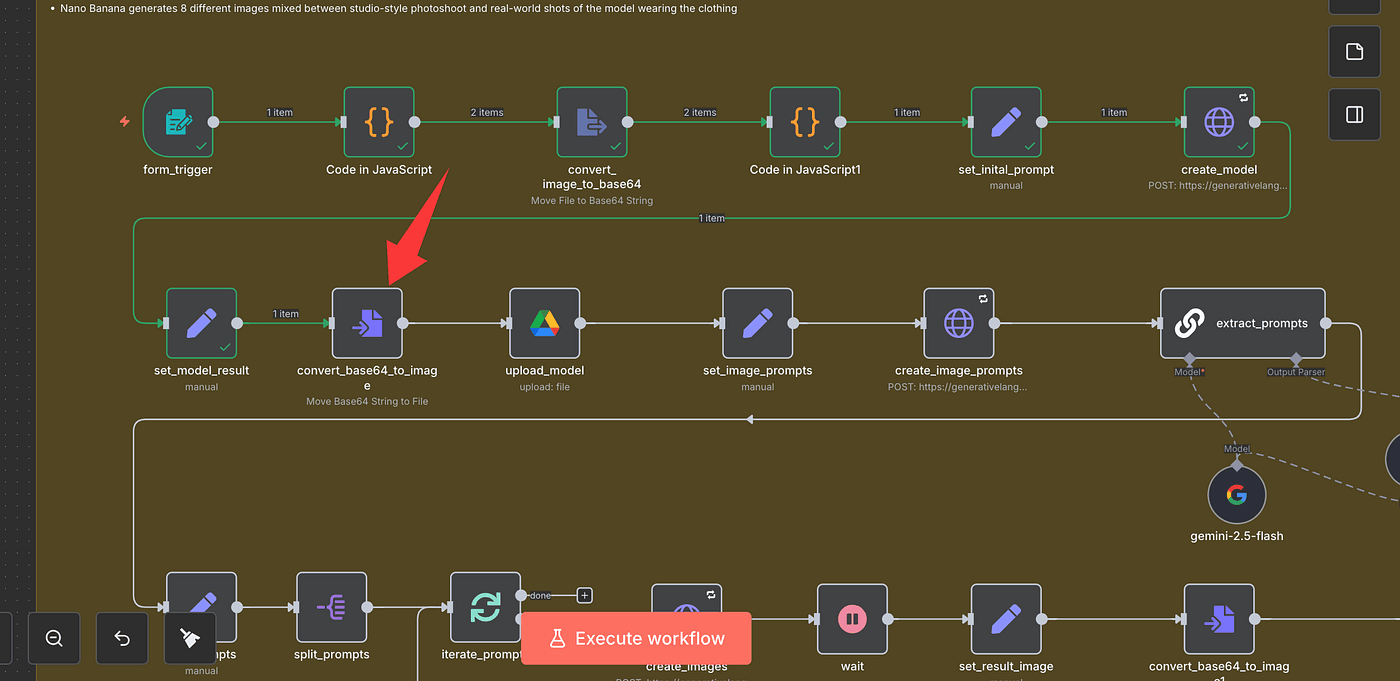
Inside the loop, we’ll:
- Generate the image (via HTTP Request)
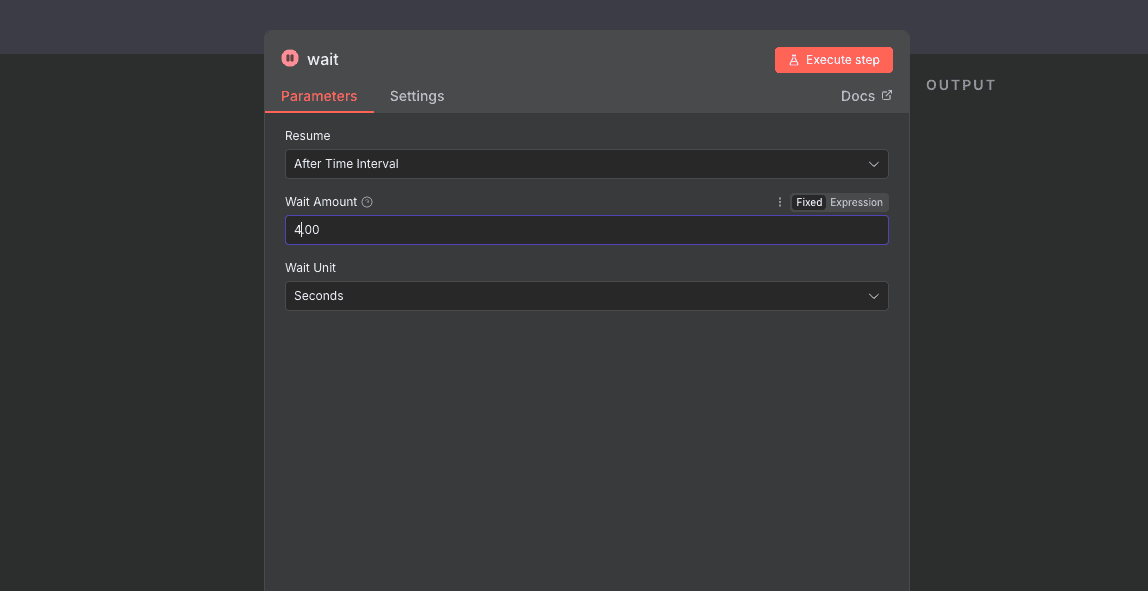
2. Add a Wait node to pause briefly (seconds, minutes, or hours — your choice)
3. Save the generated image (with an Edit Field node)
4. Convert the Base64 result back into a file (using Convert to File)

5. Upload the finished image to Google Drive
The HTTP Request setup is the same as before —
same headers, same Gemini endpoint, just swapping in the new prompt each time.
After each upload, you’ll see your generated images appearing in your Google Drive folder one by one.
And when all eight runs are complete — boom —
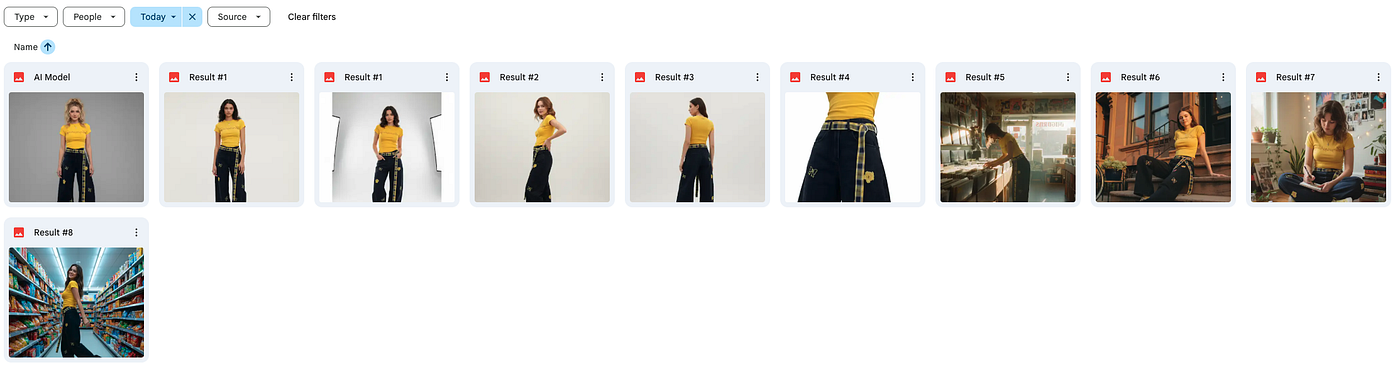
you’ll have a full set of high-quality, AI-generated product photos
ready to use on your online store,
or as ad creatives and social media assets.
It’s completely automated —
AI generates, saves, and organizes everything for you.
Final
And that’s it — the entire workflow is complete.
From uploading your product photos, to generating AI models,
to creating eight unique lifestyle scenes and automatically saving them in Google Drive — everything runs end-to-end with zero manual work.
This is how you turn AI into your personal creative team — it designs, shoots, edits, and delivers, all while you sit back and plan your next product launch.
If you found this helpful, make sure to subscribe — because in the next article, I’ll show you how to take this exact workflowand turn it into a fully automated AI product photo studio that runs 24/7.